 Docs
Docs
ALM – Exceptions
The
Create an exception
-
On the Exceptions page, click Create exception.
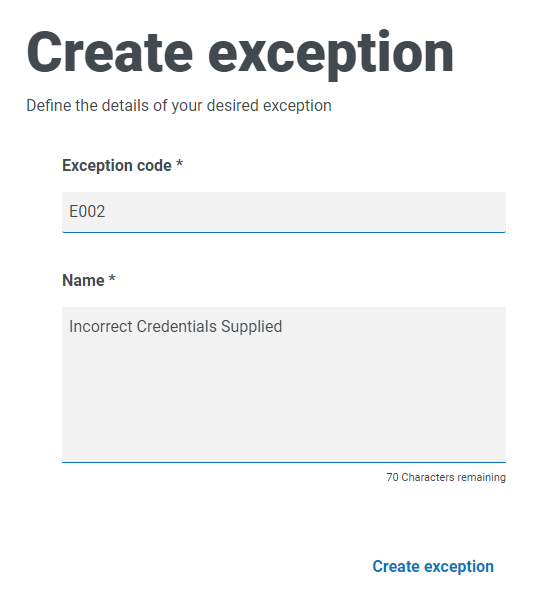
The Create exception page displays. The exception code is automatically assigned and populated by the system
- Enter a description for the exception in the Name field.
-
Click Create exception.
A notification displays confirming the exception has been created.
-
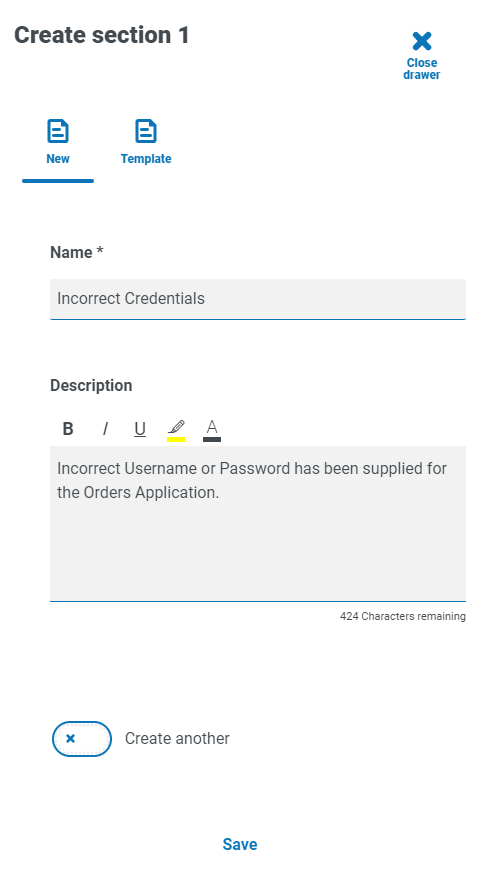
Click Add section to add the necessary sections and steps that must be performed if the exception occurs.
The Create section panel slides out from the side.
-
Enter the required information and click Save at the bottom of the Create section panel.
The section displays in the exception.
-
Click Save to save the changes to the exception.
The Increase minor panel slides out from the side.
-
Enter a note regarding the changes to the exception and click Save.
The changes are saved and the exception version number is incremented.
The exception can now be used in the steps in a process definition document as described in Add an exception to a process definition.
Default exception
The first exception is automatically created and is the default “Unplanned Exception” and is used as a catch all when something unexpected happens.
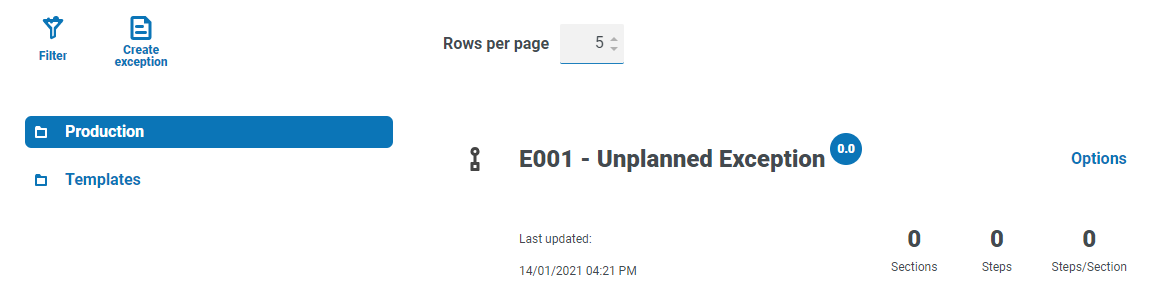
As this is the catch all exception, it must be modified each time a new application is added to support the termination process. Subsequent exceptions should be specific to the business process and the error that has occurred.
In this example, the following is created to handle the incorrect credentials being added.
Delete an exception
You can delete the latest version of an exception. The Delete option is only enabled when:
- The exception is not used in a process definition document, template or another exception.
- The exception is not locked by another user.
If you delete an exception, it is permanently deleted. You cannot restore a deleted exception.
To delete the latest version of an exception:
- In the Exceptions capture overview page, find the exception that you want to delete and click Options.
- Click Delete.
- Click Yes to delete the latest version of the exception.
- Version 0.1 or 0.0 of a form, it is completely deleted.
- Version 0.2 or higher of a form, that version is deleted and the form is reverted to the earlier version.
A message displays asking for confirmation that you want to delete the exception.
If you have selected:
Use the filters
The filters enable you to easily find a specific exceptions based on the selected criteria.
- On the Exceptions page, click Filter to open the Filter panel.
-
Use the toggle to turn on the required filter and complete the information to find the required exception. You can apply multiple filters at the same time.
The available filters are:
Filter
Description
Exception code
Enter the full or partial code for the exception. Exception name
Enter the name of the exception, or part of the name.
Version
Enter the version number of the exception. The will also filter against partial matches, for example, if you enter 1, the filter will also display exceptions which have versions such as 1.0 and 10.
Processes
Enter the full or partial name of the process definition that the exception is associated with.
Latest
Select whether you want to see the latest version of the exception or earlier versions; the options are:
- Yes – Displays only the latest version of the exception. This is the default setting.
- No – Displays only the earlier versions of the exception and not the latest version.
By default, the Latest filter is already turned on. You can turn this off if you want to view all versions of the exceptions.
Sections
Enter the name of the section that appears in the exception, or part of the name.
Locked by
Enter the user's username, or part of their username.
Updated up
Enter the user's username, or part of their username.
Updated date
Enter a date range:
- In the first field, select the earliest date.
- In the second field, select the latest date.
- If required, adjust the time fields. By default, the earlier date has the time 00:00:00 and the later date has the time 23:59:59, thereby including the full day.
This displays any exceptions updated during this time frame.
The information on the Exceptions page is immediately filtered.
If you have set the filters but want to view the unfiltered information again, either
- Click Close drawer to close the filter panel.
