 Docs
DocsRabbitMQ configuration
If required, you can amend the default RabbitMQ credentials.
Enable RabbitMQ management plugin
To create enable the RabbitMQ plugin:
- From the Start menu, under the RabbitMQ Server folder, select the RabbitMQ Command Prompt (sbin dir).
- In the RabbitMQ Command Prompt window, type the following command:
rabbitmq-plugins enable rabbitmq_management
Customize RabbitMQ credentials and set permissions
If you do not want to use the default RabbitMQ credentials, you can create a new user with custom credentials, or update the credentials used by the default RabbitMQ user:
-
Open a browser and navigate to http://localhost:15672/.
The RabbitMQ Management login screen displays.
- Log into RabbitMQ using guest as both the username and password.
-
Select the Admin tab and click Add user.
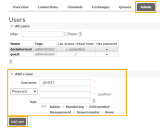
If you do not want to create a new user, you can also change the username and password of the default RabbitMQ user.
- Add the username and password for the user.
- In the Tags field, enter administrator.
-
If adding a new user, click Add user.
Once created, the new user will display in the All users list.
-
To grant administrator permissions, in the All users list, select the relevant user.
The Permissions page for the selected user displays.
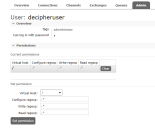
- In the Set permission dialog, ensure the Virtual Host field contains the / character and do not amend the other default parameter settings.
- Click Set permission to apply these permissions to the new user.
- Run the installers for Decipher Licensing Service and Decipher Server. On the RabbitMQ connection configuration screen enter the RabbitMQ credentials as configured above. For details, see Install Decipher IDP components.
- Run the installers for Decipher Web Client, Decipher Automated Clients, and Decipher Server Plugin.
- Open the following config files, and in the appSettings node, populate the RabbitMQHost with just the hostname or IP address of the RabbitMQ server; and populate the RabbitMQUsername and RabbitMQPassword attributes with the relevant credentials and save the changes. For more information, see Configuration file parameters.
Config file
Default location
Web.config
C:\Program Files (x86)\Blue Prism\Decipher Web
Ssi.SdkService.exe.config
C:\Program Files (x86)\BluePrism\Decipher Web SDK Service
Ssi.SdkWrapper.exe.config
C:\Program Files (x86)\BluePrism\Decipher Web SDK Service\SdkWrapper
Credentials are entered as plain text. For enhanced security, the credentials can be encrypted. For more information, see Encrypt credentials.
-
Open Internet Information Services (IIS) Manager and select the Decipher website from the navigation tree.
-
Under Manage Website in the right-hand pane, click Restart.
-
Using Windows Services, restart RabbitMQ and all Decipher Services (Decipher Licensing Service, Decipher Server, Decipher Web Client, and Decipher Automated Clients).
-
Restart your machine.


The RabbitMQ user is now set up and ready for use with Decipher IDP.
Encrypt credentials
As part of this configuration, RabbitMQ credentials are entered as plain text. While the Web.config automatically encrypts the credentials after first login, values are kept as plain text in the Ssi.SdkService.exe.config and Ssi.SdkWrapper.exe.config files. To be able to encrypt the credentials in all the files, the account running the Decipher Web SDK service must have write permissions to the Decipher installation folder. The default network service account will not have sufficient permissions. To change the account:
- From Windows Services, right-click the Decipher Web SDK service and select Properties.
- Click the Log On tab and select This account.
- Enter the location and password of the relevant account, and click OK.
- In Windows Services, restart the following Decipher services: Decipher Licensing Service, Decipher Server, Decipher Web Client, and Decipher Automated Clients.
- Log into Decipher IDP.
Upon successful login to Decipher IDP, the credentials are encrypted in all three config files. If required, you can change the service to use the original account after the credentials have been encrypted.
Update default credentials for existing installations
If required, you can change the default credentials for existing installations:
-
From the Windows Start menu, open Settings > Apps, select the Decipher Licensing Service and click Modify. The Decipher Licensing Service Setup dialog displays.
- On the Change, repair, or remove installation screen, click Change. Proceed through the wizard. On the RabbitMQ connection configuration screen, enter the new RabbitMQ credentials as configured above.
- Uninstall and reinstall Decipher Server. During installation, on the Licensing screen, enter the new RabbitMQ credentials.
-
Open the following config files, and in the appSettings node, populate the RabbitMQHost with just the hostname or IP address of the RabbitMQ server; and populate the RabbitMQUsername and RabbitMQPassword attributes with the relevant credentials and save the changes. For more information, see Configuration file parameters.
Config file
Default location
Web.config
C:\Program Files (x86)\Blue Prism\Decipher Web
Ssi.SdkService.exe.config
C:\Program Files (x86)\BluePrism\Decipher Web SDK Service
Ssi.SdkWrapper.exe.config
C:\Program Files (x86)\BluePrism\Decipher Web SDK Service\SdkWrapper
Credentials are entered as plain text. For enhanced security, the credentials can be encrypted. For more information, see Encrypt credentials.
-
Open Internet Information Services (IIS) Manager and select the Decipher website from the navigation tree.
-
Under Manage Website in the right-hand pane, click Restart.
-
Using Windows Services, restart RabbitMQ and all Decipher Services (Decipher Licensing Service, Decipher Server, Decipher Web Client, and Decipher Automated Clients).
-
Restart your machine.
The credentials used for RabbitMQ are now updated and ready for use with Decipher IDP.
