 Docs
DocsZones (Solution Designer)
Solution Designer allows you to group branches into zones to create a typical RPA solution design. When Solution Designer is enabled, you can arrange branches and decision points into zones in the same way that you can arrange groups of steps into branches.
The resulting process is easier to use in
Zones overview
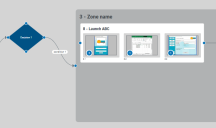
When Solution Designer is first enabled, your whole process is placed inside a single dark gray zone.

You can continue to add or remove branches, groups, and steps to your zone as you would normally do without Solution Designer enabled. There is no limit to the number of branches, groups, or steps a zone can contain.
You can then add more zones to your process to build up a process that more closely resembles a typical RPA solution design.

When you import the exported BPRELEASE file into Blue Prism, a Capture folder is added to the Processes and Objects lists in the Studio tab.

When a

|
Zone sub-pages |
Branch sub-pages |
Group sub-pages |
|---|---|---|
|
Each zone referenced on the Work page by a Page stage is automatically added as its own sub-page. A zone sub-page contains page references to any branches it contains. |
Every branch in the zone is also added as its own sub-page, and contains page references to any groups it contains. |
Every group in the process is also added as its own sub-page, and contains action stages for any steps it contains. |
|
|
|
|


Having each zone, branch, and group separated into sub-pages allows you to easily reuse them, if required.
Enable Solution Designer
Solution Designer is disabled by default. To enable Solution Designer, select Solution Designer in the Settings General tab. Your process will be displayed in a single zone.
When you have enabled Solution Designer, it is recommended that you rename and save your process, so that your original process is not overwritten. Once your process has been organized into multiple zones, you cannot disable Solution Designer and it may be difficult to revert the process back to its original state.
Disable Solution Designer
To disable Solution Designer, deselect Solution Designer in the Settings General tab. Your process zone will revert back into branches.
The option to disable Solution Designer is not available if more than one zone exists in the process. To disable Solution Designer, you must delete all additional zones and decision points outside of the original zone.
Add zones
You can add a zone by loading a saved zone, or by adding an empty zone. There is no limit to the number of zones you can add to a decision point.
The option to disable Solution Designer is not available if more than one zone exists in the process. To disable Solution Designer, you must delete all additional zones and decision points outside of the original zone.
Load saved zone
To load a saved zone:
-
Right-click a decision point attached to a zone and click Load saved zone.
The Zones screen displays.
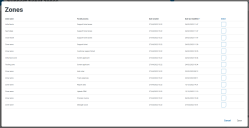
Any zones that have been renamed and saved are available for selection. Additionally, any saved processes that do not contain any saved zones can be loaded and added as a single zone.
-
Select a zone or process and click Open.
The new zone is attached to the decision point.


Add empty zone
To add an empty zone:
-
Right-click a decision point attached to a zone and click Add empty zone.
An empty zone template displays.
- To populate the zone, you can copy and paste groups from another zone, load saved groups, or capture new groups. See Edit groups.

Edit zones
To see the edit options for a zone, right-click inside the zone. A context menu displays containing the following options:
Edit zone name
To edit a zone name:
-
Right-click inside the zone and click Edit zone name.
The Edit zone dialog displays:
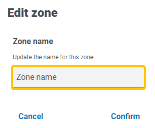
- Enter a new name in the Zone name field and click Confirm to save.

Delete zone
To delete a zone:
-
Right-click inside the zone and click Delete zone.
A confirmation dialog displays.
-
Click Delete to confirm.
If you attempt to delete the first zone in your process, a warning displays, informing you that if you delete the first zone in your process, all other zones are deleted and the process is closed.
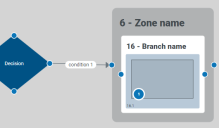
Add decision point
To add a decision point, right-click inside the zone and click Add decision point. A new decision point is attached to the zone:

Only one decision point can be added per zone. If there is already a decision point attached to the zone, Add decision point is grayed out.
Edit decision points
To edit a decision point, right-click a decision point attached to a zone. A context menu displays containing the following options:
Edit decision name
To edit the decision name:
-
Right-click a decision point attached to a zone and click Edit decision.
The Edit decision dialog displays.
- Enter a name in the Decision name field and click Save and close.

Edit decision conditions
When a new zone is added, a condition is automatically created and an editable field displays in the Edit decision dialog. This field allows you to add or edit the label displayed on the condition.

To edit the condition for an attached zone:
- Right-click a decision point attached to a zone and click Edit zone.
- Enter the required label text in the field that matches the name of the attached zone, and click Save and close.
Delete decision
To delete a decision:
-
Right-click a decision point attached to a zone and click Delete decision.
A confirmation dialog displays.
- Click Delete.
Export options
When Solution Designer is enabled, the following export options are available:
- Capture process (.json)
- Blue Prism release (.bprelease)
- Blue Prism business objects only (.bprelease)
All other export options relate to Capture processes created without the use of Solution Designer, and are not available for use with processes that have been created with the Solution Designer mode.
