 Docs
DocsConfigure environment connections for Desktop
When installing the Desktop client, users can choose to connect to a shared Desktop.User.config file, a locally stored config file, or both.
Configure a shared connection
If the Allow local connections to be configured option is selected when installing the Desktop client, a Desktop.User.config connection file is created locally. You can then copy and edit this to create a connection file that can then be made available to Desktop users from a shared location. See Edit the Desktop.User.config file for details of how to edit a Desktop.User.config connection file.
Once created and accessible, the shared connection file can be made available to Desktop users in the following ways:
- During installation of the Desktop client. On the Remote connection configuration screen, specify the location and name of the shared connection file. See Install and connect the Blue Prism Desktop client for details.
- By editing the connection settings for a user's machine, see Edit connection settings for a user's machine for details.
Desktop.User.config backup file
When a Desktop user has successfully connected to a Desktop environment using a shared connection file, a .desktop.shared.config.bak file is automatically generated and stored locally in C:\Users\<user name>\AppData\Roaming\Blue Prism Limited\Desktop. This connection file is then used to establish a connection with the Desktop environment, removing the need to connect to the shared file each time the user accesses Desktop.
Configure a local connection
|
|
The following options are available:
|

Create a new local connection using Desktop
-
Open the Desktop application.
The Welcome to Desktop screen displays.

-
The Saved connections screen displays.

The available connections and options on this screen are dependent on each user's installation of the Desktop client.
-
The Create new connection screen displays:

-
Enter the connection details, as prompted. All the fields are mandatory.
Field name Information required Connection name Enter a name for this connection. Connection names must be unique, and are case‑sensitive.
If you try to create a new connection with the same name as an existing one, a warning message displays and you cannot save the connection.
URL for Authentication Server Enter the Authentication Server URL.
To ensure a secure connection is used, all Authentication Server URLs must include https://. If you do not include https:// in the URL, it will be added automatically.
URL for Digital Worker API Enter the URL of the Digital Worker API to which you want to connect. URL for Blue Prism API Enter the URL of the Blue Prism API to which you want to connect.
-
Click Create to add the new connection.
The connection is created and displays on the Saved connections screen.


The configuration is updated in the Desktop.User.config file,
Edit a local connection using Desktop
- On the Saved connections screen, click the Edit connection icon
 .
. - Edit the connection details as required.
- Click Save changes.
The Edit connection screen displays.

The connection is updated and the Saved connections screen displays.
You cannot edit the currently used connection from the Settings screen once logged into Desktop. If you need to do this, you will first need to log out of the Desktop application. You can then edit the original connection. The Edit connection icon ![]() does not display for the current connection.
does not display for the current connection.
Import a connection using Desktop
Although the functionality is available to do so, it is not expected that Desktop users will create, edit, or delete their own connections. It is expected that this information will be provided to them by system administrators. However, because the connection configuration information is stored in their user settings, they will need to import the configuration file themselves. When rolling out Desktop to end users, it is recommended that system administrators create and distribute a centrally-controlled Desktop.User.config file to be imported by Desktop users.
Connection names must be unique, and are case‑sensitive. If you import a connection with the same name as an existing one, it will overwrite the existing connection. You will not be asked to confirm the import.
-
On the Saved connections screen, click Import connection and navigate to the connection configuration import file.
-
Click Open.
The connection configuration file is uploaded. The connections configured in the file (there can be more than one per file) are added to
Edit the Desktop.User.config file
In addition to being automatically generated and accessible through the Desktop client, you can create and modify the Desktop.User.config.file using a text editor, whether it is stored locally, or in a shared location.
The following example shows a typical Desktop.User.config file:

The connection name used in a Desktop connection configuration file must match the “ConfigurationName”, as highlighted in the above example. If you create the connection using the Desktop application, these values will automatically match, however, this must be considered if editing the Desktop.User.config file directly.
To import a Desktop.User.config file that has been saved with a .txt extension, you will need to change the file type from Custom Files to All Files in order make the text file available for import.
Edit connection settings for a user's machine
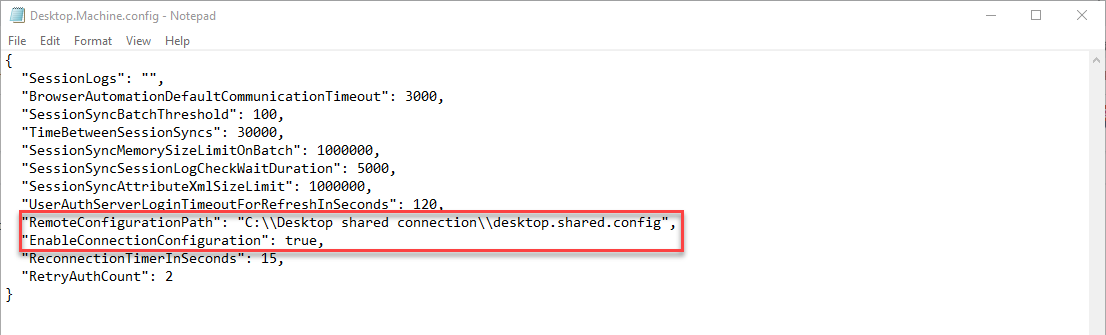
When the Desktop client is installed on a user’s machine, a configuration file called Desktop.Machine.Config is created, which contains the connection settings chosen during installation.
To change the connection settings for a user's machine without having to re-install or update the installation:
- Using a text editor, open the Desktop.Machine.Config file. The default location is C:\ProgramData\Blue Prism Limited\Blue Prism.
-
Modify the following settings, as required:
- RemoteConfigurationPath – Edit the file name and path of the shared connection file.
- EnableConnectionConfiguration – Type true to add access, or type false to remove a user’s access to the configure connections options in the Desktop client.
Delete a connection using Desktop
This action deletes the connection from the user's account and cannot be undone.
- On the Saved connections screen, click the Delete connection icon
 .
. -
Click Yes, delete.
A message displays asking you to confirm the delete.
You cannot delete the currently used connection from the Settings screen once logged into Desktop. If you need to do this, you will first need to log out and log back in using a different connection. You can then delete the original connection. The Delete connection icon ![]() does not display for the current connection.
does not display for the current connection.
