 Docs
DocsInstall the TrustPortal services
Downloading and installing any of the SS&C | Blue Prism®Service Assist components, including by silent installation via command line, means that you accept the End User License Terms.
TrustPortal services comprise a number of docker containers, connected via a docker network running on a docker host. All access to TrustPortal services is via a reverse proxy/load balancer, which is connected to the docker network of each TrustPortal instance. By default, the TrustPortal install script will install and configure the trustportal-reverse-proxy if a reverse proxy is not already installed.
The installation TAR file is available from the Blue Prism Portal and contains:
- A GenerateDeployFiles program which when executed will create a series of scripts to install TrustPortal services and deploy reverse proxy with self-signed certificates.
- An assets directory with icons and language files.
- MySQL scripts (init-db/update-db.sql) used to install or upgrade the TrustPortal schema.
Ensure you are connected to the internet before starting the installation.
-
Log into the Linux machine and verify that the docker service is running.
- Copy the SERVICE_ASSIST2020-2.tar file into your Linux machine.
-
Un-TAR the TrustPortal compressed installation scripts:
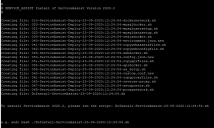
$ sudo tar xvf SERVICE_ASSIST2020-2.tarA GenerateDeployFiles program specific to your Linux version will display, for example:
- GenerateDeployFiles.centos (for CentOS systems), or
- GenerateDeployFiles.fedora (for Fedora systems)
- GenerateDeployFiles.rhel (for Rhel systems)
The format for using GenerateDeploy files is:
$ sudo ./GenerateDeployFiles.<linuxtype> <PROD> <Version> <Install> <Linux>,
for example ./GenerateDeployFiles.centos SERVICE_ASSIST 2020.2 Install Linux - When prompted, enter the following configuration details:
- Instance Name – The name of the TrustPortal environnment (for example, “serviceassist”)
- FQDN Common Name (FDQN CN) – The name of the domain for the environment (for example, ”local.net”). The instance name and FQDN CN should be the same as the DNS entry for the web (for example, “serviceassist.local.net”).
- MySQL Root Password – The administrator password for MySQL (must be complex and contain both capitals and digits). This password is not used for an external MySQL instance.
- MySQL Runtime User – The name of the account used by the API Server to access the MySQL instance for day-to-day running of the TrustPortal environment.
- MySQL Runtime Password – The password used by the API Server to access the MySQL instance for day-to-day running of the TrustPortal environment.
- Licenced Account – The name of the account used to pull the TrustPortal software from the repository. This is provided by TrustPortal.
- Licence Key – The license key that is used to pull TrustPortal software from the repository. This is provided by TrustPortal.
License Filename – The name of the license file (for example, license.lic) provided by TrustPortal based on purchase of licenses.
As part of the installation, the license file must be saved in the same directory where the GenerateDeployFiles program is executed. The license file is then automatically copied in the /var/local/<API URL>/config directory.
When prompted whether you are using a service for MySQL or Redis, enter M for MySQL. You will be prompted to confirm that you have a paid-for MySQL license before continuing, enter Y for yes.

-
Create a TrustPortal database on the external MySQL server called trustportal_api (via MySQL Workbench).
-
Create a database user that will be used by the TrustPortal API server to connect to the TrustPortal MySQL database.
-
Grant all privileges on the trustportal_api database to the user created at the previous step.
-
Execute the Init-db-1618.sql script (extracted from .tar file above) against the trustportal_api database to create the TrustPortal database schema.
-
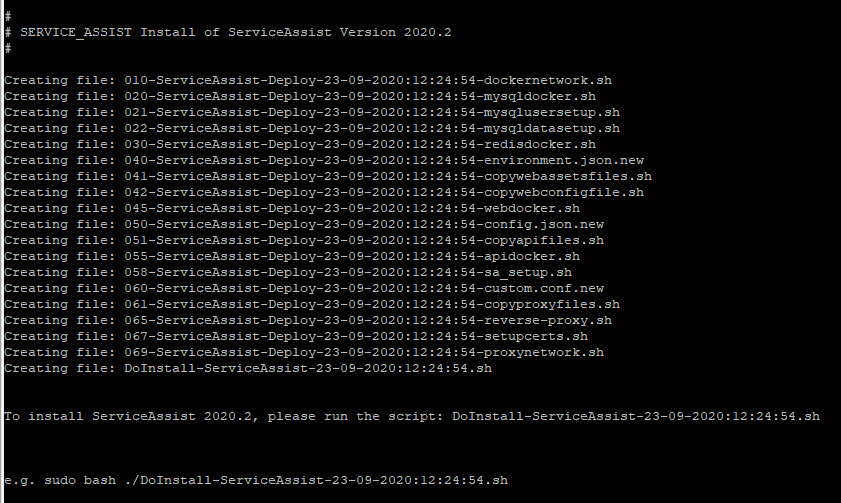
The GenerateDeployFiles program will generate a list of scripts in the format <SeqNo>-ServiceAssist-Deploy-<date:time>-<name>.<type>:
-
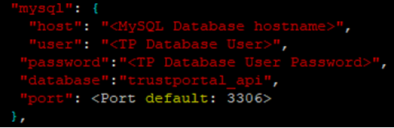
Modify the “mysql” section of the config file 050-ServiceAssist-Deploy-<date:time>-config.json.new with the following details for the external MySQL database connection:
-
Execute the remainder of the .sh scripts in the following order by using sudo bash ./<scriptname>:
- 010-ServiceAssist-Deploy-<date:time>-dockernetwork.sh
- 030-ServiceAssist-Deploy-<date:time>-redisdocker.sh
- 041-ServiceAssist-Deploy-<date:time>-copywebassetsfiles.sh
- 042-ServiceAssist-Deploy-<date:time>-copywebconfigfile.sh
- 045-ServiceAssist-Deploy-<date:time>-webdocker.sh
- 051-ServiceAssist-Deploy-<date:time>-copyapifiles.sh
- 055-ServiceAssist-Deploy-<date:time>-apidocker.sh
- 058-ServiceAssist-Deploy-<date:time>-sa_setup.sh
- 061-ServiceAssist-Deploy-<date:time>-copyproxyfiles.sh
- 065-ServiceAssist-Deploy-<date:time>-reverse-proxy.sh


Installation locations and containers
After a successful installation, there will be three docker containers running and three directories, see example below:
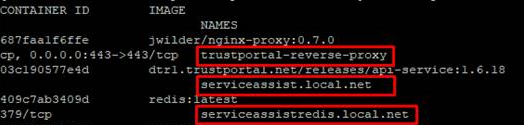
You can use use "sudo docker ps" to confirm the docker containers have been installed and are running.
|
Containers |
Directories |
Component |
|
<INSTANCE NAME>.<FQDN CN>, e.g. serviceassist.local.net |
/var/local/<INSTANCE NAME>.<FQDN CN>, e.g./var/local/serviceassist.local.net |
API server |
|
<INSTANCE NAME>redis.<FQDN CN>, e.g. serviceassistredis.local.net |
/var/local/<INSTANCE NAME>redis.<FQDN CN>, e.g. /var/local/serviceassistredis.local.net |
Redis cache |
|
trustportal-reverse-proxy |
/var/local/trustportal-reverse-proxy |
NGINX reverse proxy |
The web application configuration is located at:
<INSTANCE NAME>.<FQDN CN>/config/environment.json
The API server configuration is located at:
/var/local/<INSTANCE NAME>api.<FQDN CN>/config/config.json
Verify the installation
-
Check that your DNS record has been set up by entering ping serviceassist.local.net
If this does not show a DNS route to the Linux server, you may have to manually add a temporary entry into the C:\Windows\System32\drivers\etc\hosts file until the DNS record is shown, for example 127.0.0.1 serviceassist.local.net serviceassistapi.local.net
-
Test the API connection via a browser on a device that has a connection to the Linux machine hosting your TrustPortal API server, for example https://serviceassist.local.net/trustportal or https://serviceassist.local.net/login
If using self-signed certificates, you will need to accept the security exceptions your browser displays. A confirmation message displays if the connection is established.
-
If TrustPortal still won't start up, check that you have a valid license file.
If the license file is incorrect, the API docker container will continually report “Restarting” and the API docker container logs will show errors (e.g. EVP_DecryptFinal_ex failed). The correct license file called license.lic must be placed in the /var/local/<API URL>/config directory.
