 Docs
DocsInstall and configure the TrustPortal Agent
Typical TrustPortal – Blue Prism connection flow
The TrustPortal Agent establishes the connection between TrustPortal and Blue Prism as follows:
- A digital worker polls the TrustPortal Agent.
- The Agent communicates with the API, which passes it the next available record.
- The digital worker receives the record from the Agent.
- The digital workforce executes the work and responds back to the Agent (depending on the solution design, the receiving digital worker may pass the work to others).
- The Agent informs the API that the request is complete.
Please refer to the typical deployment diagram for more details.
TrustPortal Agent setup overview
The following steps are required to set up the TrustPortal Agent:
- Each TrustPortal Agent must be registered with the TrustPortal API. For the TrustPortal Agent to be registered, a valid token must be generated for the Agent.
- The TrustPortal Agent must be added and configured in the TrustPortal administrator user interface.
- Once configured, the TrustPortal Agent must be installed locally via the TrustPortal Agent executable
- Once installed, the TrustPortal Agent must be registered after which all the Agent configuration information is automatically pulled from the TrustPortal API service.
Configure the TrustPortal Agent
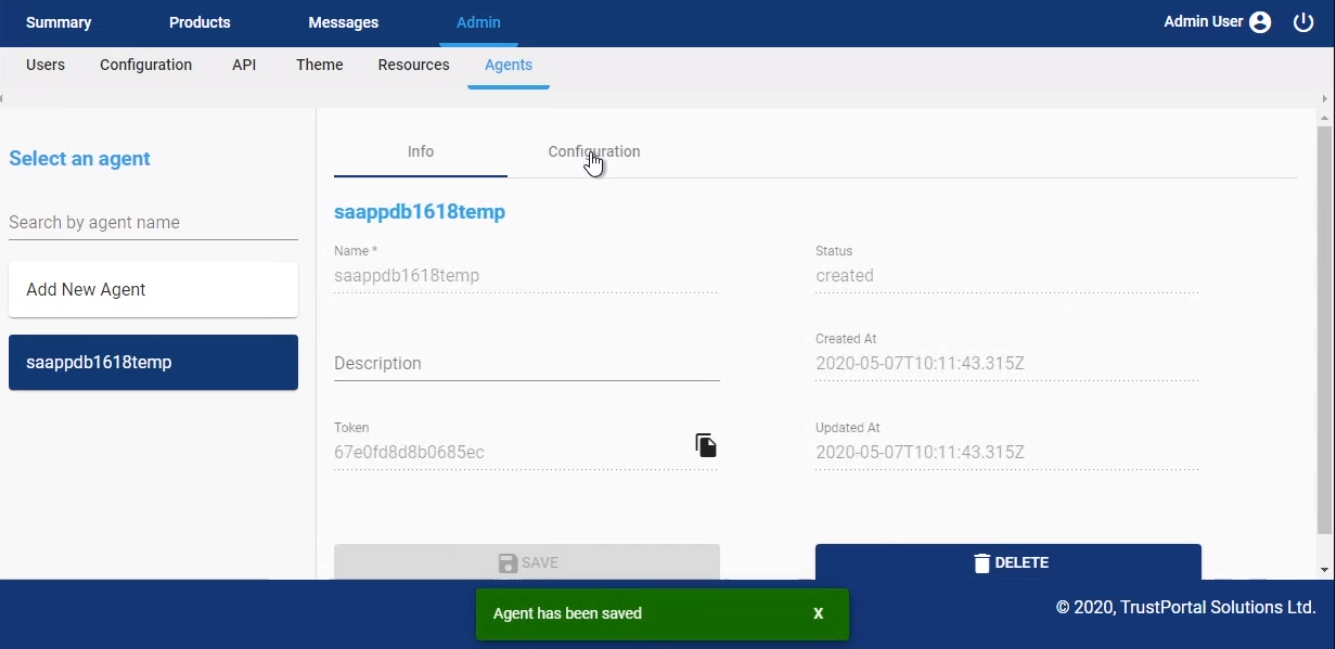
- Log into TrustPortal using the administrator account credentials.
- Navigate to Admin > Agents> Info.
-
Click Add New Agent to create a new Agent.
-
The Agent name must be identical to the name of the machine where the TrustPortal Agent will be installed. To find this, type 'system information' in your machine search bar and copy the name from the System Name field to the Name field in the Agents > Info tab.
-
Click Save. A token will be generated which you will need to register the Agent.

- Click the Copy to clipboard icon next to the token to copy it to your clipboard for insertion during the registration process.
- Click the Configuration tab to set up the configuration that will be used for the Agent.
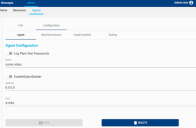
The Agent tab defines how digital workers push data to the Agent:
- Log Plain Text Passwords – If enabled, user passwords are logged when users are created. Disabled by default.
- Notes – Specify any notes specific to this Agent.
- EnableObjectBuilder – Not used and disabled by default.
- Port – Blue Prism communicates with the TrustPortal Agent via RESTful HTTP. By default, the Agent exposes port 31999 but a different port can be used and, if required, multiple TrustPortal Agents can be configured to use the same or a different port.
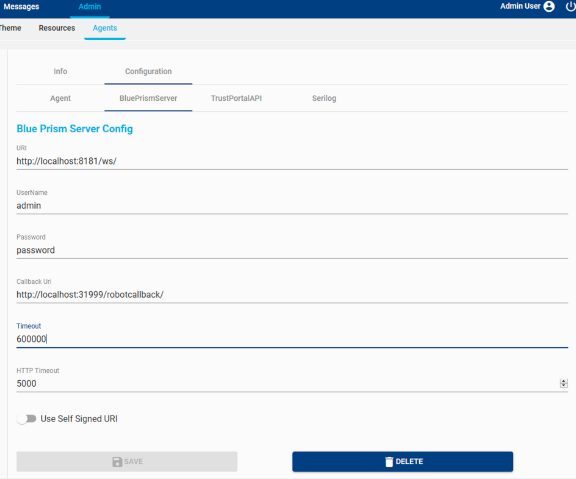
The BluePrismServer tab further defines how digital workers push data to the Agent:
- URI/Username/Password/HTTP Timeout – Specify how to connect to Blue Prism if using web services. Web services have been deprecated so the default values should be kept.
- Callback Uri – This is the REST URI used by digital workers to push work to this Agent, and should match the URI of the Agent system, or “localhost” if the Agent is installed on each digital worker.
- Timeout – Period of time in milliseconds that the Agent waits for a digital worker to confirm it has processed a queue item pulled via the Agent.
- Use self-signed URI – Should be enabled if using HTTPS with self-signed certificates to communicate between Blue Prism digital workers and the TrustPortal Agent. However, self-signed certificates are no longer supported by most web browsers so it is strongly recommended to replace these with fully signed certificates of the same format and in the same directory (/var/local/trustportal-reverse-proxy/certs).

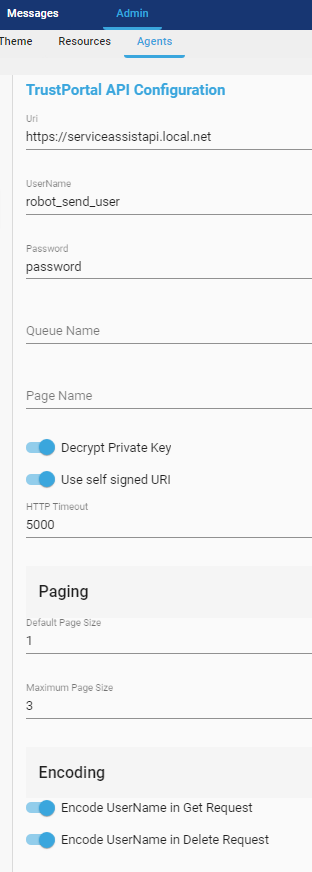
The TrustPortalAPI tab defines how the Agent connects to the API:
- Uri – This is the FQDN or IP address for the TrustPortal API, for example, https://serviceassist.local.net.
- Username
- Use self-signed URI – If the TrustPortal API has not been set up with company-signed SSL certificates, this option must be enabled to allow the use of auto-generated self-signed certificates. Please note that self-signed certificates are no longer supported by most web browsers so it is strongly recommended to replace these with fully signed certificates of the same format and in the same directory (/var/local/trustportal-reverse-proxy/certs.
- HTTP Timeout – Period of time in milliseconds that the TrustPortal Agent will wait to contact the API server before it times out.
- Encode username in Get request /Encode username in Delete request – The default settings should only be changed under direction of TrustPortal Support.

The Serilog tab defines settings for the logging performed by the TrustPortal Agent:
- Minimum Level
- Error – Logs display information only about errors.
- Information – Logs display only key interaction information.
- Verbose – All interaction information is logged.
- Path – Location of the Agent log file (default location is %TEMP%).
- Rolling interval – The frequency with which a new log file is created (from every minute to yearly).
- Retained file count limit – The maximum number of log files retained, e.g. if log files are created every day, then 10 days' worth of logs will be retained and any older files will be removed.

- Minimum Level


Install the TrustPortal Agent
- From Admin > Resources > Installers, download the installation file and copy it to the device where you want to install the TrustPortal Agent.
- Double-click the executable to start the installation.
- Run the TrustPortal Agent Setup Wizard to complete the installation.
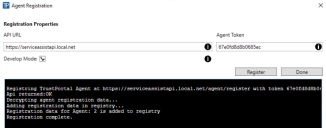
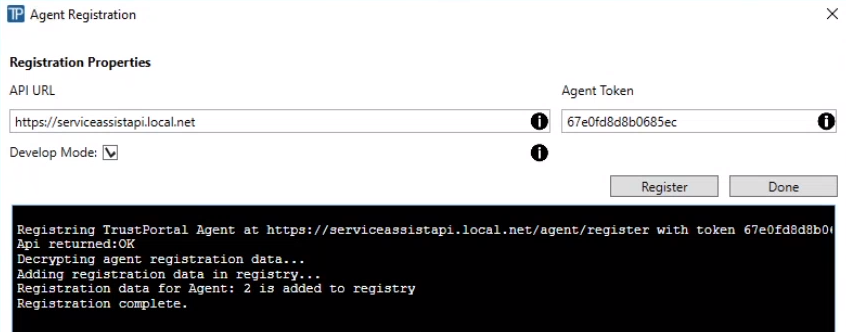
Register the TrustPortal Agent
-
Once the TrustPortal Agent has been installed, the Agent Registration utility displays. Enter the following parameters:
- API URL – The URL for the TrustPortal API service, for example
- Agent Token – The token created on the Admin > Agents > Info tab for this Agent, and copied to your clipboard.
-
Develop Mode – This option should be enabled if using self-signed certificates on the API service.
Please note that self-signed certificates are no longer supported by most web browsers so it is strongly recommended to replace these with fully signed certificates (trusted root certification authority) of the same format and in the same directory
(/var/local/trustportal-reverse-proxy/certs).
- API URL – The URL for the TrustPortal API service, for example
-
Click Register. All the Agent configuration information is now automatically pulled from the TrustPortal API service.
The TrustPortal Agent registration tool creates a registry entry on the system the Agent is installed in: Computer\HKEY_USERS\.DEFAULT\Software\TrustPortalLimited
You may need to delete this entry in the registry using the “regedit” tool if:
- There are errors when entering the API URL and Agent token (see the Troubleshooting section for possible errors).
- Changing the API server with which the Agent is communicating.
Run the TrustPortal Agent
Once the TrustPortal Agent has been installed and registered with the API server, it can be started from the directory C:\Program Files\TrustPortal\TrustPortalAgent.
To start the Agent, enter the following command in Command Prompt run as a Windows administrator:
If using self-signed certificates (the default):
TrustPortalAgent.exe run --developerModeIf using fully signed SSL certificates:
TrustPortalAgent.exe runSelf-signed certificates are no longer supported by most web browsers so it is strongly recommended to replace these with fully signed certificates (trusted root certification authority) of the same format and in the same directory (/var/local/trustportal-reverse-proxy/certs).
