 Docs
DocsRecorder logs
View logs
-
If you have installed the Recorder in Standalone mode, run the Recorder and start recording.
After the recording has stopped, the logs are available to view.
-
Click Start > Run > ABBYY Recorder > Log Viewer to open the Recorder Log Viewer.
-
Click Open New and select a local or network folder with logs.
If you try to open invalid log folder, you will see the error message: An error occurred: Folder <selected folder> contains no valid logs or no screenshots. For more details, see the Input section above.
The selected log will be open in the Log Viewer. For more details, see the Log Viewer components below.
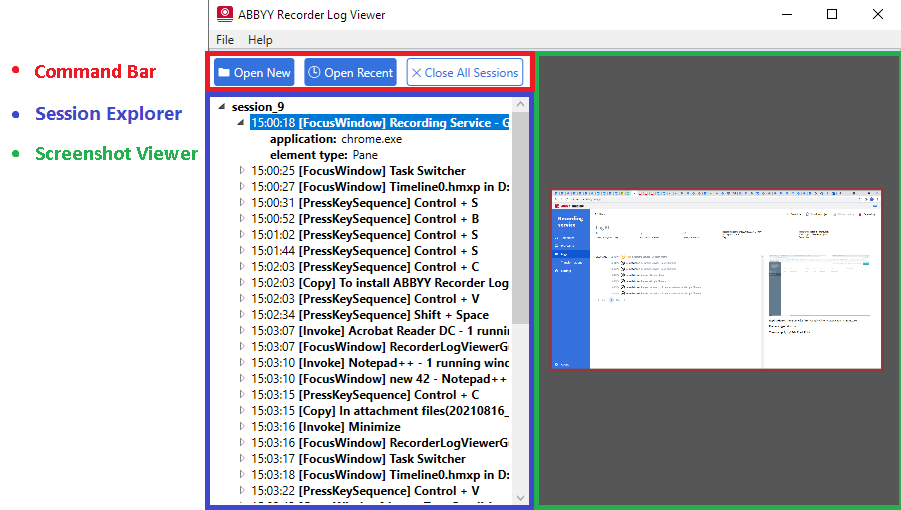
Log Viewer components
The Recording Service Log Viewer workspace has three main components that are immediately visible:
- The Command Bar where you access all program functions.
To open a log, click Open New.
When you open a log, its contents are displayed in Session Explorer. You can open multiple logs and navigate between them using Session Explorer.
To open one of the previously viewed logs, click Open Resent.
The list shows five recent logs that you've opened. You can open a log by clicking on its entry. If the log you want isn't in the recent logs list, click Open New to see log locations you can browse to find the log.
To close all open logs, click Close All Sessions.
-
The Session Explorer for navigating a session of the opened logs.
This shows all recorded events in a session. For each event, you can see the following entries:
- Application – Contains the path to the application EXE file or website URL where the user performed the action.
- Element type – Optional element contains the type of item associated with the event. For example, the Window, Button.
-
Value – Optional element. May contain encrypted copied or pasted text, URL if the event happened in the browser, coordinates of the mouse click in the followed format: x, y:
To close one of the open logs, select the session and click Delete.
-
The Screenshot Viewer the see the screenshots of the recorded events.
Upload logs from a Recorder installed in standalone mode
If the Recorder is installed in standalone mode, logs are not processed and sent to the Recording Service. Thus, it is impossible to use the Recording Service tools to upload logs to Process Intelligence.
Logs recorded in standalone mode can only be uploaded to projects set to use Task Mining - Recording Service 1.1 and later. Logs recorded in this mode do not contain information about the forms, so they are not compatible with Task Mining - Recording Service 1.1 and later.
To upload logs to Process Intelligence:
- Open the logs folder. By default, logs are saved to the %appdata%\ABBYY\Recorder\Recorded folder.
-
Select the folder that contains the Commands and Screenshots subfolders and zip it. Do the same with all the folders in the logs folder.
-
Open the Process Intelligence website.
-
Create a new project or open an existing one with the Task Mining - Recording Service 1.0 data source enabled (click Project > Details > Data sources and select Task Mining - Recording Service 1.0).
-
Select Project > Upload data.
The Upload page displays.
-
Click Browse File and select the ZIP file you created earlier.
The total size of selected zip files must not exceed 10 GB.
- Click Upload.
-
Once the upload is complete, navigate to View > Home and define Tasks.
