 Docs
DocsActions
There are
All of the web API service actions should be called from the Utility - Interact API VBO in Blue Prism, and not directly from the web service.
If you are using Active Directory and you want to use the Create Submission and Raise Submissions actions using the Interact Remote API, your users must be directly assigned to the Interact roles in Hub for the actions to function correctly. These actions do not support the use of Active Directory security groups. However, if you want to configure roles to use security groups, you can use the Raise Submission to Role action.
The following table summarizes the actions that rely on user information either in the inputs or outputs, and their compatibility with Active Directory:
|
Supports the use of Active Directory security groups with Interact roles |
Supports direct assignment of Active Directory users to Interact roles |
|---|---|
|
Raise Submission to Role |
Create Submission Raise Submission Raise Submission to Role Get Users by Form Name Get Roles by Form Name |
For information on configuring roles, see the Blue Prism Hub administrators guide.
Get Submission
The Get Submission action does a very similar action to the Get Next Item action when it retrieves the information from a queue.
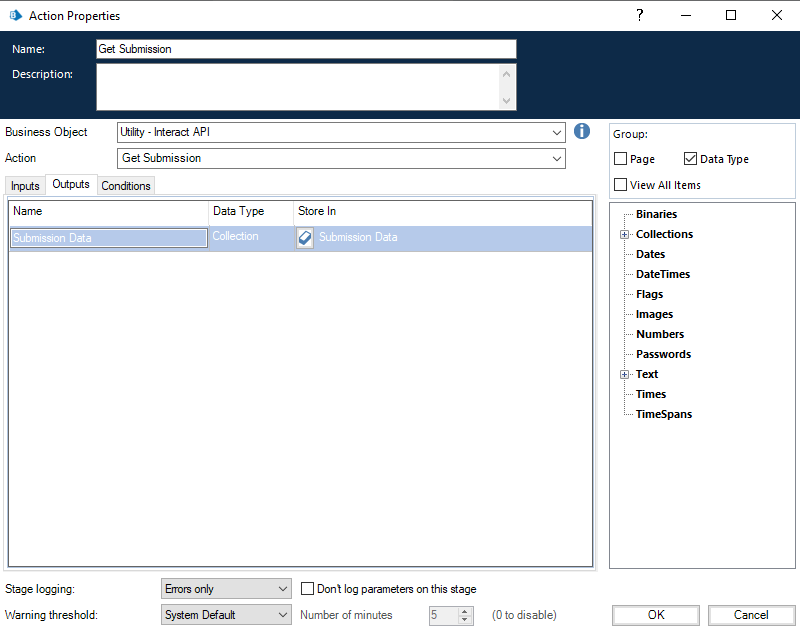
To utilize the action, an action is added to your process and the Business Object selected, with the action set to Get Submission. There is only one input parameter which is the Submission ID as illustrated below.

The output parameters retrieves the contents of the Interact Form, using the submission ID into a collection.
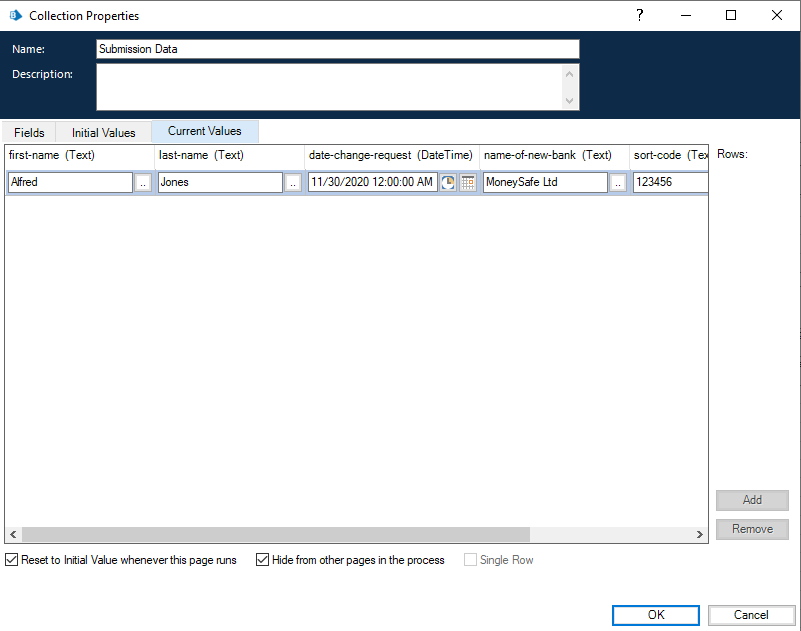
One difference when the submission is retrieved using this methodology rather than the standard Get Next Item action is the formatting of Date elements. Using the Get Next Item technique the Date is returned in a Text format, whereas the Get Submission returns it as a DateTime format as below.
For a complete list of restrictions, see Interact Web API Service object restrictions.
You cannot use the Get Submission action unless you know the submission ID, as this is unique per submission it cannot be hardcoded into your automation. This must be retrieved using the Get Next Item action.
Get Form Schema
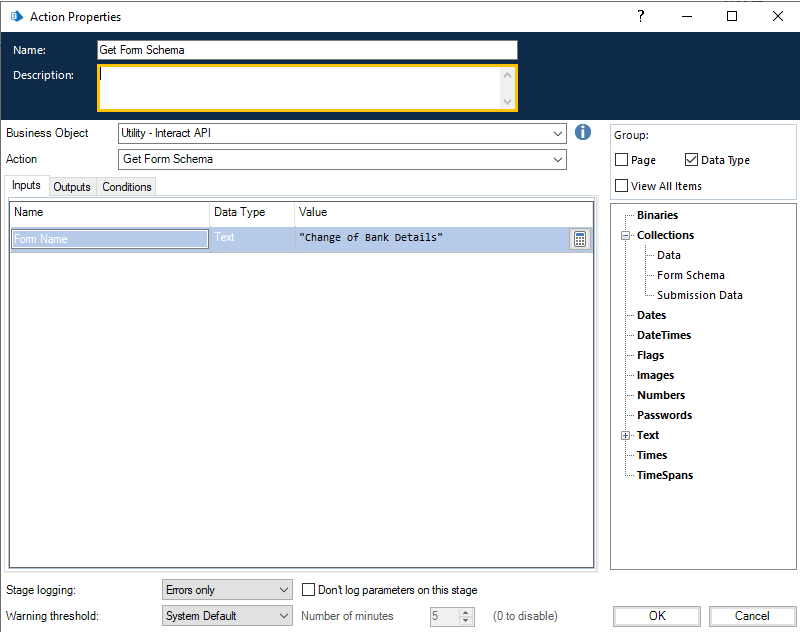
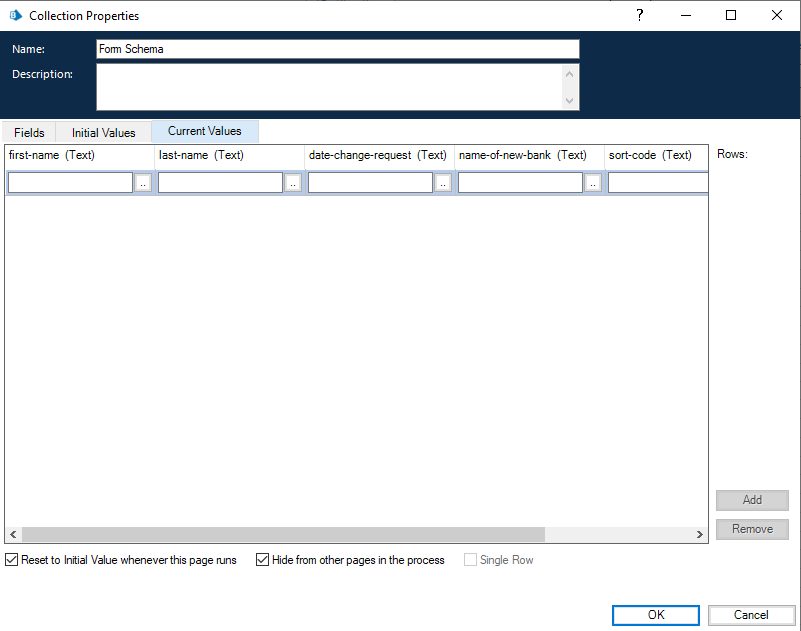
The Get Form Schema action gets a structure of an Interact Form in a collection allowing you to manipulate and then using the Create Submission action create an Interact Form either empty or partially created for a user to complete and submit.
There is only one input parameter which is the name of the Form within Interact that you are retrieving the structure for, as illustrated below.
The outputs parameters are similar to the ‘Get Submission’ action where the request status is returned along with a collection containing the fields.
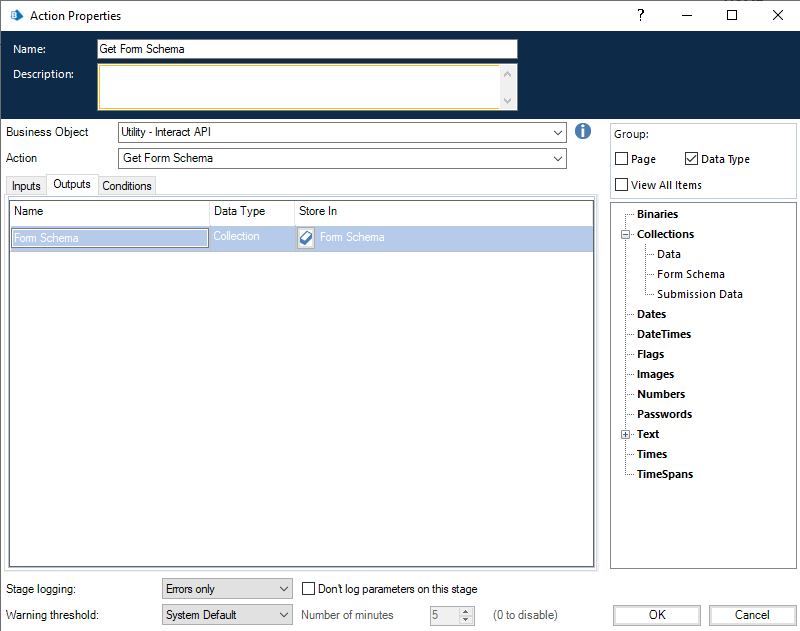
The retrieved collection is a blank collection containing the structure of the Form.
The difference between the Get Next Item and Get Form Schema formats is the upload element field. The Get Next Item action returns a link to where the file is stored, however, Get Form Schema action returns a collection which includes not just a link but details of the file uploaded. This is also required when using the Upload File action.
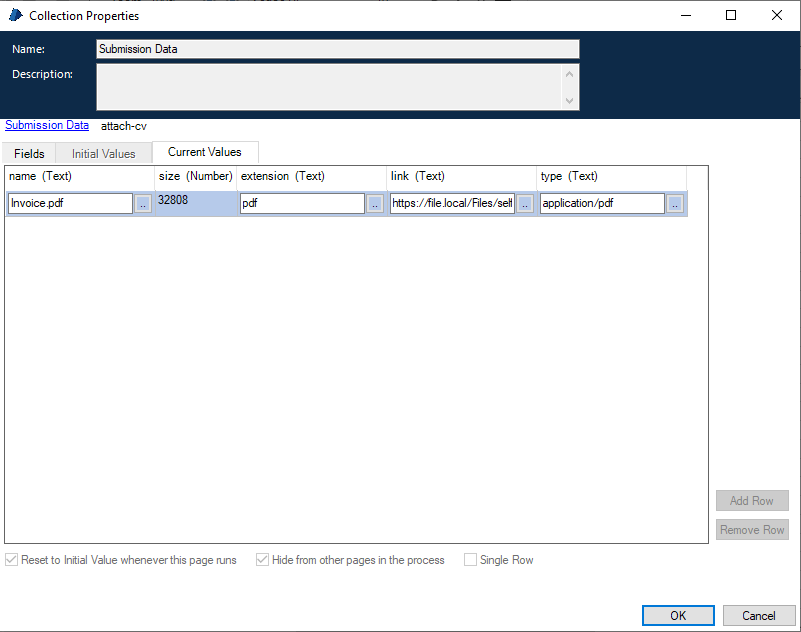
The format of the collection containing the details of the upload file must be set correctly, as illustrated above:
- Name –The name of the file including the extension.
- Size – The size of the file in bytes.
- Extension – The file extension, without the leading period or full stop.
- Link – The link to the uploaded file.
- Type – The type of file for example ‘application/pdf’ or ‘image/png’.
Get Users by Form Name
The Get Users by Form Name action allows you to collect a list of users associated with a particular Form Name.
The input for the action is the Form Name, as illustrated below.

The output is a collection that lists the users associated with that Form Name.

Get Roles by Form Name
The Get Roles by Form Name action allows you to collect a list of roles associated with a particular Form Name.
The input for the action is the Form Name, as illustrated below.

The output is a collection that lists the role names associated with that Form Name.

Get Role ID by Role Name
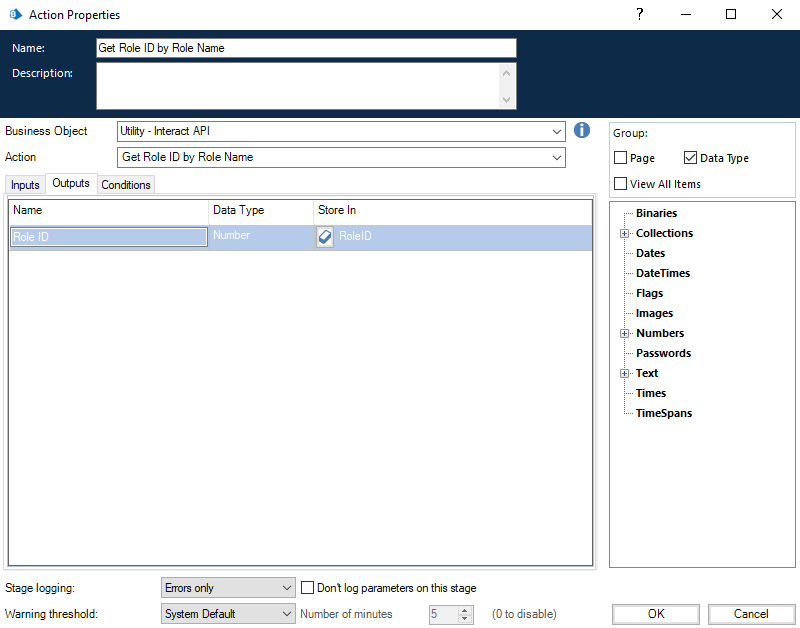
The Get Role ID by Role Name action allows you to retrieve the role identification number for a particular Role Name (which can be obtained by running Get Roles by Form Name).
The input for the action is the Role Name, as illustrated below.

The output is the Role ID, which is the identification number associated with that Role Name.
Create Submission
There are four parameters that need to be defined within the Create Submission action.
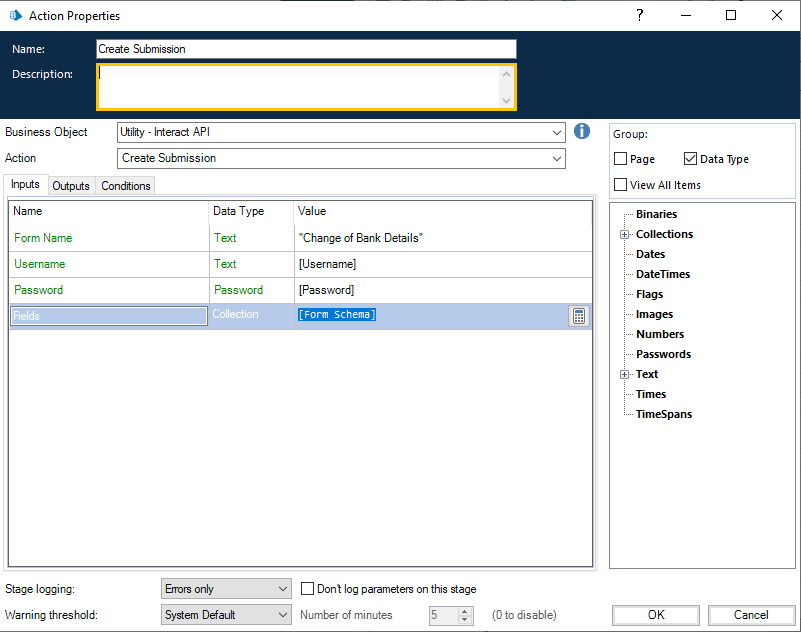
These four parameters are as follows:
- Username – This is the username of the Interact user that the submission will be created for.
- Password – The password for this Interact user. If you are using Interact Remote API v2, this is an optional parameter. If you are using Interact Remote API v1, this is a required parameter.
- Form Name – The Form that will be created within Interact.
- Fields – The values that will be set within the created submission.
To assist in creating a new submission, Get Form Schema can be used to retrieve the basic structure of the Form. This could then be populated with new data items and then created as a new submission for a user.
To create a submission, the fields and form schema must match that of the Form within Interact. Missing fields or an incorrect structure will end up creating a corrupt submission.
Once initiated the created submission will appear in the specified users Submission History as a submitted Form and will be added to the specified Blue Prism queue detailed in the Form construct.
The Create Submission action has the following optional output parameters:
- _requestId – The unique identifier for the submission.
- Submission Data – Retrieves the contents of the Interact Form into a collection. This is in the same format as Get Submission.
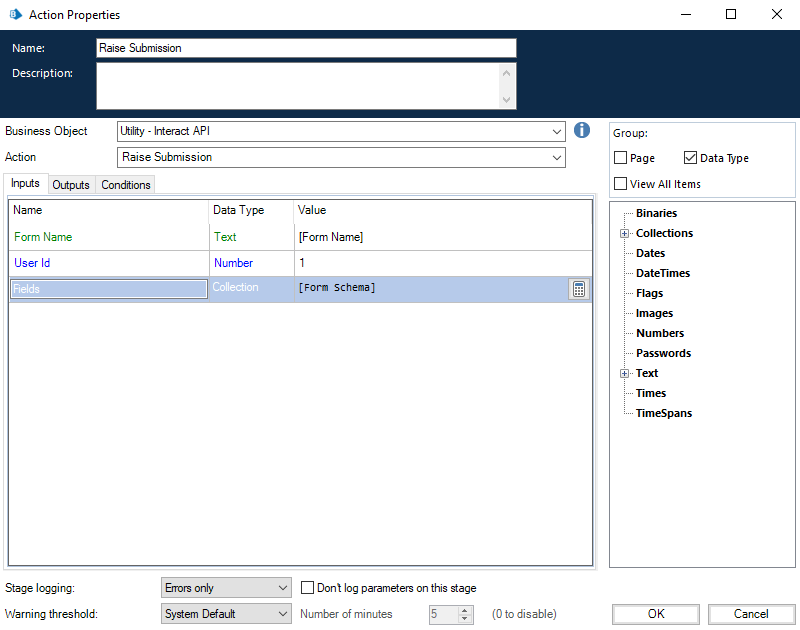
Raise Submission
The Raise Submission action allows you to create a submission in a user’s particular Inbox folder. The submission raised can be fully or partially completed, or even completely empty depending on your requirements.
If the form that your submission is based on contains the radio group capture type, you will be unable to raise an empty submission. The radio group requires a value to be set. For more information on form capture types, see Using the capture types in forms.
The inputs for the action are the Form Name, the User ID (which can be obtained by running Get Users by Form Name) and the data to be loaded in the fields, as illustrated below. The data file loaded can be created by running the Get Form Schema command.
The Raise Submission action has the following optional output parameters:
- _requestId – The unique identifier for the submission.
- Submission Data – Retrieves the contents of the Interact Form into a collection. This is in the same format as Get Submission.
When using Raise Submission with Upload File, ensure you correctly format the collection containing the details of the file being attached. See Get Form Schema for more details about the format of the collection.
Raise Submission to Role
The Raise Submission to Role action allows you to create a submission that appears in the Inbox folder of all users who are assigned to that role. The submission raised can be fully or partially completed, or even completely empty depending on your requirements.
If the form that your submission is based on contains the radio group capture type, you will be unable to raise an empty submission. The radio group requires a value to be set. For more information on form capture types, see Using the capture types in forms.
The inputs for the action are the Form Name, the data to be loaded in the fields, and the Role ID (which can be obtained by running Get Role by Role ID), as illustrated below. The data file loaded can be created by running the Get Form Schema command.

The Raise Submission to Role action has the following optional output parameters:
- _requestId – The unique identifier for the submission.
- Submission Data – Retrieves the contents of the Interact Form into a collection. This is in the same format as Get Submission.
When using Raise Submission to Role with Upload File, ensure you correctly format the collection containing the details of the file being attached. See Get Form Schema for more details about the format of the collection.
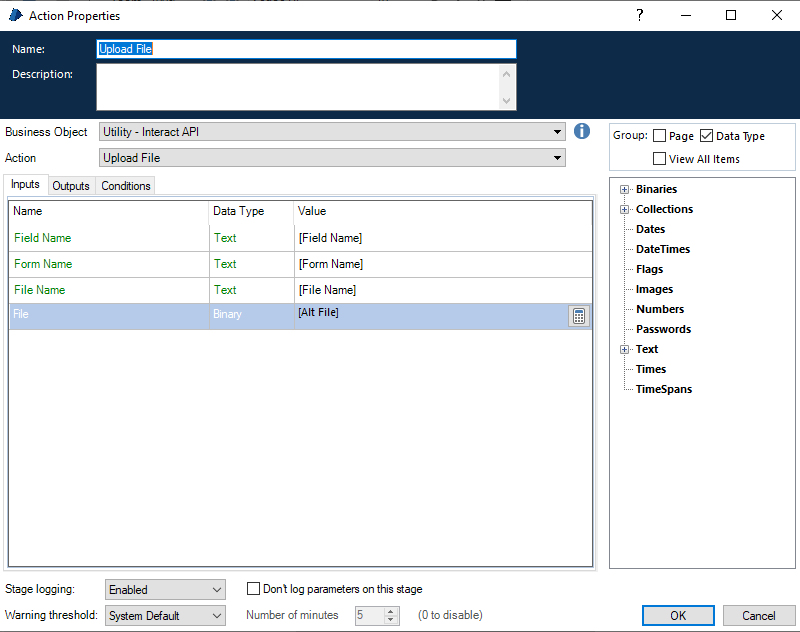
Upload File
The Upload File action allows you to upload a file to local storage, for example, an image file or a document. It can be used in conjunction with:
The Upload file action only uploads one file at a time. When uploading multiple files to a form, you must run the upload file action for each file then store the output links separately.
There are four inputs for the action, as illustrated below:
- Form Name – The Form within Interact that the uploaded file will be associated with.
- Field Name – The automation ID of the field on the Form.
- File Name – The file that will be uploaded into the local storage. This must include the full name of the file including the extension.
- File – The contents of the file attached using a Data Item with the type set to Binary.
When uploading a file, you are provided with a link which can then be used in
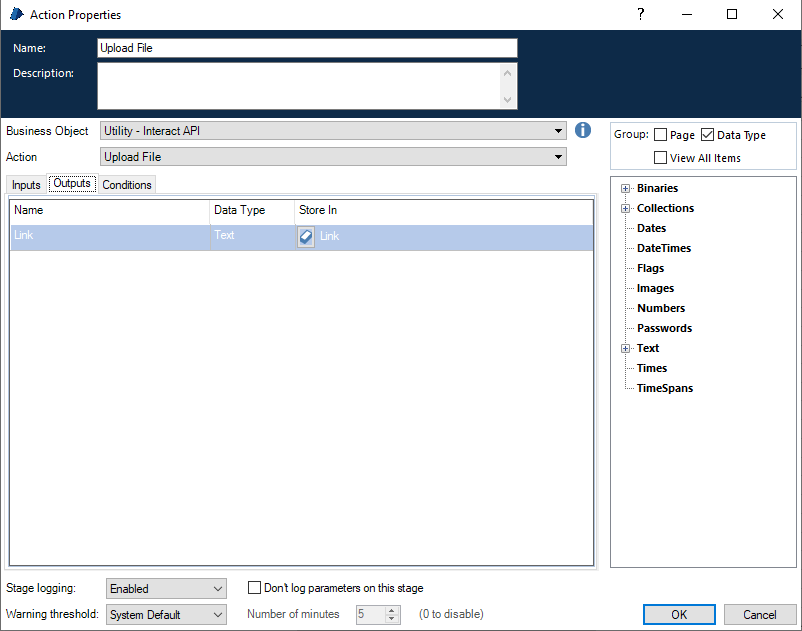
Once the file has been uploaded, you can attach the contents of the file to
- Upload File – Upload the file to the local storage.
- Get Form Schema – Obtain the structure of the form where the file will be attached to.
- Create Submission or Raise Submission – Which references the modified Form structure and attaches the uploaded file to the new submission.
When using Create Submission, the attached file can be downloaded and viewed from the Submission History tab of Interact. If Raise Submission is used, the user can only edit the link replacing the file, the user cannot view the attached file, unless it is an image, nor can they download the file.
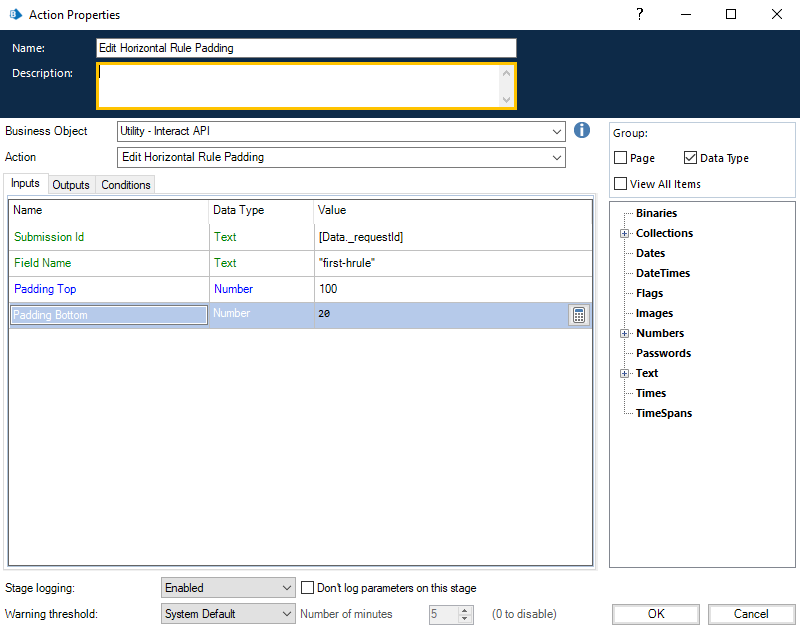
Edit Horizontal Rule Padding
The Edit Horizontal Rule Padding action complements the actions available in Edit Submission Field Value. This action links directly to the horizontal rule element on the form, enabling the padding values to be changed.
The Field Name is the Automation ID that was created within the Form designer. The padding fields accept a number, this defines the number of pixels of vertical space that will appear above and/or below the horizontal rule on the form.
Edit Submission Field Value
The Edit Submission Field Value action, like all the other actions, is called from the object. There are several actions within the object which allow you to update specific field elements, these actions link directly to the element type that is used in the Interact Form.
The Field Name in the sections below is the Automation ID that was created within the Form designer.
Details for the different element types are described in the following sections.
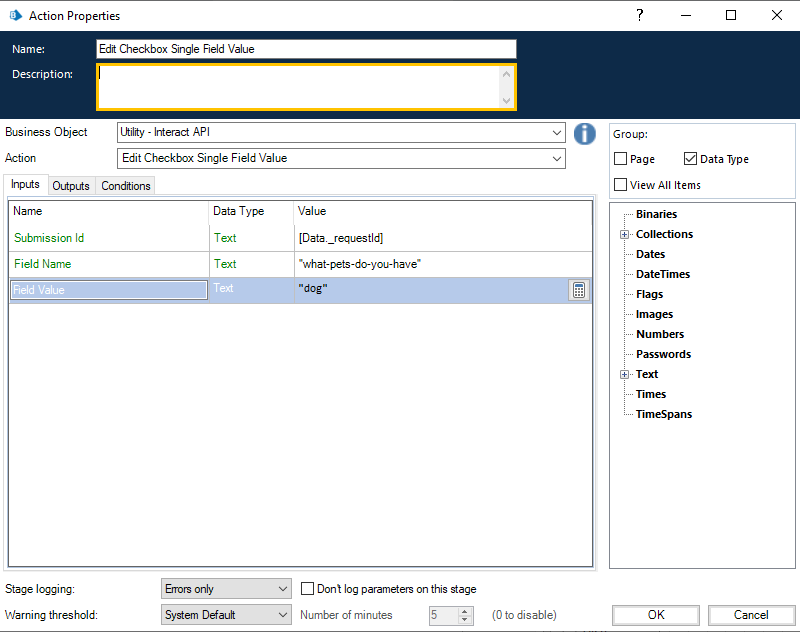
Checkbox element (Single)
The Checkbox Edit Value is two different actions supporting use of both Single and Multiple Checkboxes. To update the values for a Single Checkbox, it is a simple text string that is submitted.
Checkbox element (Multiple)
For the Checkbox Edit Value (Multiple) again it is a simple text string that is submitted but using a comma separated string for the different values.

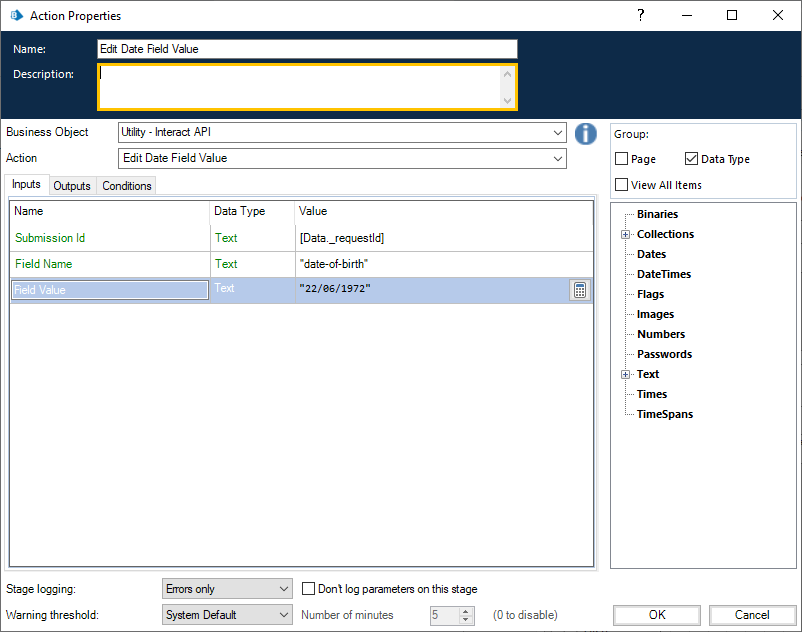
Date element
The Date element uses Text format to edit values in an Interact Form, this is to support the three different formats within the Interact Form. The Form will allow you to use these formats for dates:
- DD/MM/YYYY – UK format;
- MM/DD/YYYY – US format;
- YYYY/MM/DD – International format.
If you have set the Interact Form to accept the International format for dates and you send the date back in either the UK or US format, the Interact Form will display an invalid data message.
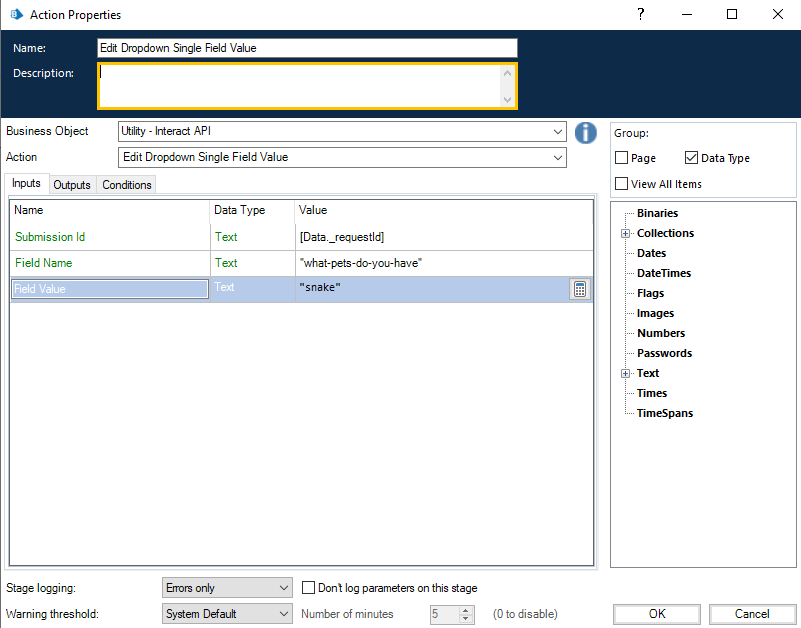
Dropdown element (Single)
The Dropdown element, like the Checkbox element, supports two actions for the single and multiple entries. To update the values for a Single Dropdown, it is a simple text string that is submitted.
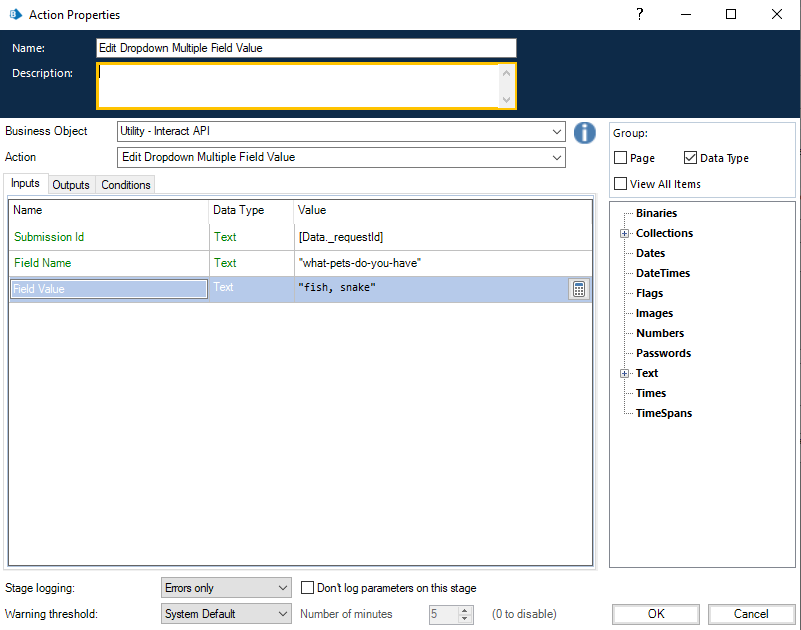
Dropdown element (Multiple)
For the Dropdown Edit Value (Multiple) again it is a simple text string that is submitted but using a comma separated string for the different values.
Number element
The Number element will accept either a number or a text being passed to it. Though the field type is a Text type you must supply a number using only the acceptable delimiters such as commas and decimal points. If text is sent back, the Interact Form will display a message regarding invalid data.

Paragraph element
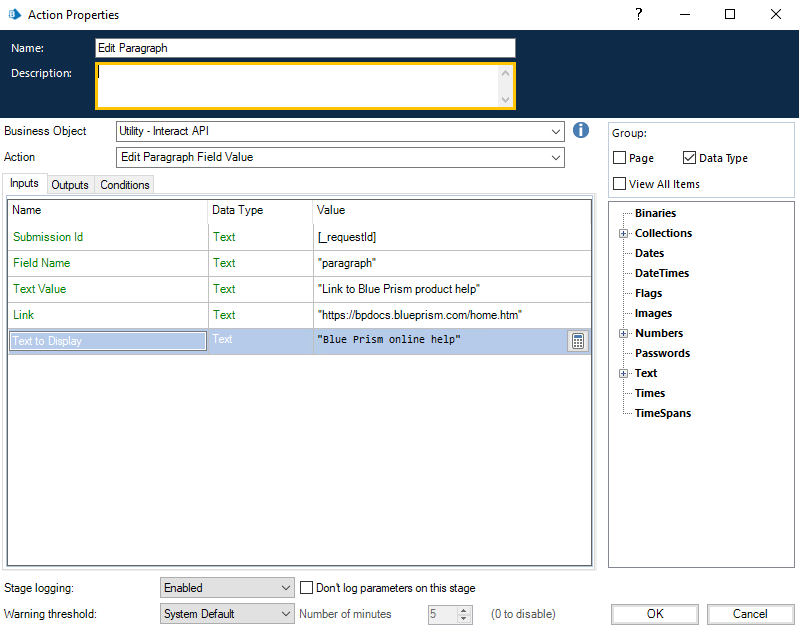
The Paragraph element accepts a string of text or HTML, a hyperlink, and a label for the hyperlink. All of these fields are optional.
In its simplest form, the Text Value parameter can be used to update a paragraph of text, without any formatting. A hyperlink can also be added which will display on the line immediately below the paragraph of text entered in Text Value when displayed in the form. The hyperlink comprises the Link parameter for the URL and the Text to Display parameter for the text.
The example below shows the information being set on the action directly, however, it is more likely that you will use Data items in your automation to input the information into these fields.
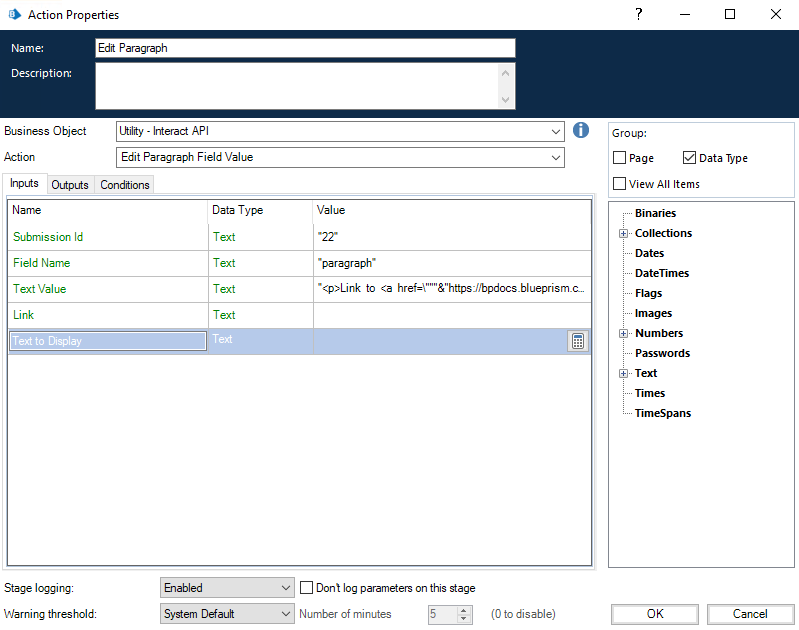
Alternatively, HTML can be entered in the Text Value parameter, which can be used to update a paragraph with formatted text. If HTML is to be entered directly into the input fields, any quotation marks inside the HTML must be escaped using a backslash (for example, when inserting links or using styles) as the entry in the Text Value parameter is wrapped in quotation marks. This can also be built up using the expression validation. The HTML must be correctly formatted using opening <> and closing </> tags.
For example:
<p>Link to <a href="https://bpdocs.blueprism.com/home.htm">Blue Prism product help</a></p>
When using a Data item to input the information into the action, this becomes:
"<p>Link to <a href=\"https://bpdocs.blueprism.com/home.htm\">Blue Prism product help</a></p>"
It is recommended that you use Data items to input the information into these fields as this avoids the formatting issue with escaped characters required by the Blue Prism fields.
For example, entering the above example directly into the field will require further escaping of the quotation marks:
"<p>Link to <a href=\"""&"https://bpdocs.blueprism.com/home.htm\"""&">Blue Prism product help</a></p>"
To reflect the formatting that can be entered in the paragraph field in the Interact Forms user interface when building a form, the following HTML tags can be used:
-
Paragraph – <p> –The HTML must always be wrapped by the paragraph tag <p>, for example, <p>This is my paragraph.</p>.
The Text Value parameter can contain more than one paragraph, for example, <p>This is my first paragraph. This is my next sentence in my first paragraph.</p><p>This is my second paragraph.</p>.
- Bold – <b> – Wrap the required text using the bold tag <b>, for example, <p>this is <b>bold</b></p>.
- Italic – <i> – Wrap the required text using the italic tag <i>, for example, <p>this is <i>italic</i></p>.
- underline – <u> – Wrap the required text using the underline tag <u>, for example, <p>this <u>text is underlined</u></p>.
-
Highlight – <mark> – Wrap the required text using the highlight tag <mark>, for example, <p>this <mark>text is highlighted</mark></p>. By default, this displays the text as black font with a yellow background.
Alternatively, a span tag can be used with the style attribute defining the background color of the text, for example, <p>this<span style="background-colour:blue;">text is highlighted</span></p>.
Remember that the quotation marks must be escaped, so this becomes: <p><span style=\"background-color:blue;\">text is highlighted</span></p>.
-
Text color – <span style> – To change the color of certain words, the text needs to be wrapped in a span tag with the style attribute applied defining the color, for example, <p>this text is <span style="color:red;">red</span></p>.
Remember that the quotation marks must be escaped, so this becomes:<p>this text is <span style=\"color:red;\">red</span></p>
Alternatively, to have all the text in the paragraph display in a different color to the standard form, the style can be specified on the paragraph tag.
-
Hyperlinks – < a href=""> – Wrap the text that will be linked using the hyperlink tag and attribute <a href>, for example, <p>this is a <a href="http://www.blueprism.com">hyperlink</a></p>.
Remember that the quotation marks must be escaped, so this becomes: <p>this is a <a href=\"http://www.blueprism.com\">hyperlink</a></p>.
Radio group element
The Radio group element is like a single Checkbox or Dropdown element. The edited value is a single text field which includes the required updated value.
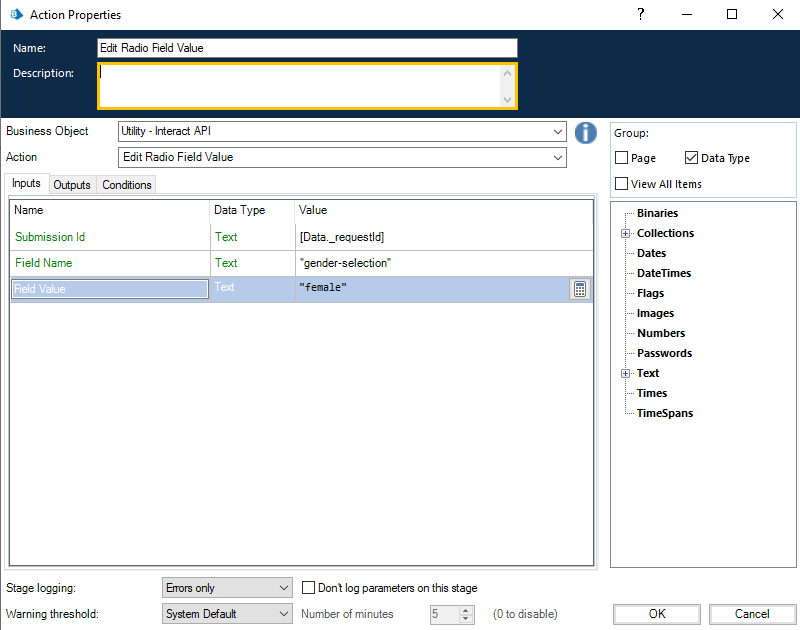
Table element
The Table element uses a collection to enable you to update the values. The collection must contain the same number of columns as the form field within the targeted form. Automation IDs must be used for the field names of the collection. The number of rows can be increased or decreased to accommodate the data being updated.
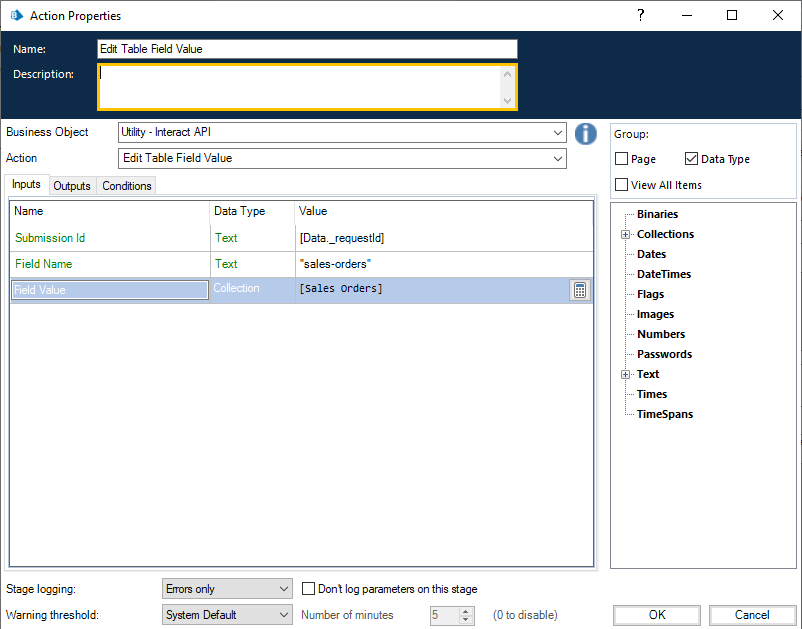
The Edit Table action overwrites the whole table as opposed to appending rows to an existing table.
Text element
The Text element requires a simple Text field being passed to it.

Text Area element
The Text Area element accepts a string of text up to 3500 characters in length.

Time element
The Time element uses Text format to edit values in an Interact Form. You can supply the Time in one of two formats these being:
- 03:00:00 PM; or
- 15:00:00.
Both will return 3 o’clock in the afternoon in Interact.

Upload
The Edit Upload Field Value action enables an existing file, such as an image or document, to be replaced with a new file.
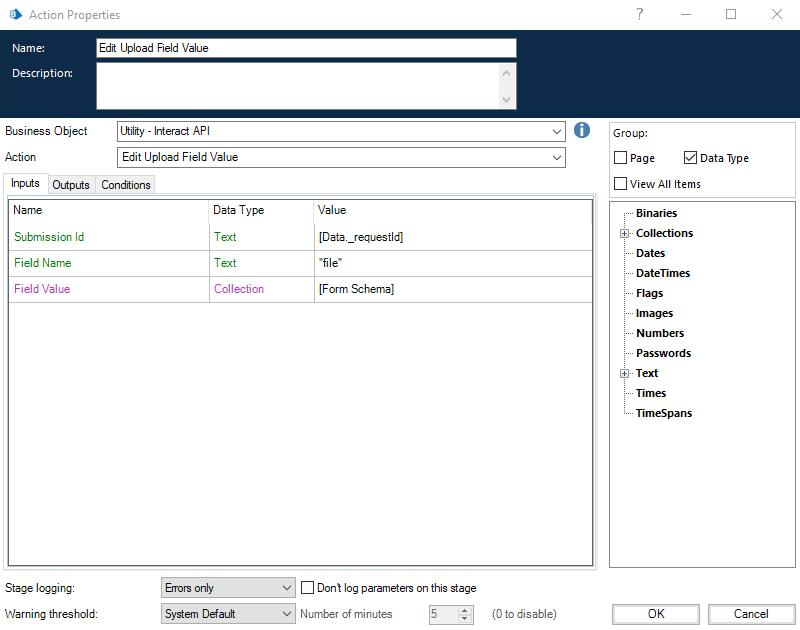
If this action is used with:
- Get Form Schema, you can start with a blank submission and use this action to upload a file.
- Get Submission or Get Next Item (from the Blue Prism Internal Business Objects, Work Queues), there must already be a file present to be replaced by Edit Upload Field Value.
Change Field State to Optional
The Change Field State to Optional action allows you to change the state of a field within a submission, moving it to an Optional condition.
The inputs for the action are the Submission ID and the Field Name you are changing the state to optional, as illustrated below. This example shows a field with the name of ‘security’ being set to a ‘optional’ state.
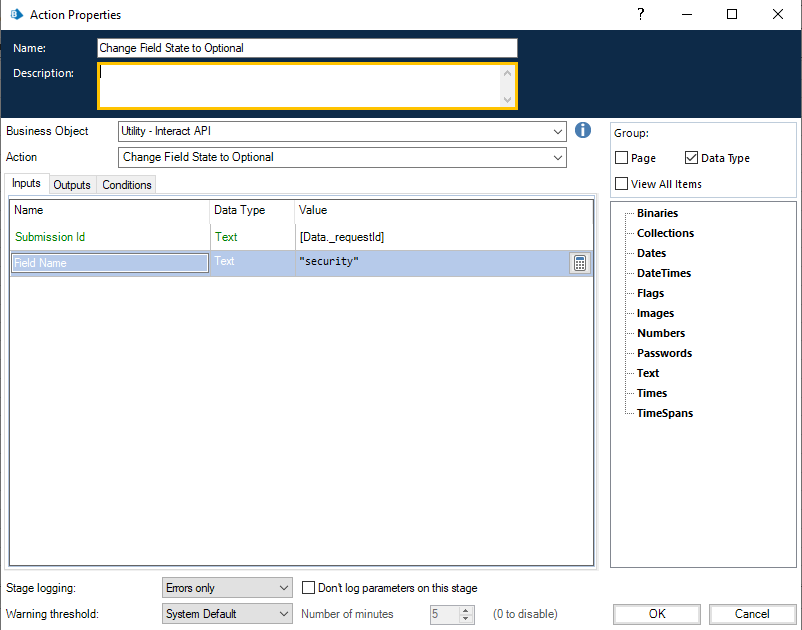
There are no outputs for the Change Field State to Optional.
Change Field State to Mandatory
The Change Field State to Mandatory action allows you to change the state of a field within a submission, moving it to a Mandatory condition.
The inputs for the action are the Submission ID and the Field Name you are changing the state to mandatory, as illustrated below. This example shows a field with the name of ‘security’ being set to a ‘mandatory’ state.
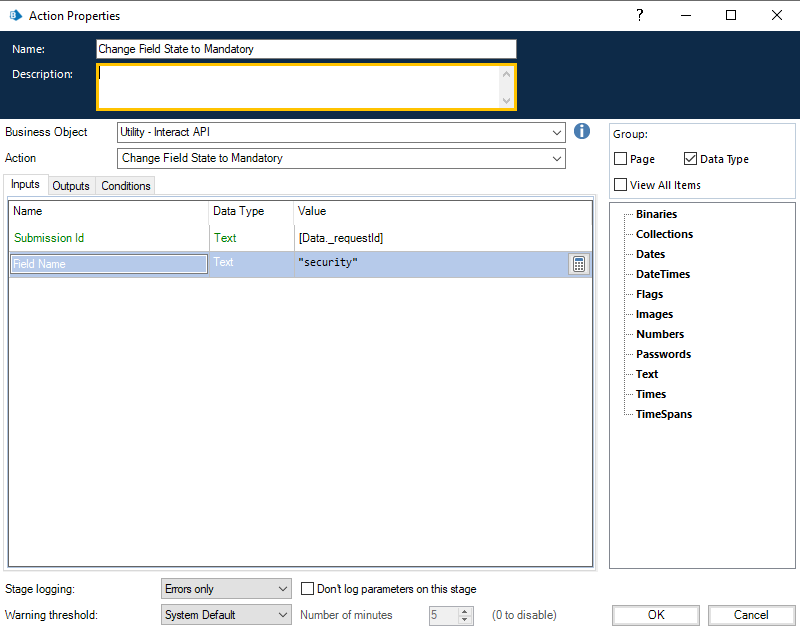
There are no outputs for the Change Field State to Mandatory.
Change Field State to Read Only
The Change Field State to Read Only action allows you to change the state of a field within a submission, moving it to a Read Only condition.
The inputs for the action are the Submission ID and the Field Name you are changing the state to read only, as illustrated below. This example shows a field with the name of ‘security’ being set to a ‘read only’ state.
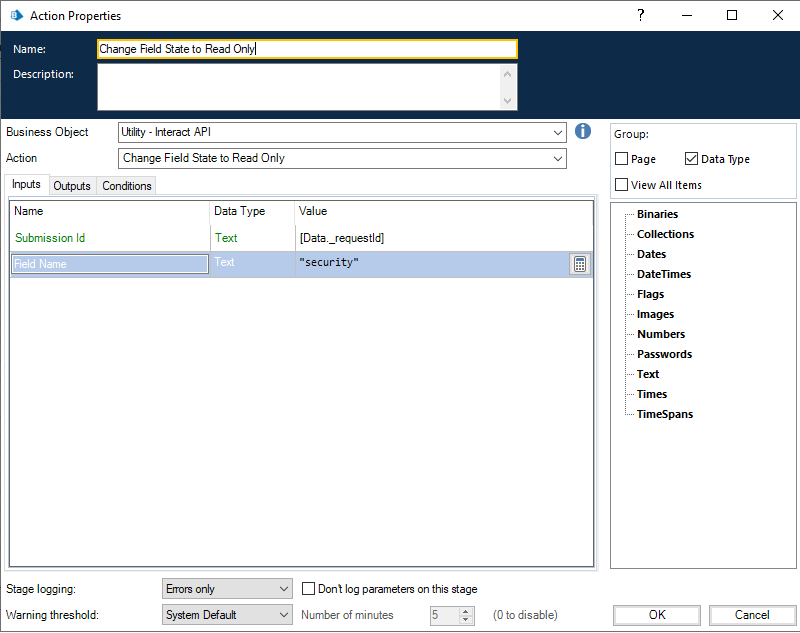
There are no outputs for the Change Field State to Read Only.
Change Field State to Hidden
The Change Field State to Hidden action allows you to change the state of a field within a submission, moving it to a Hidden condition.
The inputs for the action are the Submission ID and the Field Name you are changing the state to hidden, as illustrated below. This example shows a field with the name of ‘security’ being set to a ‘hidden’ state.
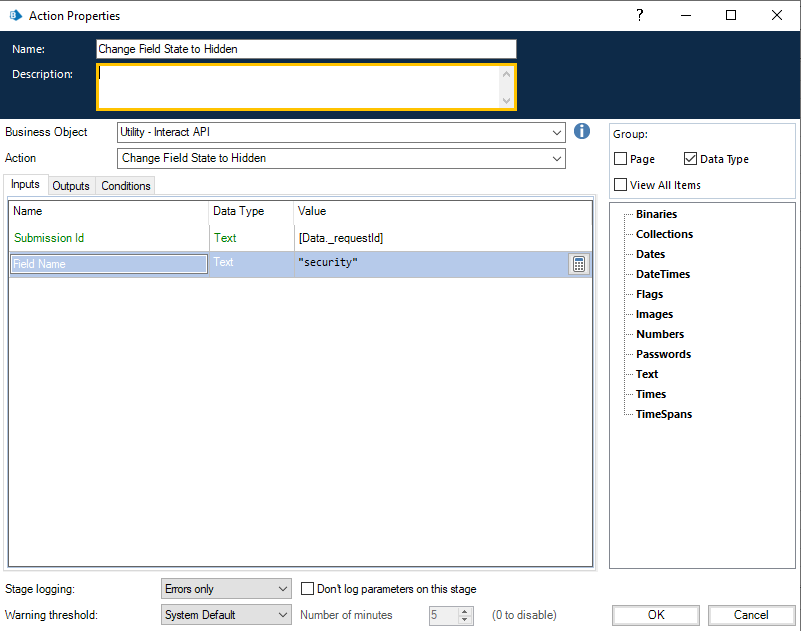
There are no outputs for the Change Field State to Hidden.
Change Page State to Visible
The Change Page State to Visible action allows you to make a page become visible within a submission.
The inputs for the action are the Submission ID and the Page Name you are changing to become visible, as illustrated below. This example shows a page with the name of ‘inputs’ being set to a ‘visible’ state.

There are no outputs for the Change Page State to Visible.
Change Page State to Hidden
The Change Page State to Hidden action allows you to make a page hidden from view within a submission.
The inputs for the action are the Submission ID and the Page Name you are changing to become hidden , as illustrated below. This example shows a page with the name of ‘inputs’ being set to a ‘hidden’ state.

There are no outputs for the Change Page State to Hidden.
Move Submission to History Tab
The Move Submission to History Tab action allows you to move a submission from its current folder to the Submission history folder under History. This action also updates the status of the submission to Submitted. The Status filter in Interact can be used to display just the submissions with this status.
The input for the action is the Submission ID of the submission being moved, as illustrated below.

There are no outputs for the Move Submission to History Tab.
Move Submission to Approved Tab
The Move Submission to Approved Tab action allows you to move a submission from its current folder to the Submission history folder under History. This action also updates the status of the submission to Approved. The Status filter in Interact can be used to display just the submissions with this status.
The input for the action is the Submission ID of the submission being moved, as illustrated below.

There are no outputs for the Move Submission to Approved.
Move Submission to Review Tab
The Move Submission to Review Tab action allows you to move the submission to the Awaiting approval folder under History for the submitter, and into the Approvals folder under My Work for the approver.
This requires a form to be configured with either Single Approver or Any Approver. If not, the form will move to the Awaiting approval folder but will not move to the My Work tab of an approver.
The input for the action is the Submission ID of the submission being moved, as illustrated below.

There are no outputs for the Move Submission to Review Tab.
Move Submission to Declined Tab
The Move Submission to Declined Tab action allows you to move a submission from its current folder to the Submission history folder under History. This action also updates the status of the submission to Declined. The Status filter in Interact can be used to display just the submissions with this status.
The input for the action is the Submission ID of the submission being moved, as illustrated below.
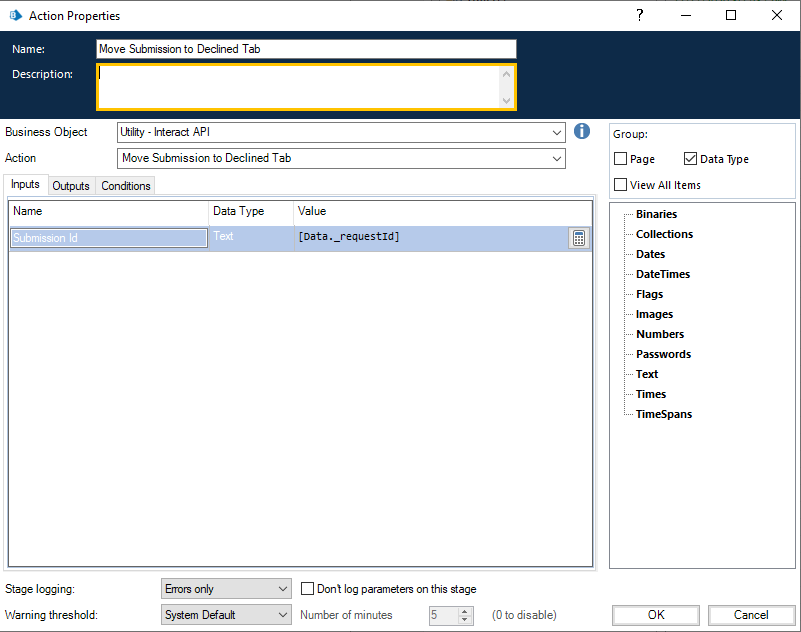
There are no outputs for the Move Submission to Declined Tab.
Move Submission to Draft Tab
The Move Submission to Draft Tab action allows you to move a submission from its current folder to the Draft folder under My Work.
The input for the action is the Submission ID of the submission being moved, as illustrated below.

There are no outputs for the Move Submission to Draft Tab.
Move Submission to Inbox Tab
The Move Submission to Inbox Tab action allows you to move a submission from its current folder to the Inbox folder under My Work.
The input for the action is the Submission ID of the submission being moved, as illustrated below.

There are no outputs for the Move Submission to Inbox Tab.
Move Submission to Archived Tab
The Move Submission to Archived Tab action allows you to move a submission from its current folder to the Archived folder under History.
The input for the action is the Submission ID of the submission being moved, as illustrated below.

There are no outputs for the Move Submission to Archived Tab.
