Docs
DocsTroubleshoot a Hub installation
The following sections seek to provide guidance if specific issues are experienced either during the install or when verifying that the installation has been successful.
Message Broker connectivity
To verify the connectivity between the Web Server and the Message Broker check that the RabbitMQ Management Console is accessible through a web browser.
There could be several reasons that connectivity fails:
- Verify Network Connectivity – Ensure that all relevant devices are connected to the same network and are able to communicate.
- Firewall – Check that the firewalls on the servers themselves or within the network are not preventing communication.
The RabbitMQ Management Console communicates, by default, on port 15672. The message broker queues use a different port, 5672, by default. The firewall should be checked for TCP access on all ports. This is especially true of the IT organization has specified non-default ports.
Database connectivity
The Test connection to proceed button within the installer checks the following:
- If the database exists:
- That it can be connected to.
- That the SQL Server hosting the database has a valid certificate applied.
- That the account has the rights to read, write and edit the database.
- If the database does not exist:
- That the account has the right to create the database.
- That the SQL Server has a valid certificate applied.
If these requirements cannot be met, the installation will stop.
There are a number of checks that can be performed when a connection cannot be made to a SQL Server over the LAN:
- Verify Network Connectivity – Ensure that all relevant devices are connected to the same network and are able to communicate.
- SSL Encryption – Ensure that the SQL Server has a valid certificate. For more information, see Prerequisites.
- SQL Credentials – Verify the SQL credentials and that the user has appropriate permissions on the SQL Server.
- Firewall – Check that the firewalls on the servers themselves or within the network are not preventing communication.
- SQL Browser Service – Ensure the SQL Browser Service on the SQL Server is enabled to allow for a SQL Instance to be found. For SQL Server Express this service is typically disabled by default.
- Enabling TCP/IP Connectivity – Where remote connectivity is required for SQL, check that TCP/IP connectivity is enabled for the SQL Instance. Microsoft provide articles specific to each version of SQL that provide instructions to Enable the TCP/IP Network Protocol for SQL Server.
If when running the installer the installation process fails with database errors, see below, then test that the Web Server has a SQL connectivity to the database. This could be due to any of the reasons potentially listed above.

Another potential reason for failure is that the account used to create the databases within the installer has insufficient privileges to create the databases.
Finally, if the installation is a re-installation after a removal of the software. Then if the same database names have been used, the original databases should be backed up and dropped before re-installing.
Web server
During the installation process the installer will check that all prerequisites are installed. It is recommended that if the prerequisites are not installed, that the installer is canceled, the prerequisites installed, and the installer process restarted.
For further information, see Prerequisites.
Use RabbitMQ with AMQPS
If you are using RabbitMQ with AMQPS (Advanced Message Queuing Protocol - Secure), the application pools created as part of the Hub installation need to be granted permissions to the RabbitMQ certificate. To do this:
- On the web server, open the Certificate Manager. To do this, type Certificates in the search box on the Windows taskbar, and then click Manage Computer Certificates.
- Navigate to, and right-click the certificate that was identified for use with RabbitMQ AMQPS during Hub installation, and select All Tasks, and click Manage Private Keys....
The Permissions dialog for the certificate displays.
-
Click Add, then enter the following application pools into the Enter the object names to select field:
iis apppool\Blue Prism - Audit Service;
iis apppool\Blue Prism - Authentication Server;
iis apppool\Blue Prism - Email Service;
iis apppool\Blue Prism - File Service;
iis apppool\Blue Prism - Hub;
iis apppool\Blue Prism - License Manager;
iis apppool\Blue Prism - Notification Center;
iis apppool\Blue Prism - SignalR;
These are the default application pool names. If you have entered different names during installation, ensure the list reflects the names you have used.
-
If you are using Windows Authentication, also add the name of the service account that is used for the following Windows services:
- Blue Prism – Audit Service Listener
- Blue Prism – Log Service
-
Click Check Names.
The names should be validated. If they are not, check that the name matches the application pool or service account you are trying to use and correct as needed.
-
Click OK.
-
Select each application pool in turn in the Group or user name list, and ensure that Full control is selected in the Permissions for {account name} list.
-
Click OK.
The application pools now have access to the certificate.
If you are also installing Interact, you will also need to do this for the application pools created during the Interact installation. For more information, see Installing Interact.
File service
If the File service fails to locate the imagery for
During the removal process, the databases are not removed and so if the reinstallation uses the same database names then the original paths to the file services and URLs will still be used.
To overcome this, after the removal process has been run, either delete or clean the databases so that any previous paths have been deleted or use alternatives database names during the reinstallation.
Configure browsers for Integrated Windows Authentication
In the event that Active Directory users cannot log into Blue Prism Hub post installation, check that you have configured the supported web browsers for Integrated Windows Authentication so that the currently logged-in users can be retrieved from the client machine. The configuration steps are different for each web browser supported by Hub.
Configure Google Chrome
- Close any open instances of Chrome.
-
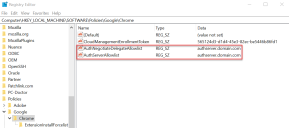
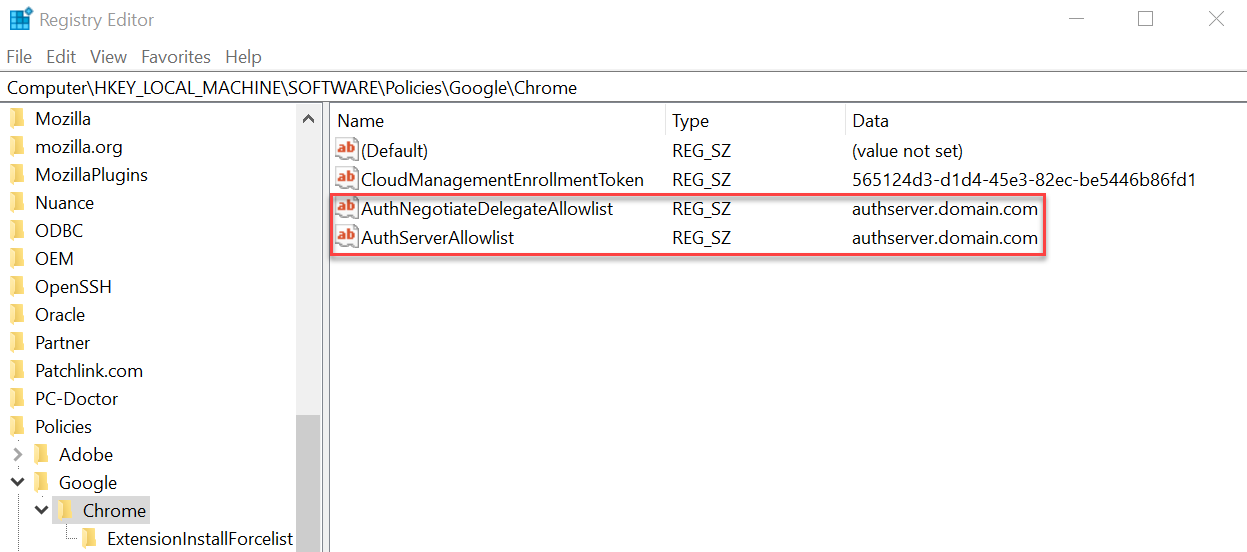
Open Registry Editor and enter the following in the top bar:
Computer\HKEY_LOCAL_MACHINE\SOFTWARE\Policies\Google\Chrome
- Right-click the Chrome folder and select New > String Value.
- Add the following string values: AuthNegotiateDelegateAllowlist and AuthServerAllowlist.
- Right-click each string value in turn and select Modify.
-
In the Value data field for both string values, enter the host name of the Authentication Server website, for example, authserver.domain.com, and click OK.
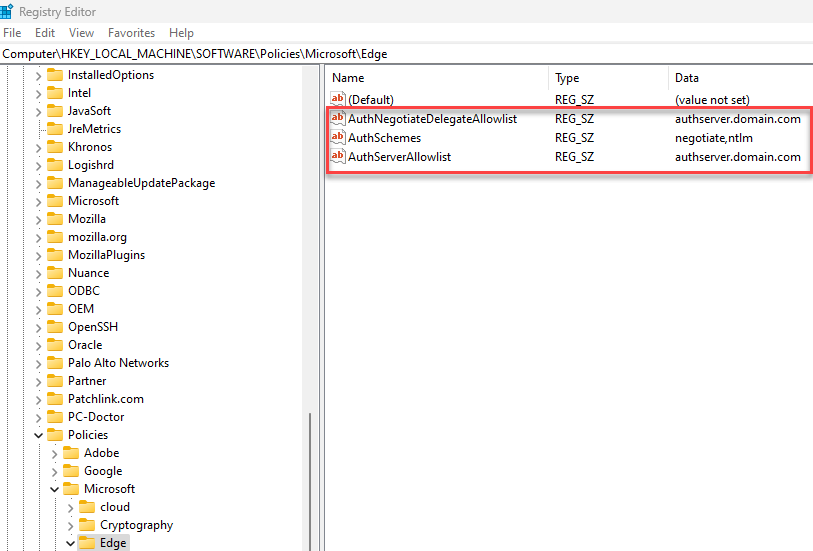
Configure Microsoft Edge
- Close any open instances of Edge.
-
Open Registry Editor and enter the following in the top bar:
Computer\HKEY_LOCAL_MACHINE\SOFTWARE\Policies\Microsoft\Edge
- Right-click the Edge folder and select New > String Value.
- Add the following string values: AuthNegotiateDelegateAllowlist, AuthServerAllowlist, and AuthSchemes.
- Right-click each string value in turn and select Modify.
- In the Value data field for AuthNegotiateDelegateAllowlist and AuthServerAllowlist, enter the host name of the Authentication Server website, for example, authserver.domain.com, and click OK.
-
In the Value data field for AuthSchemes, enter negotiate, ntlm and click OK. For more information, see the Microsoft documentation on Microsoft Edge policies.
This string value is not required if your organization is only set up for Kerberos authentication, see below for more information.
Alternatively, you can follow these steps for Microsoft Edge:
- Close any open instances of Edge.
- Navigate to Control Panel > Network and Internet > Internet Options.
- On the Advanced tab, under Security, select Enable Integrated Windows Authentication.
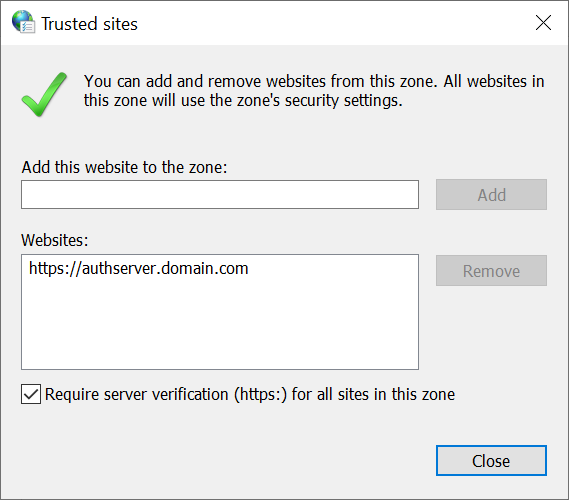
- On the Security tab, click Trusted Sites > Sites.
-
In the Trusted sites dialog, enter the URL for Authentication Server (for example, https://authserver.domain.com) in the Add this website to the zone field and click Add.
The URL displays in the Websites field.
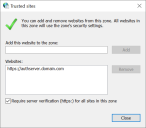
-
Click Close.
-
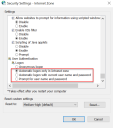
On the Security tab in the Internet Options dialog, click Trusted Sites > Custom Level.
-
Under User Authentication > Logon, confirm that Anonymous logon is not selected. Instead, use any of the settings that allows the browser to pick up user credentials, as shown below.
-
Click OK.

Configure Kerberos authentication
The steps above will not suffice if Windows New Technology LAN Manager (NTLM) authentication has been disabled for your environment. In this case, you must also configure Kerberos authentication and a service principal name (SPN). Depending on your organization's setup, you might need to also add a Microsoft Edge WebView2 registry key. For more information, see the Microsoft documentation on NTLM and Kerberos authentication.
- On the web server, open Internet Information Services (IIS) Manager.
-
From the list of connections, select Blue Prism - Authentication Server.
This is the default site name – if you have used a custom site name, select the appropriate connection.
-
Under IIS, double-click Authentication.
The Authentication page displays.
-
Select Windows Authentication (make sure it is set to Enabled) and then click Providers....
The Providers dialog displays.
-
Add one or more providers from the list of available providers, based on your organization's setup, and click OK.
Configure service principal name (SPN)
A service principal name (SPN) will also need to be configured and registered for the Authentication Server URL to ensure Kerberos authentication works correctly. See the Microsoft documentation on this topic for further details, including required permissions. This is an essential step to review with your organization's IT team to ensure that the Setspn command does not fail to execute due to missing account permissions.
-
Open Command Prompt as an administrator on the web server and run the applicable command below.
If the Blue Prism - Authentication Server application pool is running as a Local System account, use:
CopySetspn -S HTTP/WEBSITE_URL COMPUTER_HOSTNAMEIf the Blue Prism - Authentication Server application pool is running as a service account, use:
CopySetspn -S HTTP/WEBSITE_URL DOMAIN/UsernameHTTP covers both HTTP and HTTPS. Do not change the command to include HTTPS specifically as the configuration will fail.
-
Run Klist purge to refresh the Kerberos tickets.
-
Log into Authentication Server to verify that Kerberos authentication is working correctly.
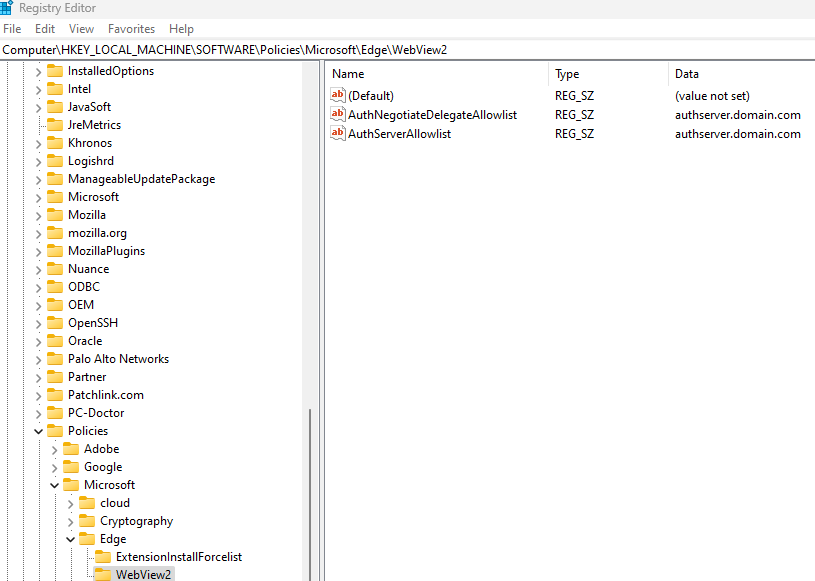
Add a Microsoft Edge WebView2 registry key
If your organization is only set up for Kerberos authentication, and Authentication Server is also used to log into Blue Prism Enterprise, a registry key for the Microsoft Edge WebView2 browser must be added:
- Close any open instances of Edge.
-
Open Registry Editor and enter the following in the top bar:
Computer\HKEY_LOCAL_MACHINE\SOFTWARE\Policies\Microsoft\Edge
- Right-click the Edge folder and select New > Key.
- Name the new key WebView2.
- Right-click the WebView2 folder and add the following string values: AuthNegotiateDelegateAllowlist and AuthServerAllowlist.
- Right-click each string value in turn and select Modify.
-
In the Value data field for AuthNegotiateDelegateAllowlist and AuthServerAllowlist, enter the host name of the Authentication Server website, for example, authserver.domain.com, and click OK.
Hub shows an error on starting
If a user logs into the Authentication Server, selects Hub and the following message displays:
An error occurred while starting the application
This means that the IIS sites need to be restarted. This error affects systems that are installed on a single server and occurs if RabbitMQ starts up after the IIS sites. Therefore, it is recommended that the IIS sites have a startup delay set on them to allow RabbitMQ to start up first.
If this error occurs, it can be resolved in the following way:
- On the server, open Internet Information Services (IIS) Manager and stop all the Blue Prism sites. For a list, see Hub websites.
- Restart the RabbitMQ Service.
- Restart all Blue Prism application pools.
- Start the Blue Prism sites that were stopped in step 1.
To delay the IIS sites service startup:
- On the server, open Services.
- Right-click World Wide Web Publishing Service and select Properties.
- On the General tab, set Startup type to Automatic (Delayed Start).
- Click OK and close the Services window.
Not able to configure SMTP settings in Hub
If you are unable to configure SMTP settings in Hub this is normally related to the startup order of the services.
The web server must start up after the RabbitMQ services have all started. If the web server services start before the RabbitMQ service is ready, then going into the SMTP settings in Hub will result in a ‘something went wrong’ message.
Saving the SMTP setting returns an error when using OAuth 2.0
If you receive an error when saving a email configuration using OAuth 2.0, check that the Mail.Send permission is configured for the application in Azure Active Directory.
To add the Mail.Send permission:
- In Azure Active Directory, open the application properties for the application that you are linking Hub to.
- Click API permissions.
-
Click Add a permission.

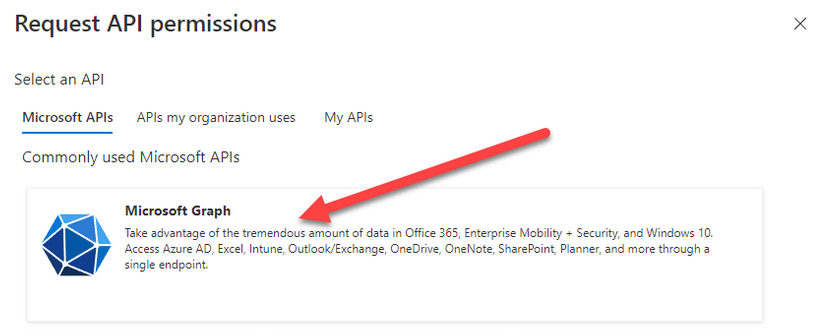
-
In Select an API, under Microsoft APIs, select Microsoft Graph.

-
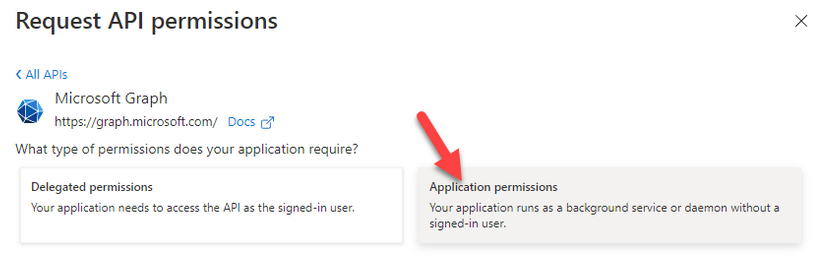
Under Microsoft Graph, click Application permissions.

-
Type Mail in the search field and press Enter.
-
Under the Mail list that is displayed, select Mail.Send and click Add permissions.
-
On the application permissions page, click Grant admin consent.


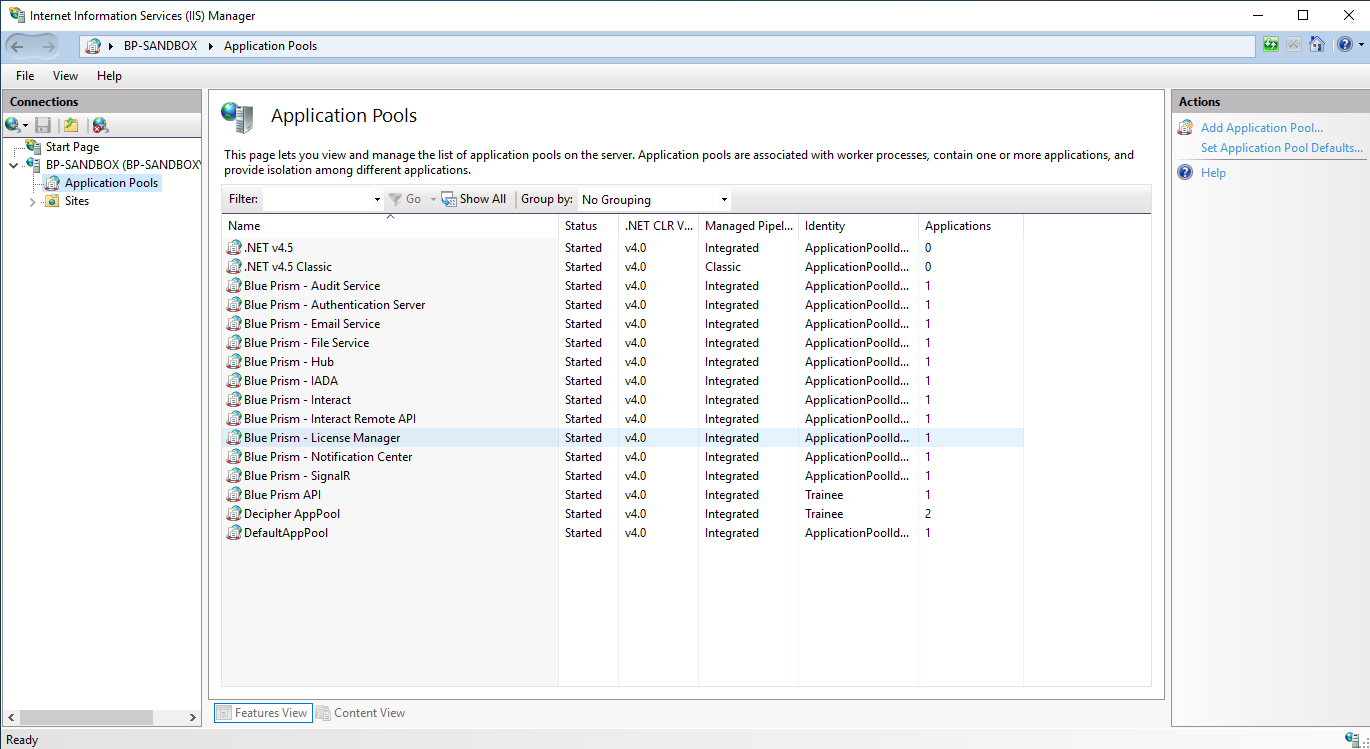
Updating the Customer ID after installation
If you need to enter or update your Customer ID after installation, you will need to update the License Manager appsettings.json configuration file. Once the configuration file has been updated, the License Manager must be restarted in Internet Information Services (IIS) Manager.
To update your Customer ID in the appsetting.json file:
-
Open Windows Explorer and navigate to C:\Program Files (x86)\Blue Prism\LicenseManager\appsettings.json.
This is the default install location – adjust this if you have used a custom location.
- Open the appsettings.json file in a text editor.
-
Locate the License:CustomerId section of the file and enter your new Customer ID, for example:
Copy"License": {
"CustomerId": "your-Customer-ID-here"
} - Save the file.
To restart License Manager:
-
Open Internet Information Services (IIS) Manager.
-
In the list of connections, select Blue Prism - License Manager.
This is the default site name – if you have used a custom site name, select the appropriate connection.
-
Click Restart from the Manage Website controls.

The License Manager restarts.