 Docs
DocsSAML 2.0 authentication
Security Assertion Markup Language 2.0 (SAML 2.0) authentication, which allows cross-domain single sign-on (SSO), can be configured to integrate with Authentication Server. In a SAML 2.0 authentication flow, there are typically two main components:
- Service Provider (SP) – The system that provides access to resources or services (in this case, Authentication Server).
- Identity Provider (IdP) – The system that authenticates users and provides identity information to the SP. The IdP must be configured outside of Authentication Server based on your organization's requirements and may include vendors such as Azure Active Directory, Okta, OneLogin, and others.
For more information, see the external SAML 2.0 documentation.
SAML 2.0 authentication is only visible on the Authentication settings page if the Authentication Server SAML 2.0 extension has been installed on the host web server where Authentication Server is installed. The Authentication Server SAML 2.0 extension installer and the associated installation guide can be downloaded from the Digital Exchange.
The following actions can be carried out from the Authentication settings page if the prerequisites above have been met:
- Enable or disable SAML 2.0 authentication.
- Configure SAML 2.0 provider settings.
- Add multiple SAML 2.0 users from a CSV file.
- Remove an existing SAML 2.0 provider and its associated users.
Enable or disable SAML 2.0 authentication
You can only enable SAML 2.0 authentication after at least one SAML 2.0 provider has been configured in the system.
- On the Authentication settings page, use the slider to toggle to the required position:
- Cross indicates off.
- Tick indicates on.
- Click OK to accept the confirmation message.
You can only disable SAML 2.0 authentication if there is at least one Hub administrator in the system who can sign in using one of the other authentication types. A check is carried out to identify whether there are any active administrator users configured to log in using any of the other enabled authentication types.
Once enabled, you can add individual SAML 2.0 users on the Add user page and they can log into Hub by using the Log in using <SAML 2.0 provider name> button. The name of the button will reflect the name of the SAML 2.0 provider as configured on the Authentication settings > Configure SAML 2.0 provider page, for example, Log in using Azure AD.
If SAML 2.0 users log out of their SAML 2.0 provider, they will be automatically logged out of Authentication Server if the SAML 2.0 provider supports federated sign-out. Otherwise, they will have to manually log out of Authentication Server. If they only log out of Authentication Server, they will not be automatically logged out of their SAML 2.0 provider.
Configure SAML 2.0 service and identity provider settings
You must configure both the SP/Authentication Server and IdP of your choice to enable SAML-based single sign-on (SSO) between them, so that the SP can rely on the IdP to authenticate users and provide their identity information.
-
On the Authentication settings page, click Configure under the SAML 2.0 section.
The Configure SAML 2.0 provider page displays.
-
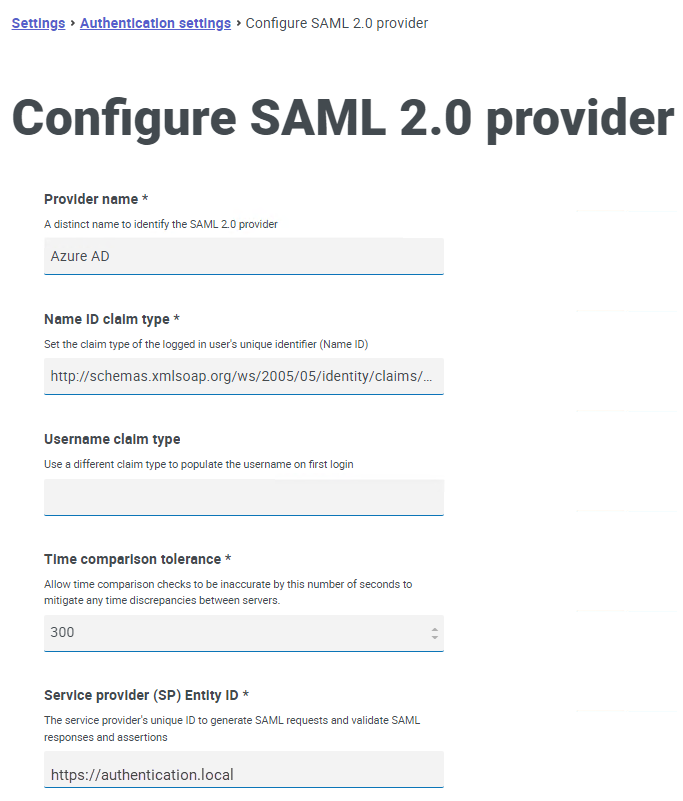
Complete the following fields:
- Provider name – Unique name that identifies the SAML 2.0 IdP. This is the name displayed on the Log in using <SAML 2.0 provider name> button, for example, Log in using Azure AD .
- Name ID claim type – Identifies the claim which contains the ID of the logged-in user to map the Authentication Server user to the external SAML identity. This is usually nameidentifier or emailaddress, for example, http://schemas.xmlsoap.org/ws/2005/05/identity/claims/nameidentifier.
- Username claim type – Populates the username on every login, for example, http://schemas.xmlsoap.org/ws/2005/05/identity/claims/username. This is optional and, if not populated, the Name ID claim type will be used.
- Time comparison tolerance – Specifies an allowed time difference (in seconds) between server and client.
-
Service provider (SP) Entity ID – Unique ID used to generate SAML requests and validate responses and assertions.

-
If you have a metadata endpoint URL you can use, click Fetch metadata. The IdP settings you have previously configured in your IdP of choice are automatically populated based on this URL. You must request the URL from your SAML 2.0 IdP. If you are not able to use a metadata endpoint URL, you can populate these fields manually based on your IdP's settings.
-
In the Metadata endpoint URL dialog, enter the URL and click Fetch metadata.
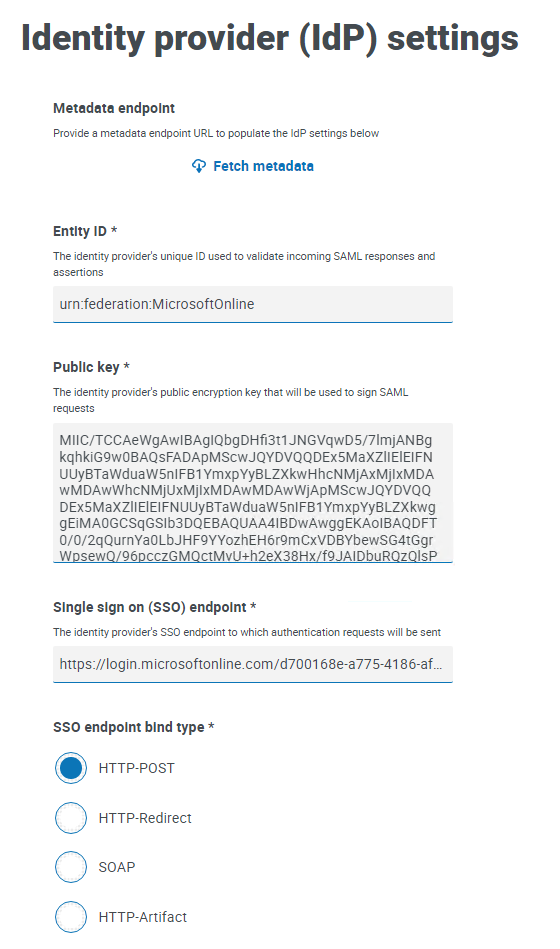
All the IdP settings below will be automatically populated:
- Entity ID – Used to validate incoming SAML responses and assertions.
- Public key – Used to sign SAML requests.
-
Single sign on (SSO) endpoint – Used by Authentication Server to redirect the user to the SAML 2.0 IdP for authentication. It is configured per provider in Hub.
-
SSO endpoint bind type – Available options are HTTP-POST, HTTP-Redirect, SOAP, and HTTP-Artifact. For more information, see SAML 2.0 bindings.
-
Click Save.
Additional configuration settings
After configuring the SAML 2.0 SP and IdP, you may need to perform additional steps such as testing the integration to ensure that the SAML 2.0 assertions are transmitted correctly, and that users can successfully authenticate and access the intended resources. In some cases, you may also need to set up additional attributes or mappings to provide the necessary claims.
The following additional claims must be configured in your SAML 2.0 IdP to integrate with the SP/Authentication Server:
|
Claim type |
Claim type format |
Configurable in Hub |
|---|---|---|
| http://schemas.xmlsoap.org/ws/2005/05/identity/claims/emailaddress | No | |
| First Name | http://schemas.xmlsoap.org/ws/2005/05/identity/claims/givenname | No |
| Last Name |
http://schemas.xmlsoap.org/ws/2005/05/identity/claims/surname |
No |
The following additional endpoint must be configured in your SAML 2.0 IdP to integrate with the SP/Authentication Server:
-
Assertion consumer service (ACS) endpoint – Used by the SAML 2.0 IdP to send a SAML 2.0 response to the Authentication Server after the user has been authenticated. It must be configured in the IdP for the Authentication Server client and is always in the format
https://<auth-server-base-address>/saml/acs, for example https://authentication.local/saml/acs.
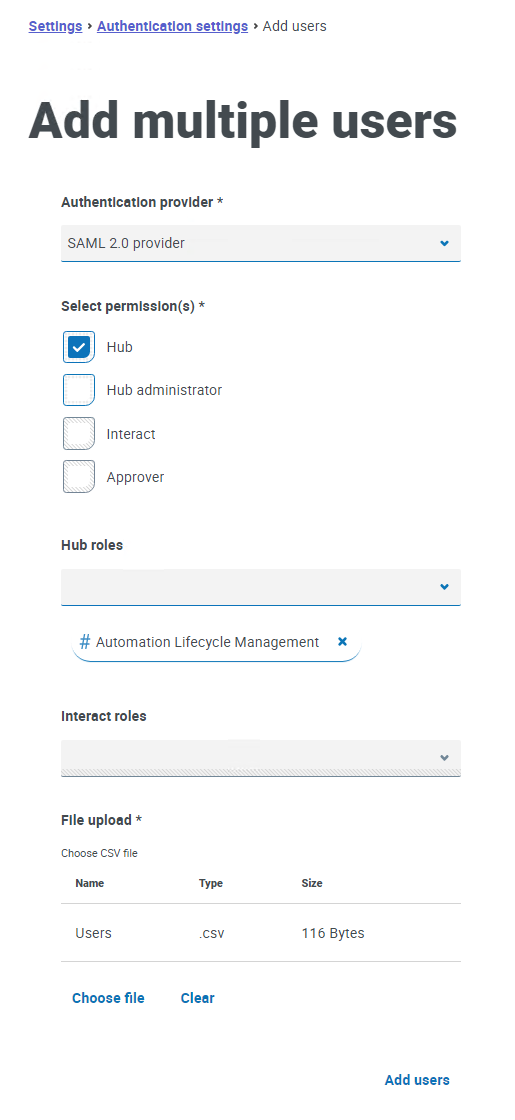
Add multiple SAML 2.0 users from a CSV file
-
On the Authentication settings page, click Add users.
The Add multiple users page displays.
-
In Authentication provider, select the SAML 2.0 provider for the users.
-
Select the permissions for the users:
- Hub – Select this check box for standard Hub users and administrators.
- Hub administrator – Select this check box to give administrator permissions to the user role. You must select Hub before this option becomes available.
- Interact – Select this check box to enable the user to be assigned Interact Forms. See the
- Approver – Select this check box to give approval rights for Interact to the user role. You must select Interact before this option becomes available.
-
Select the roles for the users:
-
Hub roles – Select the Hub roles required for the users. If the required role has not yet been created, you can edit the users at a later date to assign new roles.
-
Interact roles – Select the Interact roles required for the users. If the required role has not yet been created, you can edit the users at a later date to assign new roles. You can select more than one role.
-
-
Click Choose file to upload a CSV file containing all the users you want to add.
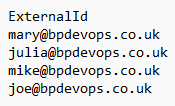
For SAML 2.0 users, the CSV file only requires the following field as column heading:
- ExternalId – A string value representing the unique identifier for the external user. This field is required for the import.
This example assumes that the Name ID claim type is set to use the user's email address:
It is recommended that the CSV file does not contain more than 1000 entries.
-
Once uploaded, the file displays under File upload. Click Clear if you want to remove the file and upload another one.
-
Click Add users.
A message displays the number of:
- Users successfully added.
- Existing users who were skipped (if applicable).
- Users who could not be added (if applicable).
All added users display on the Users page. You can only edit the users' existing permissions on the Users page, all other user details are read only.
Any users that have been created this way will have their own audit log entry.

Remove an existing SAML 2.0 provider and its associated users
-
On the Authentication settings page, click Remove.
A confirmation message displays.
-
Click Remove.
The SAML 2.0 provider is removed from the system and any associated users are retired.
