 Docs
Docs
Control Room – Schedule Manager
The Schedule Manager page lets you control, create, and modify all the schedules for your connected environment. These are the same schedules that you see in the Blue Prism interactive client Control Room.
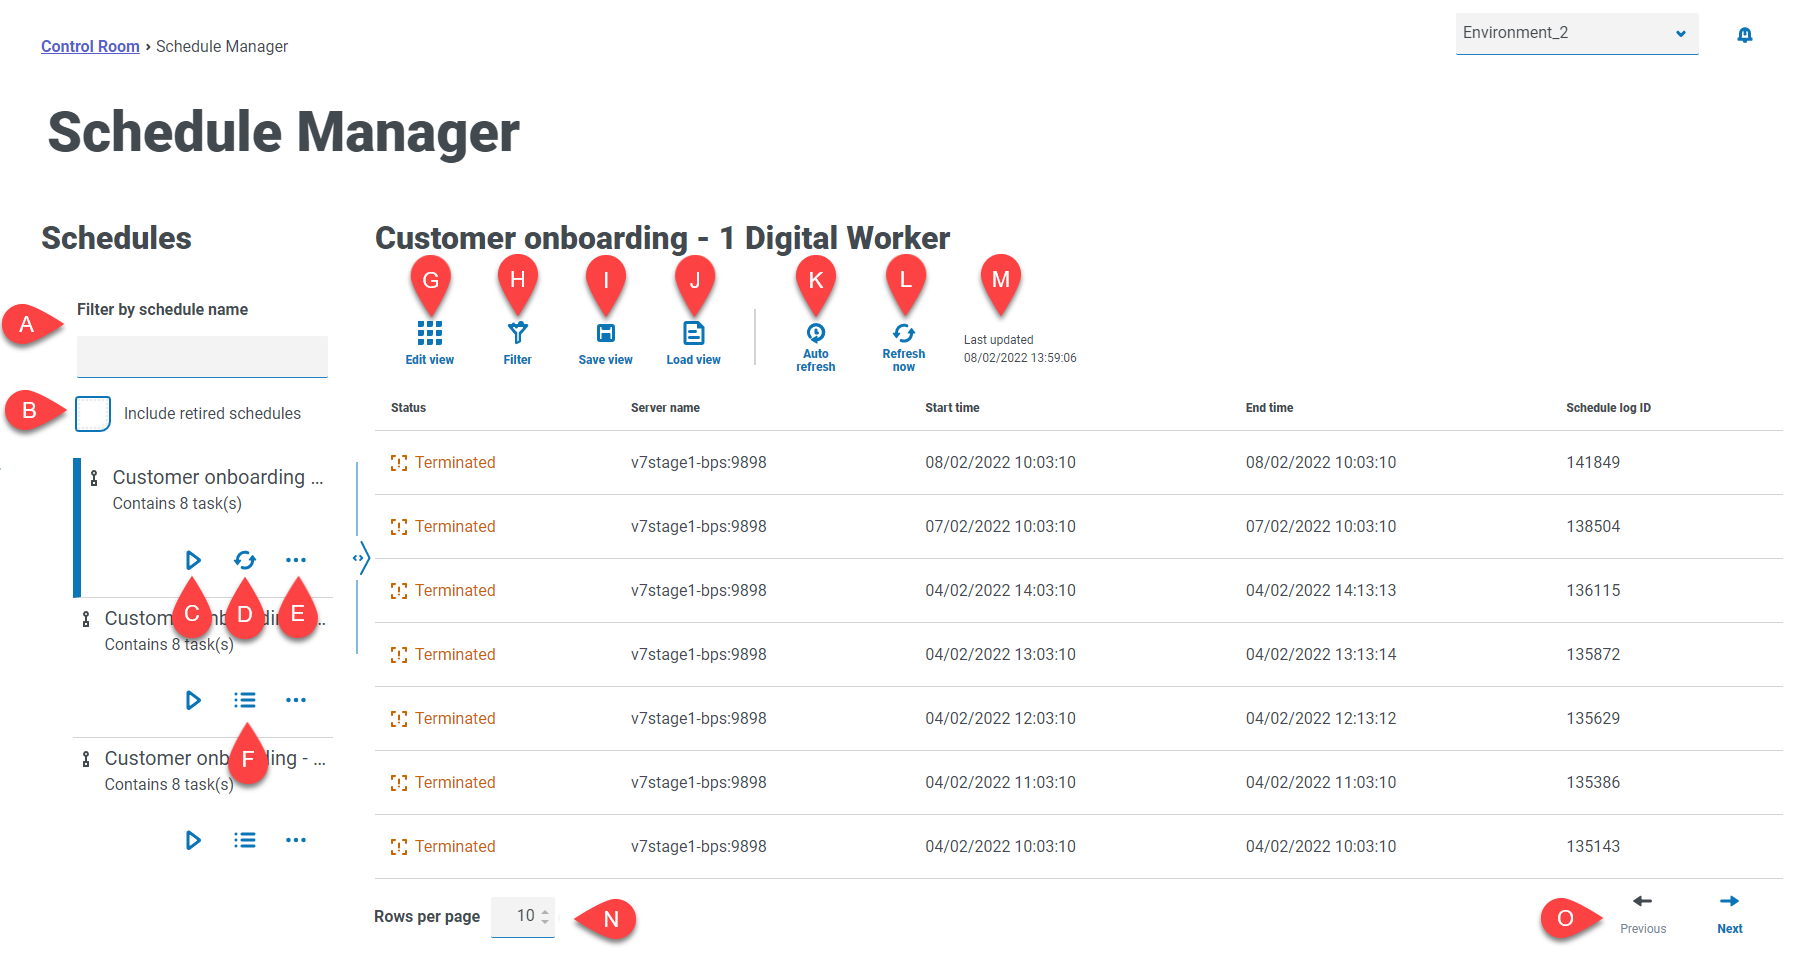
The Schedule Manager page consists of a schedule list, schedule actions, and schedule activity for the selected schedule. It provides you with the following information and functions:
Schedule list
-
Filter by schedule name – Search for specific schedules.
- Include retired schedules – Display retired schedules in the schedule list.
Schedule actions
- Run (play icon) – Run the selected schedule.
- Refresh (refresh icon) – Refresh the activity for the currently selected schedule. This icon replaces the schedule activity icon when a schedule is selected.
- Additional actions (ellipsis icon) – Perform additional actions on the schedule, such as, editing, deleting, cloning, and retiring.
- Schedule activity (line icon) – Display the schedule activity for the selected schedule in the pane to the right.
Schedule activity
- Edit view – Define the columns that are displayed. You can then show or hide the columns using the toggle switches. You can also change the grid to display in a compact format.
- Filter – Filter the information that is displayed. You can turn on the required filters and enter or select the appropriate information for display, for example, you could turn on the Status filter and select Completed.
-
Save view – Save your current column view. You can enter a name for your view to make it easily identifiable when loading views.
- Load view – Load a saved view. You can select the required view and click Apply.
- Auto refresh – Define how often the table contents will automatically refresh. By default it is disabled, but can be set to every minute, five minutes, 10 minutes, or 30 minutes.
- Refresh now – Refresh the table contents. If operating with auto refresh configured, using this option will reset the timer.
- Last updated – The date and time the table data was last refreshed.
-
Rows per page – Enter a number, or use the up and down arrows, to change the number of rows seen on a page.
- Previous and Next – Click Previous or Next to move through the pages of schedules.
Find a specific schedule
-
On the Schedules page, start typing in the Filter by schedule name field.
The list of schedules reduces to only those that match the text entered in the field.
-
To view all the schedules again, clear the text in the Filter by schedule name field.
Run a schedule
You can manually run a schedule rather than wait for it to be triggered at the scheduled time. Manually running the schedule does not impact the schedule that has been configured, it will still be triggered to run at the scheduled time.
If a schedule is already running, another run cannot be manually triggered.
-
On the Schedules page, click the run icon
 for the required schedule.
 A message displays asking you to confirm that you want to run the schedule now.
-
Click Run to run the schedule.
A message displays confirming the schedule is set to run.
View schedule activity
To view the activity for a specific schedule:
-
Click the schedule activity icon
 for the required schedule.
 The schedule activity is shown in the pane and the icon changes to a refresh icon.
-
If required, click the refresh icon
 to update the schedule activity.
Additional actions
You can perform additional tasks to manage your schedules by clicking on the ellipsis icon (...) on a schedule and selecting from the following actions:
The above actions will only display if you have the correct user permissions assigned to your account. For more details, see User permissions.
View details
To view schedule details:
-
Click the ellipsis icon (...) on the relevant schedule, and select View details.
The Details pane displays, containing the schedule's configuration details. You can also access the Edit schedule page by selecting the Edit button.
- Click Close drawer to return to the Schedule Manager.
Delete
To delete a schedule:
-
Click the ellipsis icon (...) on the relevant schedule, and select Delete.
A message displays containing the name of the schedule and asks you to confirm the action.
Once deleted, schedules cannot be restored.
-
Click Delete schedule.
Clone
To clone a schedule:
-
Click the ellipsis icon (...) on the relevant schedule, and select Clone.
The Clone schedule page displays, and is automatically populated with all details of the existing schedule.
-
Configure the details as required. As part of the cloning process, you can choose to retire the existing schedule by selecting the Would you like to retire <schedule name>? check box.
-
Click Save.
The Schedule Manager page displays, filtered by the cloned schedule name.
View tasks and sessions
To view a schedule's tasks and sessions:
-
Click the ellipsis icon (...) on the relevant schedule, and select View tasks and sessions.
The tasks and sessions pane displays, where you can view and add tasks and sessions.
-
To add a task, use the Add task button in the top right of the pane.
-
Use the arrow icon on a task to expand and view the task's sessions.
-
To add a session, click the ellipsis icon (...) on the relevant task and select Add session.
-
Click Close drawer to return to the Schedule Manager.
For more details on configuring tasks and sessions, see Tasks and sessions
Retire
To retire a schedule:
-
Click the ellipsis icon (...) on the relevant schedule, and select Retire.
A message displays containing the name of the schedule and asks you to confirm the action. Retired schedules can be restored, whereas deleted schedules are unrecoverable.
-
Click Retire.
The schedule is marked as retired on the schedule card, and will only display in the Schedules list if the Include retired schedules check box is enabled. To restore a schedule, click the ellipsis icon on the relevant schedule, and select Unretire.
Edit
To edit a schedule:
-
Click the ellipsis icon (...) on the relevant schedule, and select Edit.
The edit schedule page displays.
-
Configure any details as required.
-
Click Save.
For more details on configuring schedules, see Update schedule configuration
Stop
To stop a currently running schedule:
-
Click the ellipsis icon (...) on the relevant schedule, and select Stop.
A message displays containing the name of the schedule and asks you to confirm the action.
-
Click Yes, stop now.
Use the filters
The filters enable you to easily find schedule activity based on the selected criteria. Alternatively, click a column to sort in ascending or descending order based on the column value.
- On the Schedules Manager page, click Filter to open the Filter panel.
-
Use the toggle to turn on the required filter and complete the information to find the schedule. You can apply multiple filters at the same time.
The available filters are:
Filter
Description
Status
Select the status of the schedule from the following options:
- Completed – Displays schedules that have run successfully and completed.
- Terminated – Displays schedules that have terminated and not completed.
- Part exceptioned – Displays schedules where some tasks have resulted in exceptions.
- Running – Displays schedules that are currently running.
- Pending – Displays schedules that are due to run.
You can filter on more than one status at the same time.
Server name
Enter the full or partial name for the schedule server.
Start time
Select the required time period that the start time falls within from the drop‑down list. If you select A given range, enter the date range and times in the fields provided.
End time
Select the required time period that the end time falls within from the drop‑down list. If you select A given range, enter the date range and times in the fields provided.
The information on the Schedules Manager page is immediately filtered displaying any matches that contain the text you have entered.
If you have set the filters but want to view the unfiltered information again, either
- Click Close drawer to close the filter panel.
