Docs
DocsManaging forms
Version control
Forms are subject to version control to assist during development. Each time a form is saved, the minor version is incremented and annotated with the entered description for ease of identification.
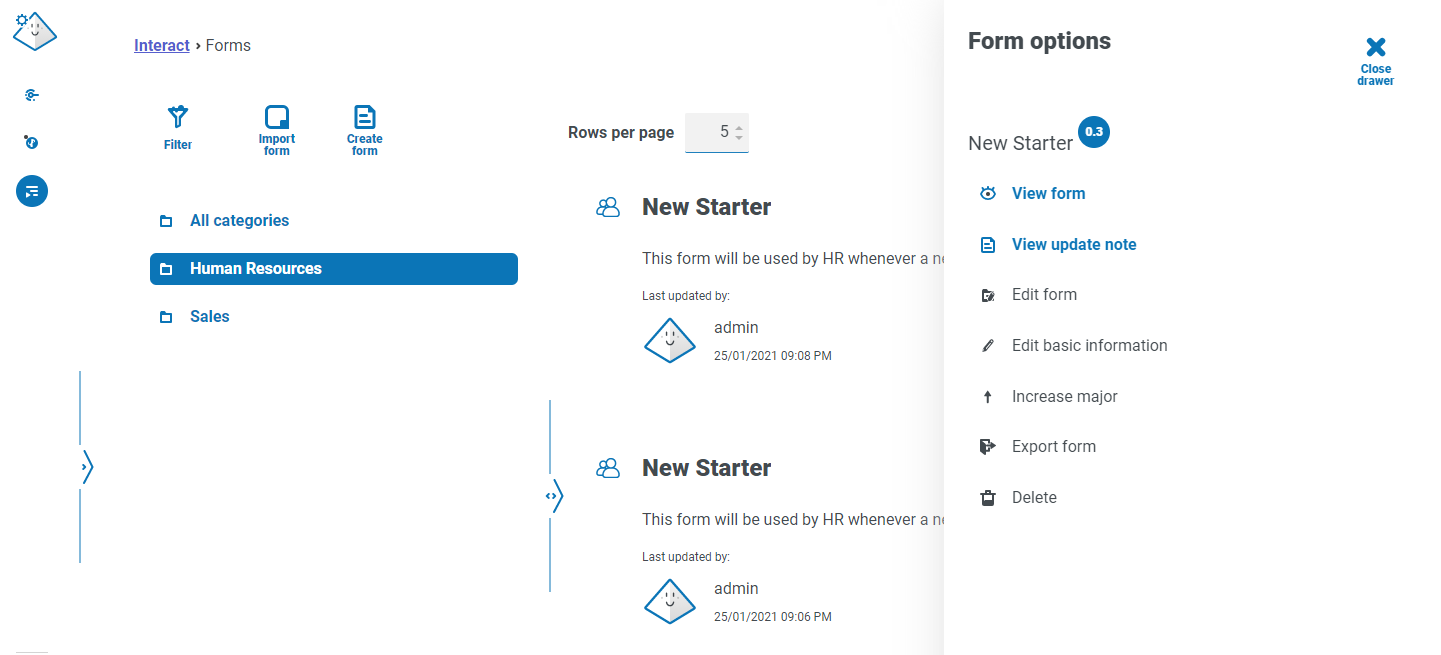
By default, the Latest filter is turned on and only the latest versions of each form display on the Forms page. Earlier versions are hidden to provide a clean view.
To view all the minor versions of a form:
- On the Interact Forms page, click Filter to display the filters.
-
Turn off the Latest filter.
All versions display.
-
If required, click Options on an earlier version of the form. From here you can select either to view the form or view the update note.
You can only access all the options from the latest version of the form. These are:
- View form – Displays the form and enables you to use Play test, but you cannot edit or make changes to the form.
- View update note – Displays the associated update note.
- Edit form – Allows you to continue editing the form.
- Edit basic information – Allows the basic details associated with the form to be updated.
- Increase major – Increases the form version to a major version.
- Export form – Exports the form in a BPFORM file format for importing into another system.
- Delete – Deletes the latest version of the form, reverting back to the previous version. You cannot delete the original version of the form.


Import a form
Forms that have been previously exported from this or another Interact system can be imported to save having to recreate forms that have already been developed.
Before you can import the form, you will need to have a business process available that does not have any forms already assigned to it.
-
On the Interact Forms page, click Import form.
If there are not any business processes available that do not have a form associated with them already, the Import form icon is not active. You will need to create a business process before you can import the form. You can only have one form associated with a business process. See the Automation Lifecycle Management User Guide for more details.
-
Navigate to, and select, the required exported form.
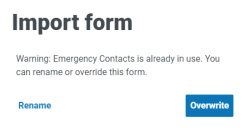
If the form:
-
Already exists in your Interact system, a message displays.
-
Doesn’t already exist, the Import form page displays.
-
- If required, select one of the following options:
- Overwrite – The Import form page displays. This has the same fields as Edit form page where a description, delivery method, default approval type, update note, category, and icon can be added.
Rename – The Import Form page displays. You must select the business process to which the form will be assigned, and enter a new name for the form.
-
If required, change the business process that the form is to be linked with.
- Click Import form to complete the import.

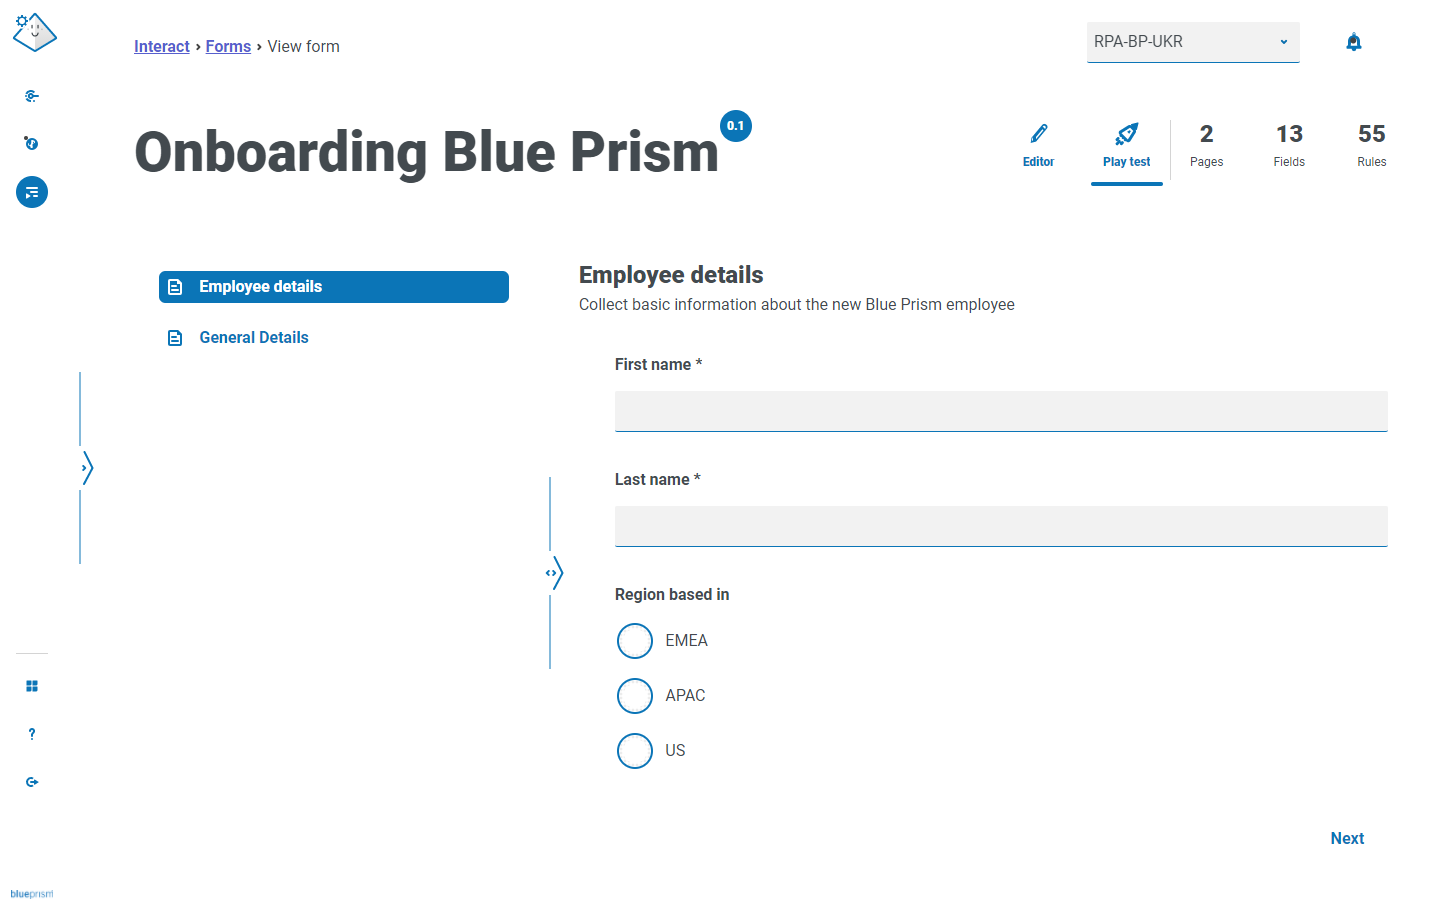
Test a form
You can use Play test when viewing or editing a form to test the fields and functionality, and view the form as it will look to an Interact user. It allows you to test and verify that any rules or field restrictions work as required.
To test a form:
- On the Interact Forms page, click Options for the required form, and then click either View form or Edit form.
- Click Play test.
The example below shows the Play test page for a multi-page form.
Key field
A key field provides an easy way to track and audit the data as it moves through your automation.
When creating your form, you can select one field to be identified as the key field using the key icon ![]() . The key icon is only available next to fields that are a Text field type or a Number field type. Once selected, a key will appear alongside the field name in the form, for example:
. The key icon is only available next to fields that are a Text field type or a Number field type. Once selected, a key will appear alongside the field name in the form, for example:

becomes

You can reassign which field is the key field by clicking on the key icon next to a different field. If you want to remove the use of a key field from the form entirely, you need to delete the field that the key is assigned to and recreate the field.
The key field can be used to track data from the form in Interact through to the processing of the data by work queues in Blue Prism:
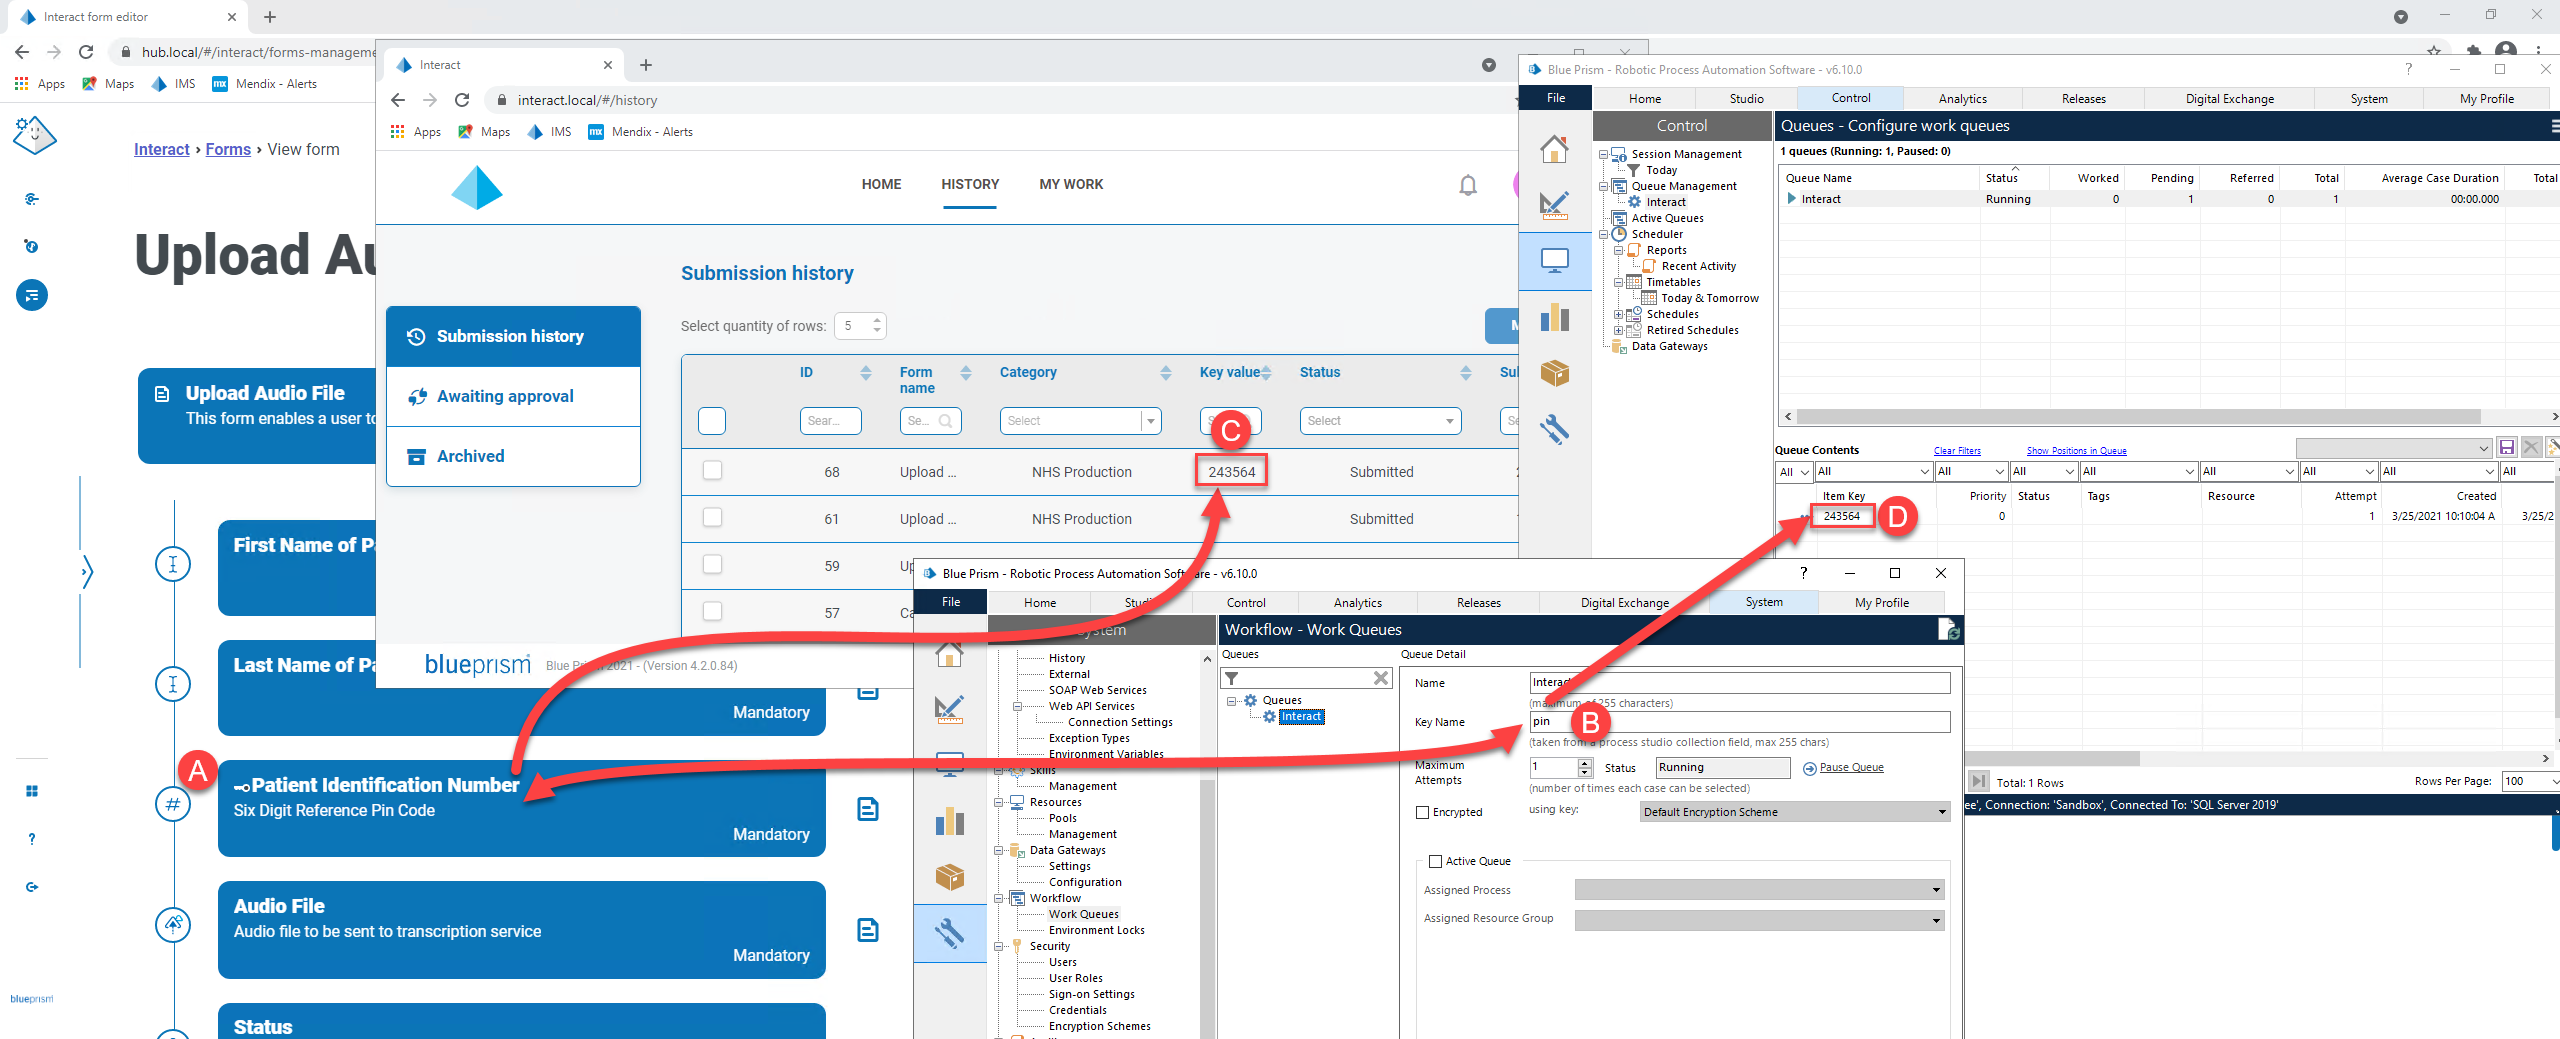
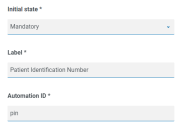
This example shows that:
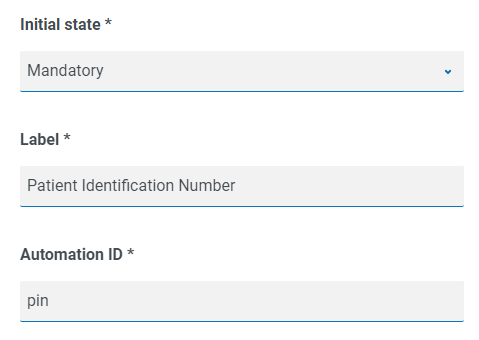
- A form has been created with a field called Patient Identification Number that has been set to be the key field.
-
In Blue Prism > System Manager > Workflow > Work Queues, a work queue can be configured to look for the key field information. In the Key Name field, enter the automation ID that was used when creating the form. In the example above, the automation ID is pin as the Patient Identification Number field was created as a Number type field with the following values:
It is important that the value entered in the Key Name field in Blue Prism matches the value entered in Automation ID for the form field.
- When users complete this form in Interact and submit the form, the value that they have entered in this field displays in the Key Value column on the Submission history page in Interact. If required, users can filter this column to look for particular values. For more information, see Interact user interface.
- The key value is displayed in the Blue Prism work queue as the information is processed.