 Docs
DocsEstablishing communication
This section of the help covers the integration elements that need to be in place for Interact to successfully send information to a Blue Prism queue, ready for processing.
To set up a process in Interact that inserts data to a queue, allowing an automation in Blue Prism to use the submitted data, there are several factors that need to be established for the data to be correctly passed from Interact to Blue Prism. To explain the configuration and the setup required to allow the interactions we will take you through an example process.
The example we are using is a Baseline Personnel Security Standard (BPSS) check that may be performed on a new starter for an organization. The checks we are performing are checking an Excel spreadsheet but this could be a call to an external database or another environment. The response once the information is collected is then passed, using the Interact API, to an individual for review – human/digital worker collaboration. The approver reviews the information and makes a decision whether to offer the person the position by either sending an acceptance letter or rejection letter. This is done through the same Interact process form where a flag is changed to open a new section of the Interact process form showing that the BPSS Check results have been completed.
Link to Blue Prism queues
Specify a queue in a process
A key factors to ensure communications are established, are in Interact processes. The main page of the example Interact process form is shown below.
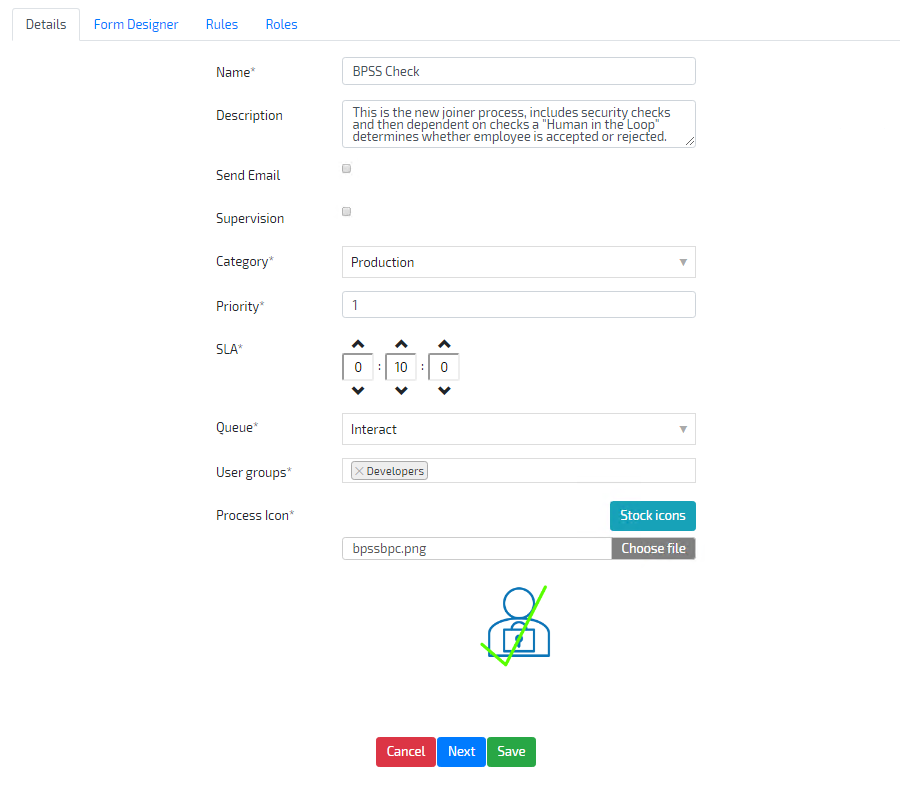
The Queue field must match the Blue Prism queue that is being used. This is where the data collected from the Interact process will be loaded into.
If the queue name is not in the dropdown then you will need to sync the queue data from Blue Prism.
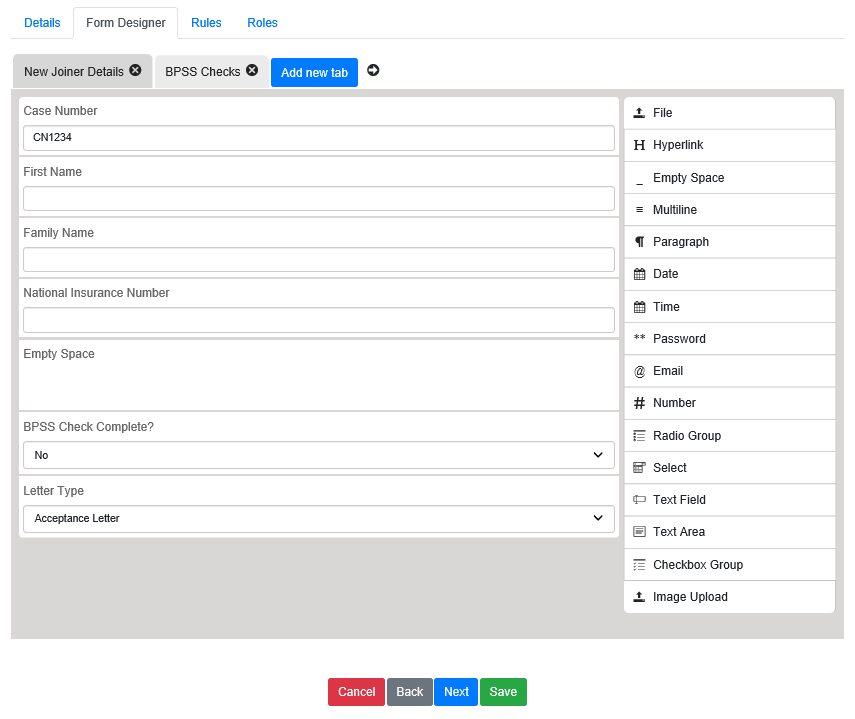
In the Form Designer tab of an Interact process, we have created all the fields that will be added to the queue in Blue Prism. There are two tabs being used in our process:
-
New Joiner Details – On this tab we have put a Case Number field that will allow us to enter a unique reference number if we wish. We then have entered the first name, last name and national insurance number fields for the potential new starter.

-
BPSS Checks – This is where the results of the BPSS check will be displayed. These include items such as the result for the right to work, identity check, whether there are any outstanding CCJs, whether they have a criminal record and whether their employment record is complete.


If we look in detail at the field elements, we can see the parameters associated with each element, the configuration provides the interaction with Blue Prism. The image below shows the First Name text element from the first tab. The key field is the Name field.

This is set to ‘first’ and is the name of the data item entry that will be used in Blue Prism. There are specific requirements for the names that are used to link between Interact and Blue Prism.
|
Element |
Element Type |
Name |
|---|---|---|
|
Case Number |
Text |
caseno |
|
First Name |
Text |
first |
|
Last Name |
Text |
last |
|
National Insurance Number |
Text |
nin |
|
BPSS Check Complete? |
Radio Group |
bpss |
|
Letter Type |
Select |
letter |
|
Right to Work |
Text |
rtw |
|
Identity Check |
Text |
Identity |
|
County Court Judgements |
Text |
ccj |
|
Criminal Record |
Text |
criminal |
|
Employment Record |
Text |
employment |
Field validation:
- The Name field will default to lowercase letters. In fact, if you put any uppercase letters in and go to another field or close the field designer, it will automatically change everything to lowercase.
-
Spaces and special characters are also not supported. If you want to use a space to make the field clearer use the hyphen (-). The table below lists the ‘names’ that have been assigned to the elements on the two tabs of the process form.
The two other parts that make up the Interact process are the Rules and Roles.
Roles is where we define whether the element fields are mandatory, optional, read-only or hidden. In the example below four fields on the first tab are mandatory:
- Case Number
- First Name
- Family Name
- National Insurance Number
These must be completed to enable the process form to be submitted.
The BPSS Check Complete? element is optional so the process form can be submitted without the field being completed. The Letter Type is set to Hide and the remaining elements are all set to read-only as they are element fields that will be updated by Blue Prism and we do not want a user to enter data here.


The hidden Letter Type field is controlled by a the rule below.
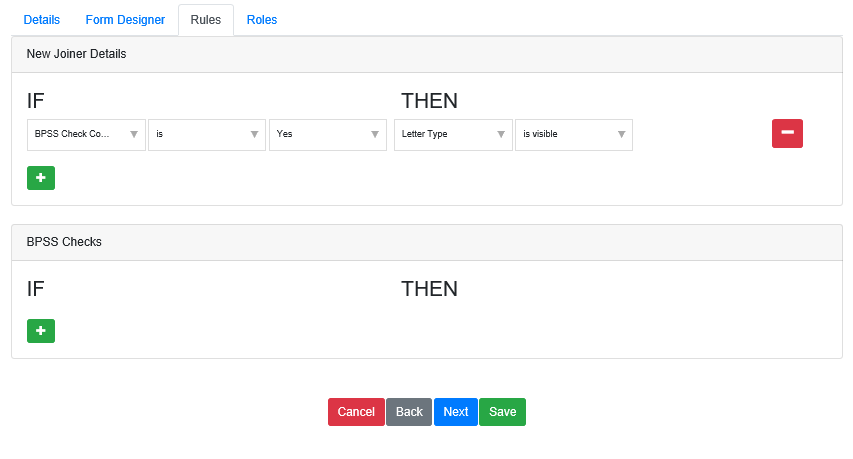
If the BPSS Check Complete? flag is set to Yes then the Letter Type field becomes visible, else when set to default value No, the field is invisible.
Sync queue data
If you create a new queue in Blue Prism for use with interact, Interact must be synchronized before it the queue can be selected for use. In our example we are using an existing queue called Interact, as shown in the System > Workflow - Work Queues settings in Blue Prism.

To synchronize the Blue Prism queues follow these steps as an administrator:
- In Interact, select Settings > Endpoint Settings from the main menu.
-
Click Sync to refresh the Blue Prism data in Interact and ensure the new queue is available in Interact. In the image below the queues have been synchronized and the Interact queue is available for use.


Submit a request to a Blue Prism queue
-
Log in to Interact.
The processes that have been assigned to you are displayed as determined by the assigned user groups and categories. In this example process, the user was allocated to a user group of Developers and a category of Production. If required, you can select a specific category to filter the process forms displayed.

-
Complete the process form. The second tab does not yet have any data as the automation has not yet been run.


-
Click Submit. The data is submitted to the work queue in Blue Prism and the main dashboard displays.
The request displays in the My Requests tab.

Double click a request to see the detailed view of a request.


Using Interact Data
Once added to the Blue Prism queue, information from Interact is accessed by the Get Next Item action using the Work Queues VBO.
It is recommended that no fields are added to the collection. This allows a level of flexibility and supports the use of additional inbuilt field names like the _requestId field which tracks the ID of the submission.
The example automation we will be running is illustrated in the following diagram.

In the drop-downs below, each tool in the example automation is examined.
Retrieves the information from the Interact queue and outputs the information into the Data collection. The properties of the action are illustrated in the next two images.
Inputs

Outputs

This is a simple Decision stage to check if there was an item in the queue for processing. A check is made whether there ‘Item ID’ Data Item is populated. If there is an ‘Item ID’ then the automation will continue if not, the process will end.

Is a Calculation stage to store the ‘_requestId’ extracted from Interact into a Data Item. This is needed for the Interact Controller to gather the JSON from Interact to allow values to be manipulated. The request ID is a the unique number that is assigned to the submission when the ‘Submit’ command is selected.

This is another decision stage that checks whether the BPSS flag is set to ‘Yes’ or ‘No’. This is set in the Interact process form and is pulled into the ‘Data’ collection when the information is gathered from the queue. By default, the flag is set to ‘No’ and when this option is chosen the automation proceeds down the gather data route where data is extracted from Microsoft Excel. If the choice is set to ‘Yes’ then the ‘Produce Correspondence’ path is selected and Microsoft Word launched.

There are a number of Data Items and Collections that are used throughout the automation. The important ones are detailed below.
Data Collection
This is the main collection that is populated when the information is pulled from the queue. There are no specified fields set in the collection.

Replacements Collection
This is where the information is stored after being extracted from Microsoft Excel. The format of this collection is important as it is used as an input for the Interact Controller, we will cover the Interact Controller object in more detail in the next section. The Replacement Collection has no fields defined, but these are set by the ‘Open and Extract Data’ page. The Collection on this page has two defined fields as illustrated below. However, the automation will add rows to the collection depending on how many items are being updated in the Interact process form.

Therefore, when the process is run a row is added to the collection, each with two fields one defining the name of the Interact element ‘name’ and the other with value that will be applied for that ‘name’ element.
The name that is entered into the Name field must match the name that was specified in the Interact process form, they are case sensitive so must be all lowercase and must not contain spaces.
This page is used to gather data and information for updating in Interact. In our example process we are pulling data from Microsoft Excel, though this could be any other application or system.
This page is used to write either an acceptance or rejection letter back to the candidate once the result of the BPSS check has been completed, this page calls Microsoft Word. Again, the page contents are not important this could be calling any other application or system but exists to demonstrate the ‘human/digital worker collaboration’ functionality.
The Mark Complete action stage utilizes the Work Queues Business Object to mark the item in the queue as complete once the processing has been completed.

