 Docs
DocsSchedules
A schedule represents the point of execution of a set of tasks. Each schedule is self-contained and contains various data, such as name and description, timing data and a set of tasks to perform.
When a schedule is executed, its initial task is executed first and the subsequent tasks to perform are determined based on the outcome of that task. Thus, the tasks within a schedule are executed serially.
A schedule cannot be executed concurrently with itself. For example, if a schedule starts at 12:00 GMT and is scheduled to run again at 13:00 GMT, if at 13:00 GMT the schedule is still running, it will not be executed again.
You can create schedules in the navigation panel in Control Room under the Scheduler node and configure their settings in the detail panel.
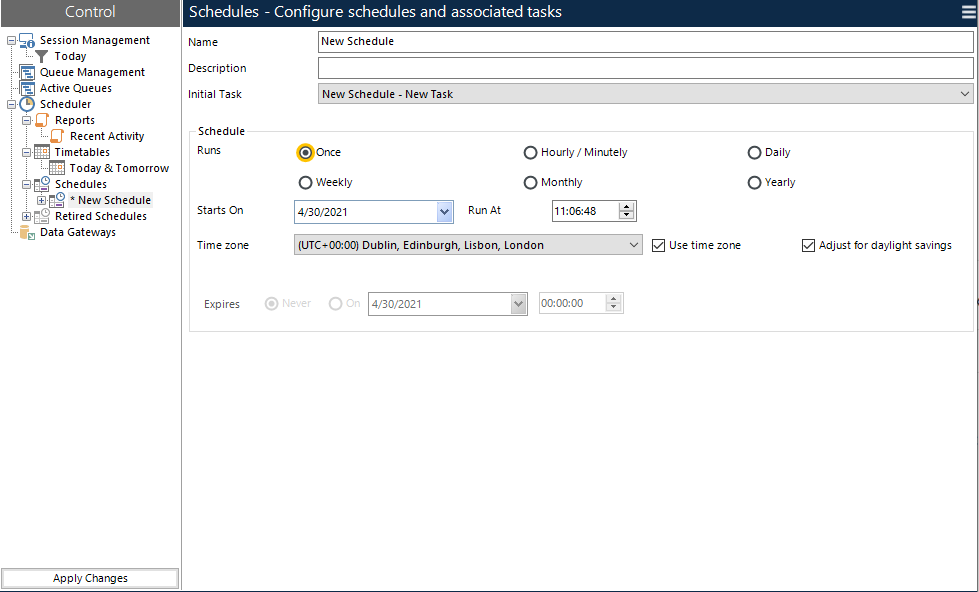
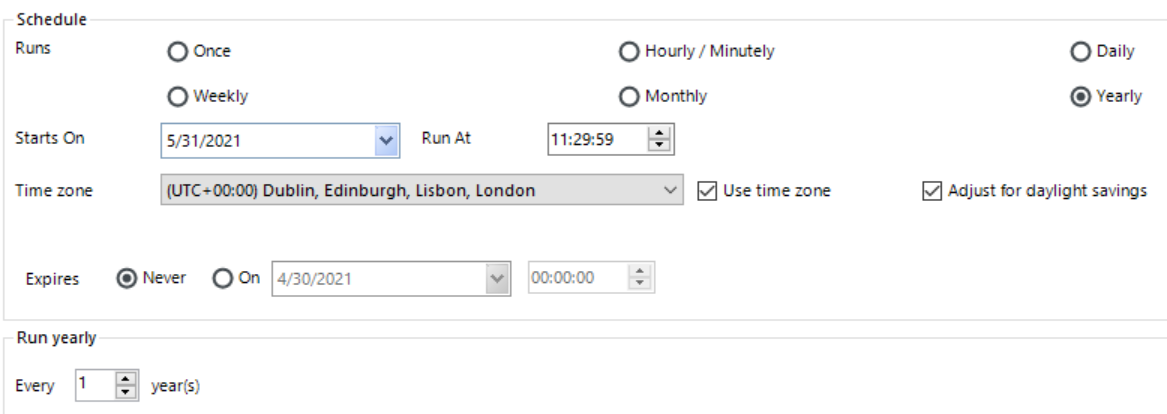
Schedules can be configured to execute from a particular date, repeating at various intervals and expiring on a particular date.
The time zone in which the schedule should be run can be selected from the drop-down list and will be applied when schedules are run.
The tasks which form the schedule's execution plan can be configured using the Tasks element.
Create a schedule
To create a schedule, right-click the Schedules element in the navigation panel and select New Schedule.
A new schedule populated with default values will be created and automatically selected in the detail panel. Update the schedule name and add a description if required.
Until the schedule is saved, it does not exist on the database and will not be executed by a running scheduler.
Configure a schedule
Running once
When a new schedule is created, it will have an automatically generated name and will initially be set to run once at the current date and time.
To create a schedule which just runs once at a specified date and time, enter the date in the Starts On field and the time in the Run At field.
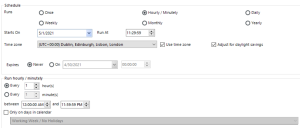
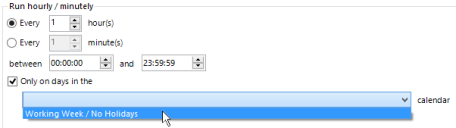
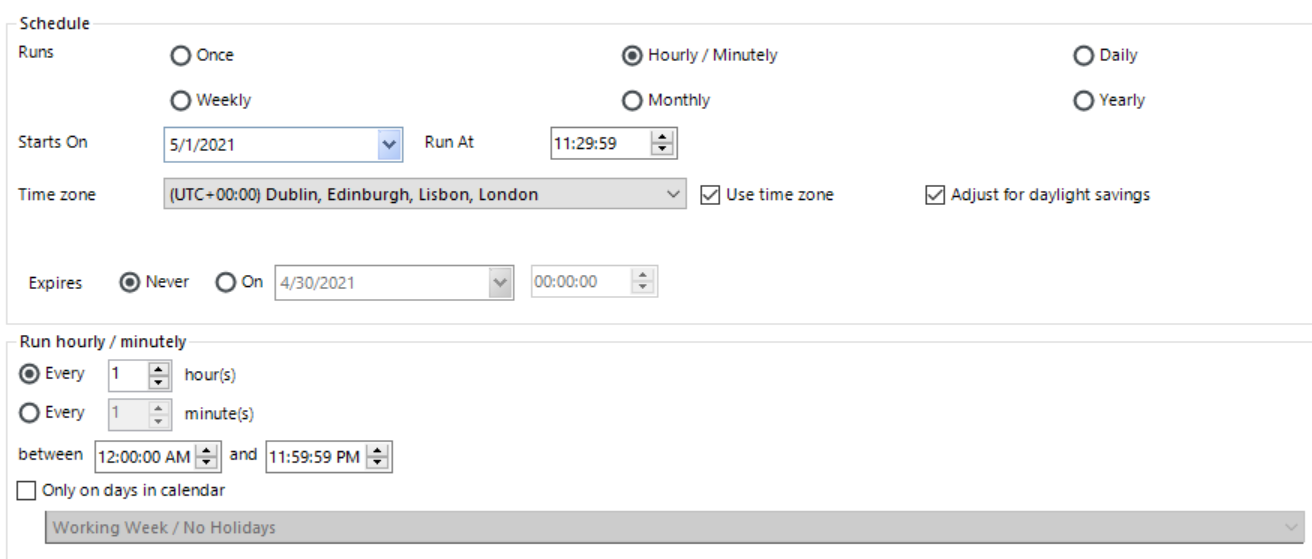
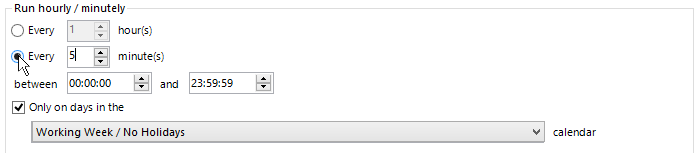
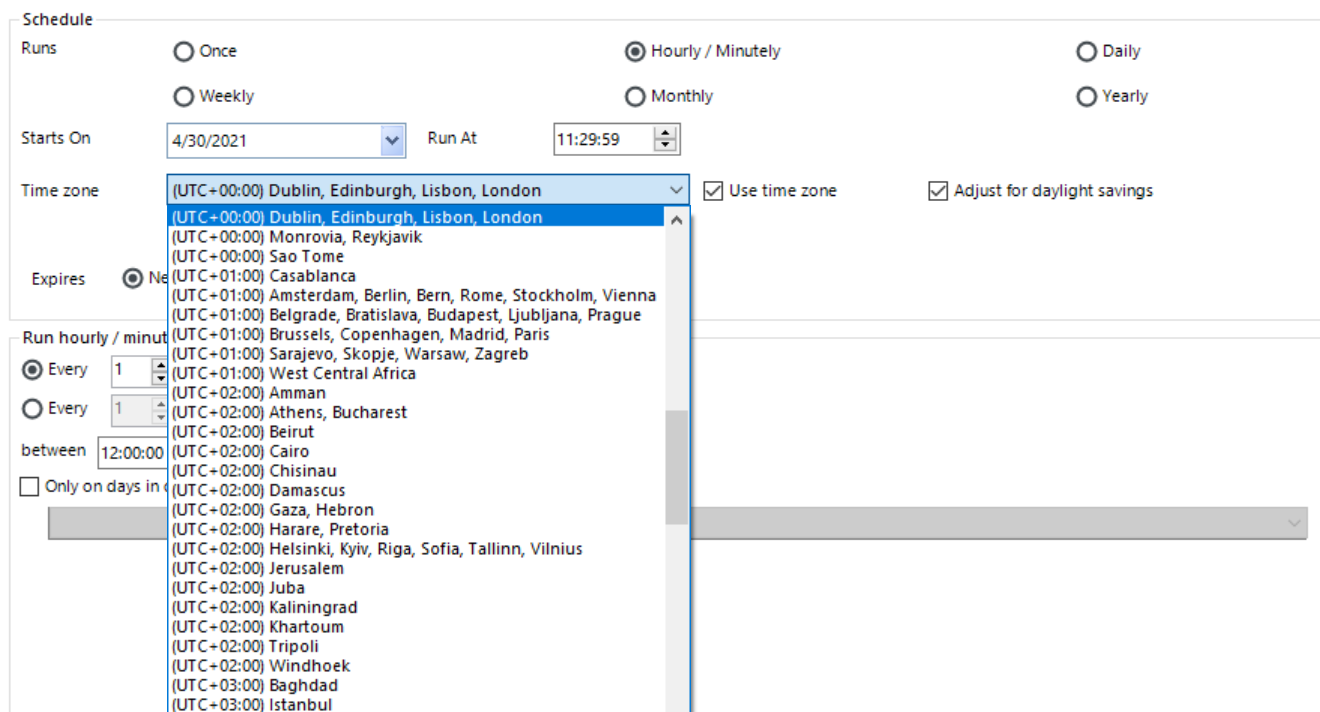
Running hourly
A schedule can be executed at hourly intervals which fall in between specified times.
To run a schedule hourly:
- Select the Hourly/Minutely option.
-
In the Run hourly/minutely section, select the first Every option and enter the number of hours.
You can configure it to run every hour, every 2 hours, and so on, up to a maximum of 999 hours.
By default, the schedule will run each interval it is due to run, but this can be further constrained by setting the times between which the schedule should be executed. Activation times outside those specified will not cause the schedule to execute.
-
Optionally, select Only on days in the calendar to configure the schedule to run hourly on work days as defined in a predefined calendar. Select the required calendar from the drop-down list.
-
Click Apply Changes to save your changes.

Running minutely
The configuration of a schedule running at minute intervals is similar to that of a schedule running at hour intervals with the difference that you have to select the second Every option and enter the number of minutes.
To set the schedule to run at times which fall in between specified boundaries, for example, only at night or only during working hours, select the Only on days in the calendar option.
Running daily
A schedule can be executed at daily intervals or on working days specified in a predefined calendar.
To run a schedule daily:
- Select the Daily option.
-
In the Run daily section, select Every option and enter the number of days.
You can configure the schedule to run every day, every 2 days, and so on, up to a maximum of 999 days.
-
Optionally, select Only on days in the calendar and set the schedule to only run on working days specified in that calendar.
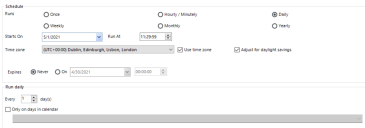
For more details, see Calendars.
Running weekly
A schedule can be executed at weekly intervals on the same day as the start date, or on the first/last working day according to a specified calendar.
To run a schedule weekly, select the Weekly option. You can configure it to run every week, every 2 weeks, and so on, up to a maximum of 999 weeks.
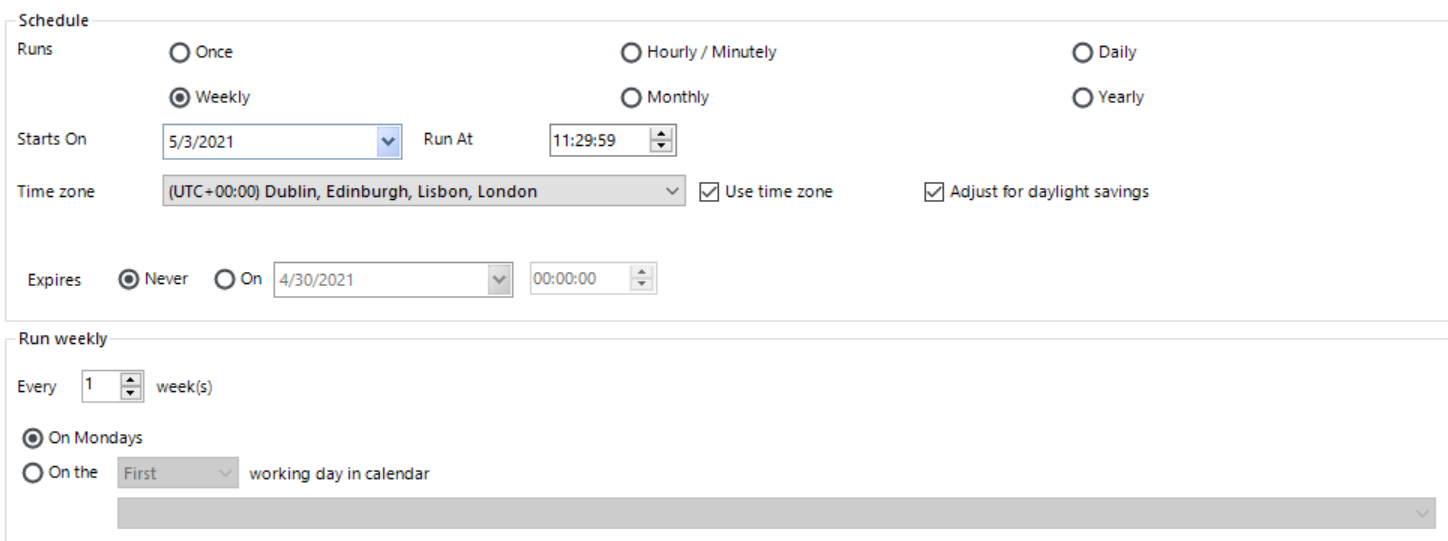
By default, the schedule will run every week on the same day as the start date. This can be modified to run on the first or last working day of the week as specified in the calendar.

By selecting the On the [nth] working day in calendar option, selecting whether the schedule should run on the first or last working day, and specifying the calendar, the schedule can be configured to run on the first or last working day of the week.
Internally, the first day of the week is considered to be Monday, so if, for example, a calendar is configured to work from Sunday to Friday, Monday will be considered the first working day and Sunday will be considered the last working day of any given week (other holidays aside).
For more details, see Calendars.
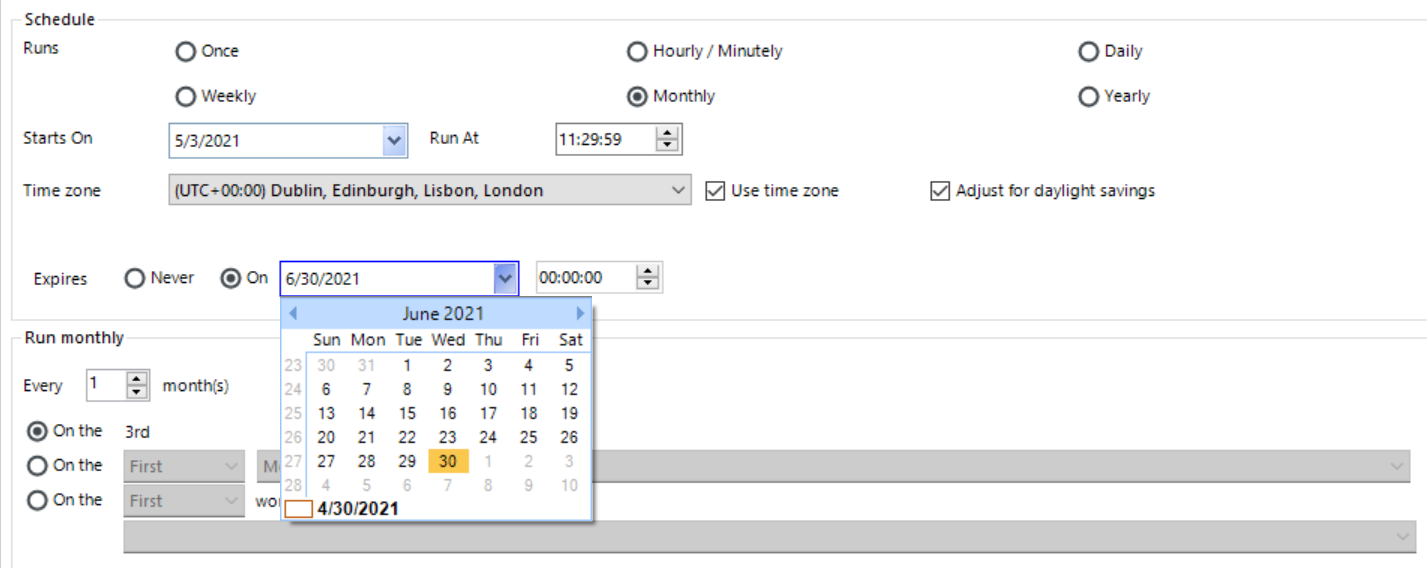
Running monthly
A schedule can be executed at monthly intervals on the same date as the start date (or the last day of the month or first day of the subsequent month if that date doesn't exist, for example, 31st February), or on the first, second, third, fourth, fifth or last specified weekday of the month (for example, first Thursday, third Thursday, last Friday), or on the first or last working day according to a specified calendar.
To run a schedule monthly, select the Monthly option. You can configure it to run every month, every 2 months, and so on, up to a maximum of 999 months.

By default, the schedule will run every month on the same date as the start date, skipping any months in which the date doesn't exist.
Instead of skipping, the schedule can be configured to run on the last day of the month, or the first day of the following month if the configured date doesn't exist for a particular month. This can be set by selecting the appropriate value from the adjacent drop- down.
Alternatively, the schedule can be configured to run every month on a counted occurrence of a weekday within the month, for example, first Friday, last Wednesday, and so on.

This is activated by selecting the On the [nth] [weekday] of the month option and selecting the following:
-
Which occurrence of the day it should run on : First, Second, Third, Fourth, Fifth or Last.
If the specified occurrence doesn't occur in a month, it is skipped for that month, for example, if the Fifth Thursday was selected and a month occurred with only four Thursdays in it, the schedule would not execute in that month.
- Which weekday it should run on.
The schedule can also be configured to run every month on the first or last working day of the month, according to a specified calendar.
This is activated by selecting the On the [nth] working day in calendar option, and selecting the following:
- Whether the schedule should run on the first or last day of the month according to the calendar.
- Which calendar should be used to determine the working days.
![on [nth] working day](Graphics/schedule-monthly-nthworkingday.png)
For more details, see Calendars.
Running yearly
A schedule can be executed at yearly intervals on the same date as the start date, skipping any years in which that date doesn't exist, for example, if configured to run on 29th February starting in a leap year, this will skip each year until the next leap year.
To run a schedule yearly, select the Yearly option. You can configure it to run every year, every 2 years, and so on, up to a maximum of 999 years.
Set a time zone
The Use time zone option is enabled by default when creating a schedule in Control Room. You can select the required time zone from the drop-down list and it will be applied when the schedule is run.
If the Use time zone option is disabled, the schedule will use the time zone of the application server on which the scheduler is operating.
Select the Adjust for daylight savings option if you want the schedule to automatically update to reflect daylight savings changes in the selected time zone.
This video demonstrates how to adjust time zones in the Blue Prism scheduler.
Set an expiry date
By default, when a schedule is configured to execute at regular intervals, the schedule is set to never expire.
You can specify an expiry date and time which will cause the schedule to stop being executed on or after the specified date/time.
To specify an expiry date and time, select the On option and the required date and time in the Expires section.
Set an initial task to execute

When a schedule is first created, a blank task is also created and set as the initial task to execute when the schedule is activated.
If an alternative is required, the Initial Task drop-down can be used to select the task which should be the first one executed.
For more details, see Tasks.
Trigger a schedule
You can trigger a schedule, regardless of its timing data, by right-clicking it and selecting Run Now. This will cause a marker to be written to the database which the scheduler will pick up the next time it checks for changes.
The scheduler checks for changes to schedule data every 30 seconds, so the schedule should execute within no more than 30 seconds, assuming that a scheduler is running on the same database that the Blue Prism interactive client is connected to.
The Run Now option triggers a schedule immediately regardless of whether the schedule has been configured to run in a specific time zone or not.
Stop a schedule
To stop a schedule from running, right-click it and select Stop. Any active sessions created by the schedule that are running will be terminated and the current instance of the schedule will be stopped, preventing any further associated tasks from being performed.
Save a schedule
A changed schedule can be saved by right-clicking it and selecting Save. The tasks within the schedule are checked to see if the schedule could enter into an infinite loop. If it can, a warning message displays. Click Yes to continue and save the schedule, or click No and amend the schedule.
Alternatively, by clicking Apply Changes, all changed schedules, reports, and timetables will be saved.
By default, if the Execute missed schedules from the past option has been enabled in System > System - Scheduler, updated schedules will run immediately when saved using the Apply Changes button if the start date and time of the schedules falls within the setting range. This is more likely to occur when creating a new schedule, because the start date and time are set to the user’s current date and time. If a schedule should not run immediately when updated, it is recommended to set the start date and time of the schedule in the future before saving it. This applies to new, amended, or unretired schedules.
Clone a schedule
You can copy a schedule by right-clicking it and selecting Clone.
A schedule is created with the same timing data, tasks, and sessions as the initial schedule.
The newly cloned schedule will not be saved to the database until it is explicitly saved, either by right-clicking and selecting Save, or by clicking Apply Changes at the bottom of the navigation panel.
Remove a schedule
Schedules can be removed in one of two ways – by retiring or deleting them. Retired schedules can be restored, whereas deleted schedules are unrecoverable.
Removed schedules, regardless of the method of removal, will not be executed by the scheduler and will not show up in any reports or timetables.
Retire a schedule
You can deactivate a schedule by right-clicking it and selecting Retire. The schedule will be moved into the Retired Schedules node of the left-hand side pane.
The action of retiring a schedule is executed immediately – it does not need to be saved separately.

By default, if the Execute missed schedules from the past option has been enabled in System > System - Scheduler, a retired schedule will run immediately when restored if the start date and time of the schedule falls within the setting range. If a retired schedule should not run immediately when restored, it is recommended to set the start date and time of the schedule in the future before retiring it.
Retired schedules can be selected in the navigation panel, and their settings can be viewed in the detail panel, but not edited from there.
Restore retired schedules
You can restore a retired schedule by right-clicking it and selecting Unretire. This action happens immediately and does not need to be saved separately.
As soon as a schedule is restored, it is eligible to be activated by a running scheduler.
By default, if the Execute missed schedules from the past option has been enabled in System > System - Scheduler, a retired schedule will run immediately when restored if the start date and time of the schedule falls within the setting range. If a retired schedule should not run immediately when restored, it is recommended to set the start date and time of the schedule in the future before retiring it.
Delete a schedule
You can delete a schedule by right-clicking it and selecting Delete.
This fully deletes the schedule if it has not been executed by the scheduler. Otherwise, the data remains on the database for auditing purposes, but it can no longer be referenced by the application user interface or the scheduler.
Configure schedule alerts
It is possible to configure alerts to be sent at specified stages of a schedules execution. For details on how to configure schedule alerts, see Process alert configuration.
