 Docs
DocsSchedule manager
The Scheduler configuration is located in a tab within Control Room, and it provides a central point for configuring the Blue Prism Scheduler and its related reports and forecasts.
It will be available only if the current logged in user has sufficient user rights to be able to, at least, view schedules.
It primarily consists of two panes. A tree on the left is used to select, create and delete the reports, timetables and schedules, and the panel on the right allows viewing and configuration of the details of the selected element.
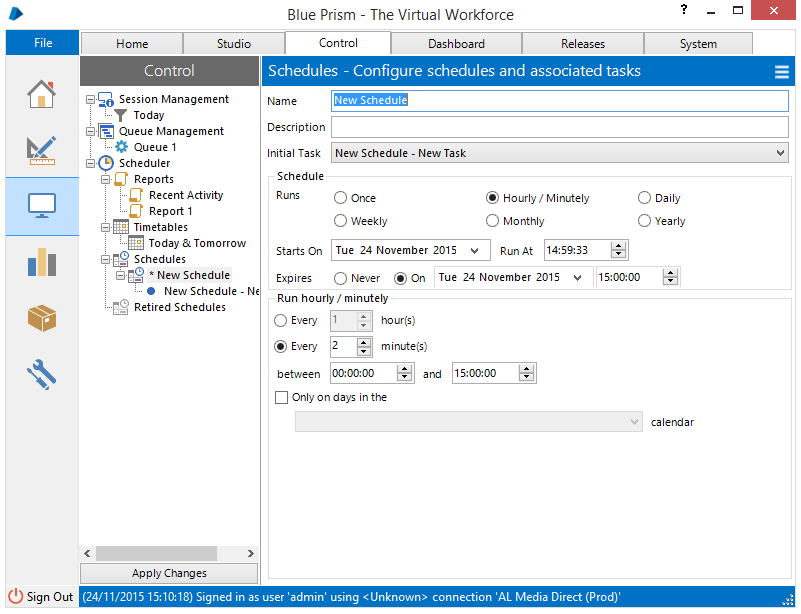
Scheduler tree
The tree is divided into 3 groups:
-
Reports provide a mechanism for viewing scheduler activity for specified schedules over a given date range. Multiple reports can be saved and recalled by selecting them in the scheduler tree.
To create a new report, the 'Reports' node in the tree must be right-clicked and "New Report" chosen from the subsequently displayed context menu. The ability to save or delete a report is available from the context menu when a specific report node is right-clicked.
The diary, displayed when the 'Reports' node in the schedule manager tree is selected, shows all reports for today and the previous seven days for all active schedules. Clicking on an entry will open the schedule which the entry represents. Future times / dates are greyed out, indicating that there will be no report data for those times.
-
Timetables are used to predict which schedules will run when according to their current configuration. Again, bespoke timetables can be configured to be viewed later by selection in the tree.
To create a new timetable, the 'Timetables' node in the tree should be right-clicked and "New Timetable" chosen from the context menu. To save or delete a timetable, the options are available on the context menu when a specific timetable node is right-clicked.
The diary, displayed when the 'Timetables' node in the schedule manager tree is selected, shows all scheduled instances of a schedule for today and for the next 6 days. Clicking on an entry in the diary will open the schedule which the entry represents. Weekdays between 9am and 5pm are highlighted, and weekends are slightly greyed in order to highlight the 5 day working week.
-
Schedules and their underlying tasks and sessions are configured below the Schedules element.
A new schedule and its initial task are created when Blue Prism is installed – this schedule is empty and will never run until it is edited and saved to the database.
A new schedule can be created by right-clicking on the 'Schedules' node in the tree and selecting "New Schedule". Likewise, a new task can be created by right-clicking on the relevant schedule and choosing "New Task". A context menu is available by right-clicking on the specific schedule and task nodes which allows a schedule to be saved or deleted, or a task to be deleted.
Schedules are made up of tasks which are also selectable in the tree, but cannot exist without a parent schedule.
The diary, displayed when the 'Schedules' node in the schedule manager tree is selected, shows a report of all active schedules from the previous three days up until the current hour, and a timetable of upcoming schedules for the rest of today and for the next 3 days in the future. The highlighting of the cells indicates the distinction between the report and timetable areas of the diary.
-
Retired schedules
When you retire a schedule it is de-activated and removed from any reports or timetables.
The schedule data itself is stored in the 'Retired Schedules' group, from where it can be restored (by right-clicking and choosing 'Unretire') or fully deleted (by right-clicking and choosing 'Delete').
A retired schedule cannot be modified without restoring it first, but all fields are readable and navigable from this group.
There is no diary element visible when the retired schedules node is selected.
If any data is changed within the scheduler, the appropriate element in the tree is prefixed with an asterisk to indicate that unsaved data exists for that element.
Schedule diary
When a group node is selected, a schedule diary may be displayed – the data shown in the diary will vary depending on which node has been selected.
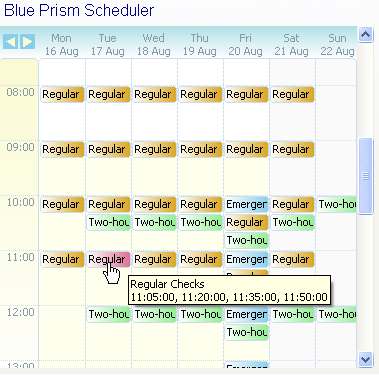
The diary shows a seven day view of schedule instances; reports of schedule instances which have run in the past, timetables of upcoming schedule instances or a combination of both.
The dates are shown along the top and times are shown on the left.
When a diary entry is hovered over, the exact time(s) of the schedules within that hour are displayed in a tooltip.
When a diary entry is clicked, the schedule that it refers to is opened in the schedule manager.
The left / right arrows in the top left of the diary can be used to go back or forward seven days using the current view.
The height of the hours can be modified by dragging a dividing line up (to reduce the height of the hours) or down (to increase the height). Double-clicking on a dividing line will set the height to be just large enough to view the largest number of entries within the currently displayed dates.
Apply changes
Immediately below the tree is the 'Apply Changes' button which, when clicked, will save all changes made in the Scheduler to the database.
Detail panel
When an element is selected in the tree, the relevant detail panel is displayed on the right hand side of the schedule manager. This allows the schedules, timetables and reports to be viewed and configured.
