 Docs
DocsStandalone deployment
Prior to following this guidance, ensure that you have fully considered the information in Preparation.
An overview of the steps typically required to complete a standalone deployment are provided below.

If problems are experienced whilst installing, review Troubleshooting an installation.
Steps
Run the appropriate installer depending on whether you wish to use the 32-bit or 64-bit installer.
- 32-bit Installer: BluePrismx.x.nn_x86.msi
- 64-bit Installer: BluePrismx.x.nn_x64.msi
Installers are available from the Blue Prism Portal.
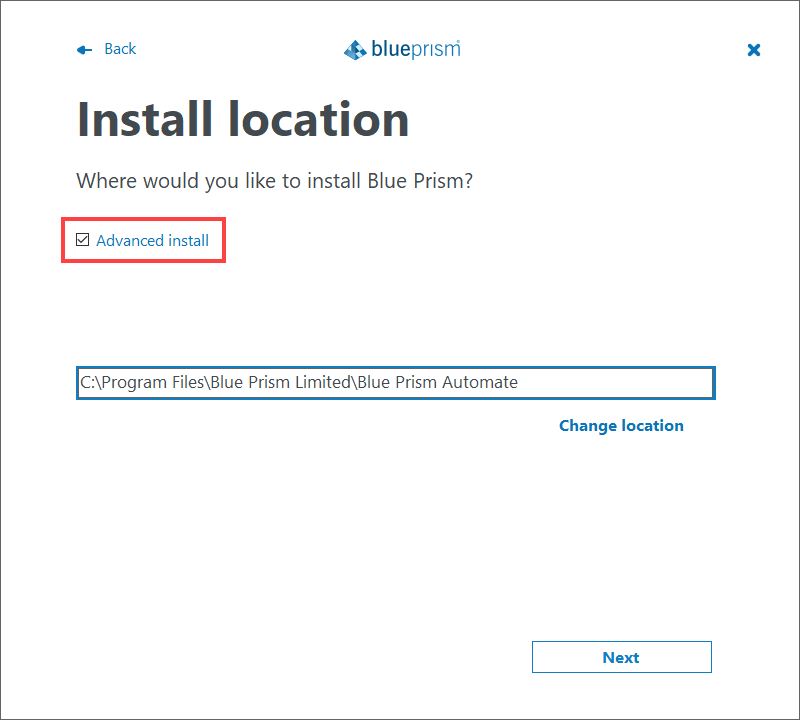
Advanced install options
The following additional components are available during a Blue Prism installation if the Advanced install check box is enabled on the Install location screen:
- Outlook automation – Required on devices where the Blue Prism MS Outlook Email VBO will be executed.
- Google Sheets automation – Required on devices where the Blue Prism Google Sheets VBO will be executed
- Chrome browser extension – Required on devices that will be used to automate Chrome.
- Firefox browser extension – Required on devices that will be used to automate Firefox.
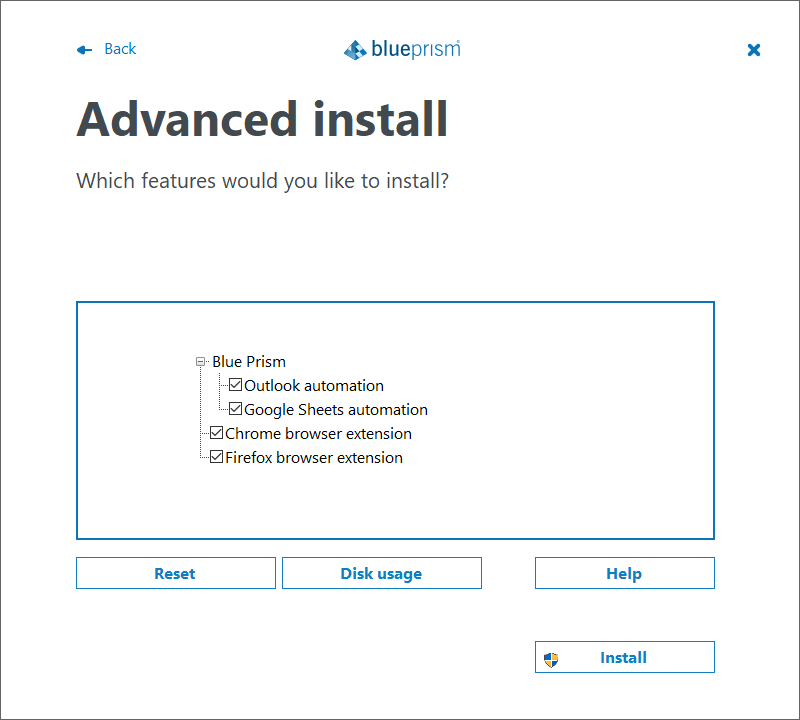
All components are installed by default unless they are deselected before proceeding with the installation.
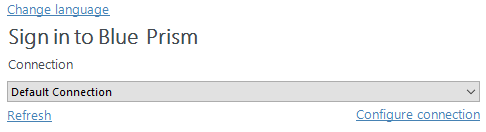
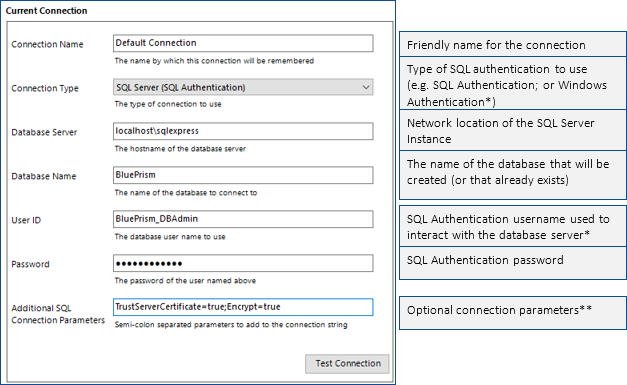
When Blue Prism is launched for the first time it is necessary to define a connection to the SQL Server instance where the database is, or will be, hosted.
-
Click Configure connection. This will open the Connection Configuration dialog where you can provide the connection information.
-
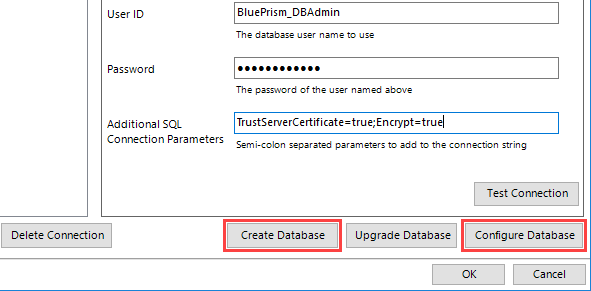
Specify the name for this connection, and the settings required to connect to the SQL Server instance.
The name of the intended database will also be specified on this screen. This is the name that will be used to create a new database; or it can be the name of an existing database.
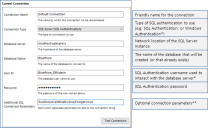
*If the Connection type applies Windows Authentication, the context of the user currently logged into the device will be used to authenticate against the SQL Server. Where possible Windows Authentication (rather than SQL Authentication) should be used.
- SQL Authentication – Connection Name (must be unique), Database Server, Database Name, User ID
- Windows Authentication – Connection Name (must be unique), Database Server, Database Name
- Availability Group (SQL Authentication) – Connection Name (must be unique), Database Server, Database Name, User ID
- Availability Group (Windows Authentication) – Connection Name (must be unique), Database Server, Database Name
** Can be left blank. Populate if there is a requirement to add custom SQL Connection Parameters such as: encrypt=true; trustservercertificate=true.
See SQL Server Connection Properties information provided by Microsoft for a list of available values.
If connecting to Microsoft SQL Azure, the database must be pre-existing, and the connection details provided within the Azure database configuration area should be used. Example settings (ADO.NET) are provided below:
Connection Type
SQL Server (SQL Authentication)
Database Server:
e12n3456.database.windows.net,1433
Database Name:
BluePrism
User ID:
authUser@e12n3456
Password:
*********
-
Click Test Connection to establish if a connection can be established with the SQL Server.
As the database does not yet exist we expect to be presented with a meaningful error.
Expected Responses
Database 'Blue Prism' does not exist.
This does not appear to be a valid Blue Prism database.
The database needs configuring before it can be used.
Indicates that a successful connection was established with the server, but that the database does not yet exist.
Indicates that a successful connection was established with the server, but that it cannot be verified as a Blue Prism database. This would typically be the case where the database has been manually created but has not had the Blue Prism schema applied.
Indicates that a successful connection was established with the server, and that a Blue Prism database has been found, but that some further configuration is required.
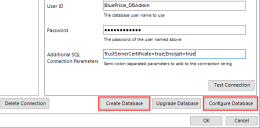
Click OK to clear the message and then click Create Database.
Click OK to clear the message and then click Configure Database.
Proceed to the next step for further instructions.
Alternative Responses
Database Valid
Unable to determine whether database exists – A network-related or instance-specific error occurred whilst establishing a connection to SQL Server. The server was not found or was not accessible. Verify that the instance name is correct and that SQL Server is configured to allow remote connections. (provider: Named Pipes Provider, error: 40 – Could not open a connection to SQL Server)
Indicates that a successful connection was established with the server and the database.
Actions to Create or Configure the database can be bypassed.
Indicates that an error occurred establishing a connection with the SQL Server. Check that the details for the SQL Server instance are correct, and refer to the Troubleshooting an installation.
There are three stages involved in the creation and preparation of a database for use with Blue Prism.
- Create a SQL Server database – This can either be achieved manually or through use of the in-product Create Database action.
- Apply Blue Prism schema – The database schema is applied to the configured database.
- The in-product Create Database action will automatically apply the schema to a database that it creates; or to a specifiable pre-existing blank database.
- alternatively the schema can be applied by manually using the CreateScript.sql (from Customer Services) against a pre-existing database.
- Configure Blue Prism sign-on settings – A number of configuration options are applied to the database. These are applied automatically when using the in-product Create Database action. If the database has been created and had the schema applied manually the Configure Database action must be used.
All of the above stages are completed in a single step when using the in-product Create Database functionality.
-
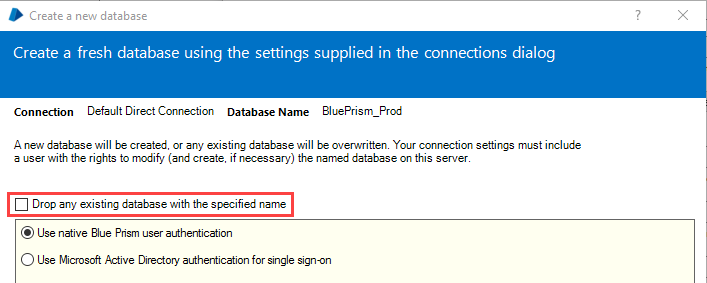
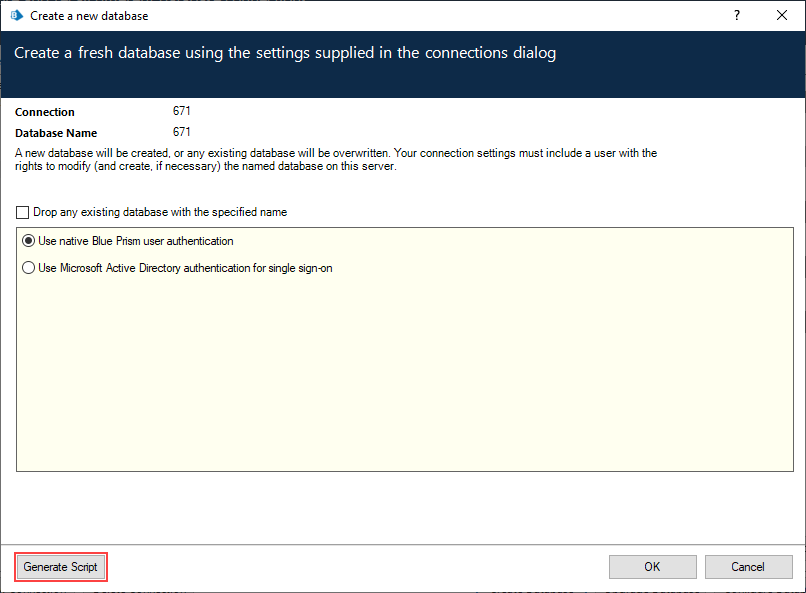
To launch the in-product utility to create and configure a database, use the Create or Configure options within Connection Manager.
- Complete the form by selecting:
- Whether to drop and recreate the database if already exists.
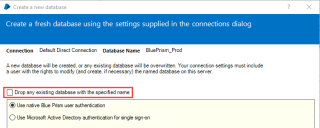
- If the connection is configured to use SQL native authentication it will also be necessary to re-enter the password.
- Select the preferred authentication method for users connecting to Blue Prism. Native Blue Prism authentication is the simplest to setup. See following item for information on a single sign-on configuration.
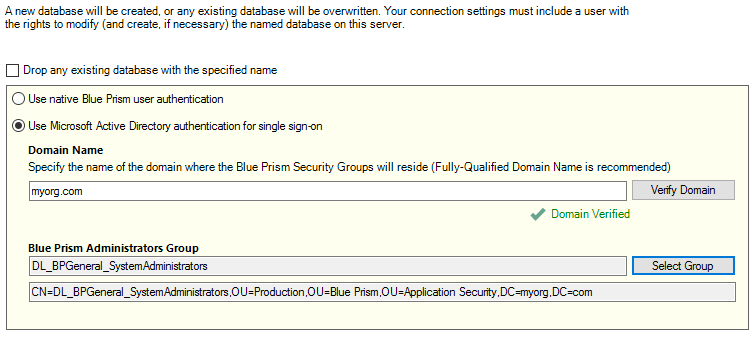
- If the implementation is to be integrated with Active Directory, this must be configured now by selecting the option to Use Microsoft Active Directory for single sign-on. Once the authentication mechanism is implemented, it cannot be changed.
-
If using Microsoft Active Directory authentication for single sign-on it is necessary to enter the name of the domain that contains the Active Directory Security Groups that are to be associated with security roles in Blue Prism; and to select the Security Group within that domain whose members will be granted System Administrator access to Blue Prism.
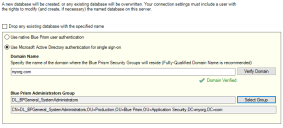
Only custom security groups should be associated with Blue Prism – do not use built-in groups, or groups with derived membership.
- Click OK to complete the database configuration.
Contained databases
Blue Prism supports the use of contained databases, hosted on Microsoft SQL Server. To use a contained database, it is necessary to manually create the database and apply the Blue Prism CreateScript.sql.
- The CreateScript.sql script can be obtained in the following ways:
- Via a request to Blue Prism Customer Support
-
Generated using AutomateC. To generate the script, use the following command:
AutomateC.exe /getdbscript > CreateScript.sql
-
Generated using the Blue Prism client: click Generate Script on the Create a new database or Upgrade the database screens.
Create and configure contained databases
- Create a SQL Server database using Microsoft SQL Server Management Studio or by using an alternative method if required.
- Run the script to create the required Blue Prism tables, views and other required objects in the database.
- Configure a connection to the database as described in Create and configure a Blue Prism SQL database.
It is now possible to login for the first time and carry out some system-wide configuration.
The steps will differ slightly depending on whether the environment is configured to use Blue Prism Native Authentication or Single Sign-on for Blue Prism.
Blue Prism native authentication
Login using the default credentials:
- Username: admin
- Password: admin
Follow the onscreen instructions to change the administrator password.
This video shows you how to recover your admin password.
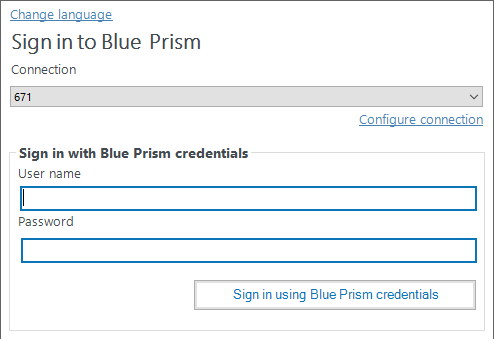
Single Sign-on for Blue Prism
Log in by clicking Sign in to validate that the configuration has been correctly applied.
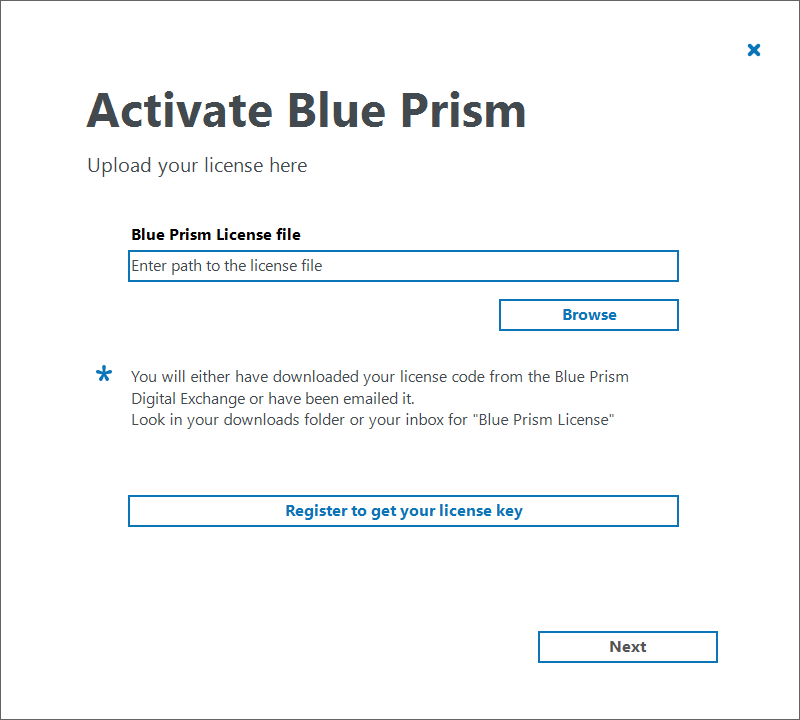
A valid license file is required to activate the software. License files can be obtained from a Blue Prism Account Manager.
After logging in, if a license is not already installed or the current one has expired, you will be prompted to enter your license key.
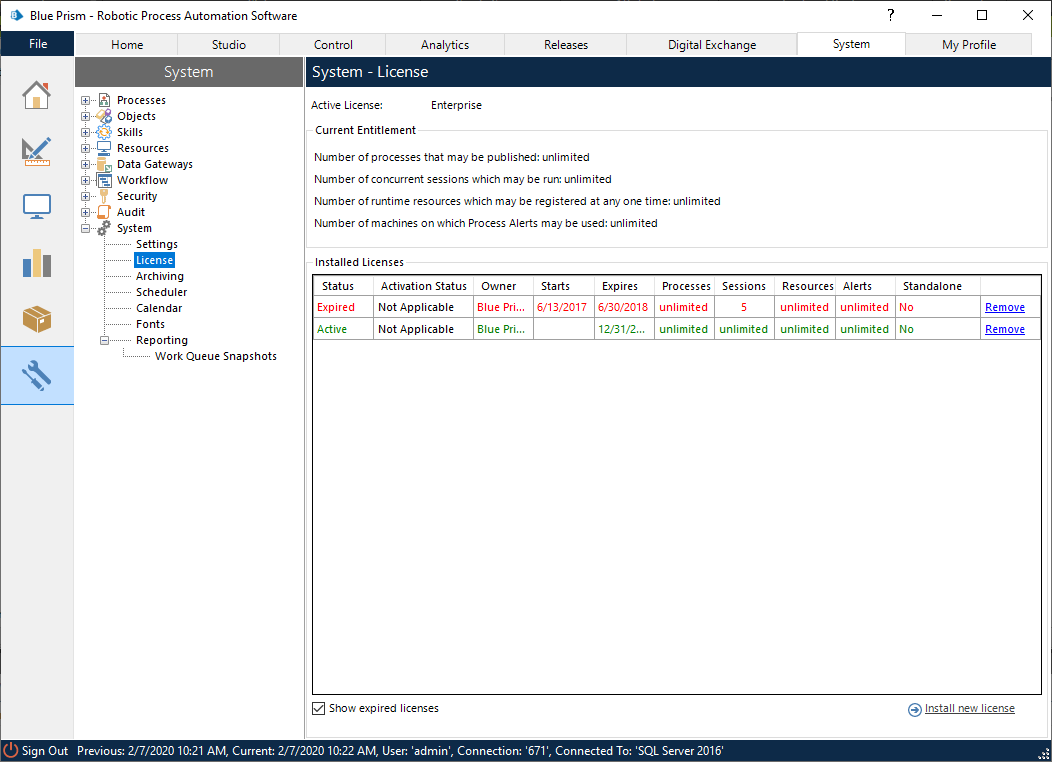
Licenses are managed in Blue Prism in the System settings – click the System tab and select System > License from the navigation tree.
Details of the active license are displayed and options are available to install new licenses and remove existing ones. Select the Show expired licenses checkbox to display details of licenses that have reached their expiry date.
Click Install new licence to add a license.
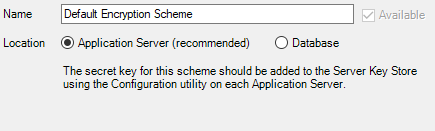
In order to support the use of Credential Manager (for securely storing credentials), configure the Encryption Scheme that will be used.
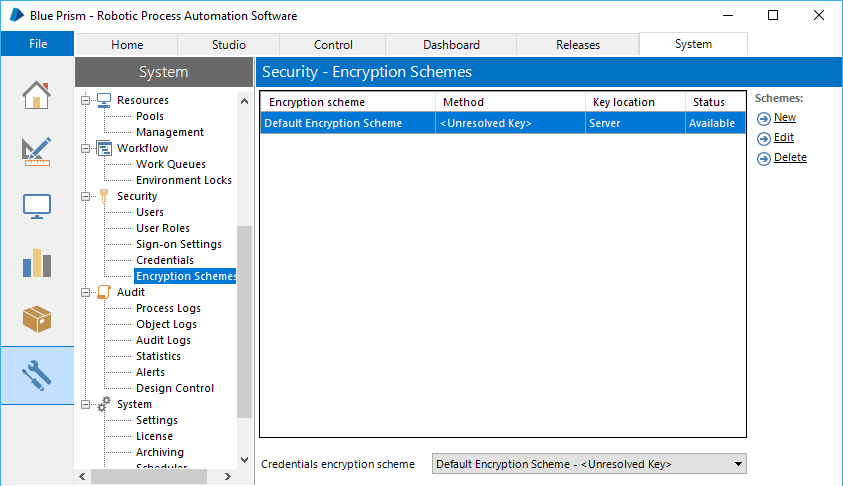
- Click the System tab and select Security > Encryption Schemes from the navigation tree.
- Select the scheme listed and click Edit.
-
Follow the steps below as appropriate:
Standalone Deployment
Multiple Component (App Server) Deployment
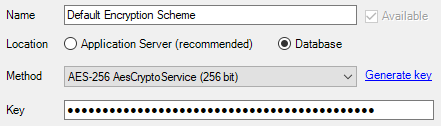
- Select Database.
- Select AES-256.
- Click Generate Key.
- Click OK.
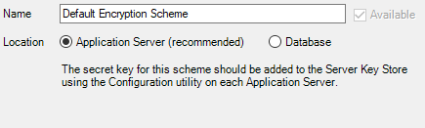
- Select Application Server.
- Click OK.
A copy of each key must be backed up in a secure location

It is recommended that the installation is manually verified by carrying out some simple tasks within the system and confirming that they execute successfully.
For step-by-step instructions, see to Verify an Installation.
