 Docs
DocsDashboard tiles
Dashboards are a collection of tiles which provide a visual representation of information from various data sets. Tiles are created and stored in the Tile Library tab and can be added to dashboards.
To work with tiles users need the appropriate permissions (for more information, see User Permissions).
The data for a tile is taken from a stored procedure created in the
Blue Prism database. For more information, see
Filter tiles
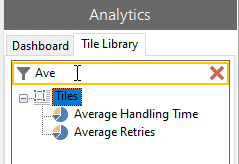
You can filtering tiles to easily find tiles or tile groups.
To search for an existing tile in the Tile Library tab:
-
Click the Tile Library tab.
-
Start typing a search term into the text field at the top of the Tile Library tab.
-
To see the full list of tiles again, click the red cross.
Any tile in the Tile Library tab that does not match the search term will be filtered out and hidden.
Create a tile
- Click the Tile Library tab.
- Right-click anywhere in the Tile Library tab.
-
Select Create Tile from the context menu.
-
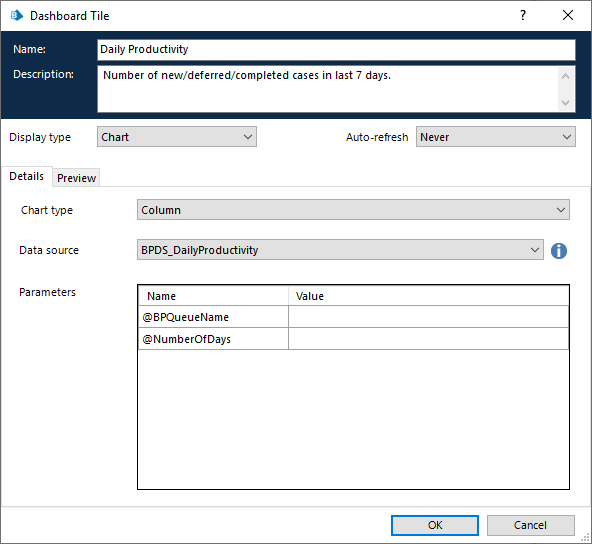
Enter the required information into the fields:
-
Click the Preview tab to view how the tile will appear using the current settings.
-
Click OK to create the tile, or Cancel to close the dialog and cancel the creation of the tile.
The Dashboard Tile dialog displays:
|
Field |
Description |
Values/Valid Range |
|---|---|---|
| Name | The name of the tile. This will usually reflect a specific metric like number of available runtime resources. | Free-form text value (up to 50 characters). Names do not need to be unique. |
| Description | A text description giving a more detailed explanation of the values represented in the tile. | Free-form text value (up to 80 characters). |
| Display type | The type of visual representation of the data. | Selection. The default and only current option is Chart. |
| Auto-refresh | The interval to poll the server for changes to the tile’s data. | Selection. The default is Never. |
| Chart type | The type of chart to be applied to the data source such as bar chart or pie chart. | Selection. The default is Bar. |
| Data source | A database stored procedure designed to return the values for the chosen display type. | Selection. List populated from published stored procedures in the Blue Prism database. |
| Parameters | A list of parameters required as inputs to the Data Source stored procedure. | Data values vary according to the requirements of the stored procedure. For more information, see |
If you clicked OK, the new tile name displays in the Tile Library tab.
Edit a tile
- Click the Tile Library tab.
- Double-click any tile in the Tile Library tab.
- The Dashboard Tile dialog displays where the tile properties can be amended (see Create a tile for the list of properties).
Clone a tile
A tile can be copied (cloned) with its existing settings in order to create a new tile. To clone a tile:
- Click the Tile Library tab.
- Right-click the tile to be copied.
- Select Clone tile from the context menu.
- A new tile displays in the same tile group as the source tile, which takes the name of the source tile with the phrase “ – Copy” added to the name.
Delete a tile
-
Click the Tile Library tab.
-
Right-click the tile you want to delete.
-
Select Delete tile from the context menu.
-
If the tile is currently displayed on one or more dashboards, a warning messages displays. Select Yes to delete the tile. It will be removed from all dashboards.
Create a tile group
Tile groups are a way of organizing existing tiles into groups to provide a user-friendly storage structure.
To create a new tile group:
- Click the Tile Library tab.
- Right-click the root node in the Tile Library tab.
-
Select Create group from the context menu.
-
Rename the new group (see Rename group).
You can drag and drop tiles over the tile group to add them to the group. Tiles are arranged in the order that they were added to the group.
Groups can be nested, and tiles can be placed at any level inside the nested groups.
Rename group
-
Click the Tile Library tab.
-
Right-click the tile group you want to rename.
-
Select Rename group from the group context menu.
-
Type the new name into the text field and press Enter.
Remove tile from group
To remove a tile from a group, either drag the tile out of the group or:
-
Click the Tile Library tab.
-
Right-click the tile you want to remove from the group.
-
Select Remove tile from group from the context menu.
The tile moves out of the group into the next level up.
Delete group
To delete an existing tile group:
-
Click the Tile Library tab.
-
Right-click the empty group you want to delete.
-
Select Delete group from the group context menu.
-
A warning messages displays. Select Yes to delete the group.
You cannot delete group folders which contain tiles.
